*The ABC's of Solar Power and Batteries*
So you spread out the new boxes of solar panels, and look at your deep cycle batteries... You whip out the trusty Swiss army knife, open the boxes, pull out the cells and watch the single instruction page flutter to the ground... Who needs instructions? You just hook the wires to your batteries, Right? Wrong.
There IS a little more to Solar Power than that, even in it's simplest form. Never fear, we're gonna do it together!

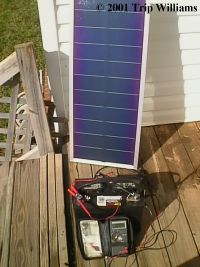
There are MANY solar panels on the market at MANY different prices... yes, it can be confusing. I have friends that have HUGE solar arrays and 24 volt battery banks and massive inverters etc etc... but we wanted portability, yet we also wanted to "add on" later. Knowing this, we went with 21 Watt "Thin Film" Models by UniSolar. We purchased them from Northern Arizona Wind and Sun. I've discussed the different types of solar panels before, so I won't do it here, but our "thin film panels" are light weight and come with a 10 year guarantee. As discussed in other articles, our Battery Bank consists of 12 volt deep cycle marine batteries.
As I said above, there is a bit more to solar battery charging than just hooking the wires to the batteries. You'll need a diode on the positive wire if you plan to plan to charge batteries directly from the solar cell. A diode can be thought of as a "one way valve" for electricity. If you hook your battery to your solar cell, the battery will start a pushing war with the solar cell... The Battery will try to push current into the solar cell while the solar cell tries to push current into the battery... when the sun goes down, the battery WILL win, and your solar panel will probably get burned up. Adding a diode to the positive lead of the solar panel will ONLY allow the current to flow from the cell, to the battery.
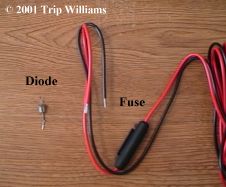
If you plan to charge your batteries directly, you'll also need some battery leads for the solar panels, and of course you want a fuse in there! So while the soldering iron is hot, we might as well do all this at once...
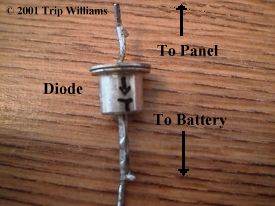
Your diode will have a stripe at one end. About all you need to remember is that current/electricity flows TOWARD the stripe end. Solder the diode to your solar panel's positive wire with the stripe on the diode furthest from the panel. The stripe end should be toward the battery.. this is important! After adding the diode to the wire from your solar panel, solder your positive battery lead (with fuse holder) to the stripe end of the diode... then solder the two negative wires together (nothing goes in between them).
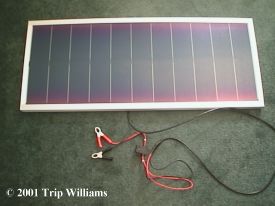
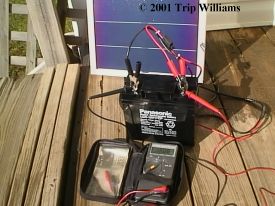
Your finished product will probably look something like this:
Many Solar panels come with "built in blocking diodes"... trust me, add a fat diode in there... a word to the wise.
The instructions with most solar panels recommend that you add a blocking diode, this is because when a diode fails, it usually fails in a "closed position".. it conducts current BOTH ways. Whether you have a built in diode or not, add another! You lose AT MOST .747 volts, and usually only about .123 volts (if that, depending on the diode). Remember, when TSHTF, you may not be able to replace a damaged panel... redundancy!
Actually, solar panels are made up of several "cells" much like a battery (again, more on "cells" below)... your better panels have diodes across every cell inside the panel (Unisolar, etc). This way when one cell falls into shadow, the rest of the cells in the panel keep charging your batteries, just at a slightly lower rate. Some models of panels don't have these diodes and when shadow falls on any part of the panel, the whole panel quits charging.
In Another article, we'll talk about charge limiters and adding solar panels together for different current and voltage ranges, but this article just deals with the very basics... so lets move on.
Charging Batteries
There are SEVERAL good articles here in the Rubicon and Alpha site about charging batteries, but charging straight from solar panels is just a bit different, especially when you start getting into higher wattage/amperage/voltage panels. You can easily cook your batteries if you aren't careful... Yeah, with the smaller panels (5 watts, 12 volts, or so) you can basically hook em up to the battery and forget it.. there is not enough current to cook off a big 12 volt deep cycle battery. The little panels won't hurt your batteries, but they also take a LONG time to charge your batteries... life is full of trade offs.
But we need to charge a little faster to keep up with our expected demands, which means more current output from the panel... AND many panels (ours included) actually produce 16 volts and 21 watts, and when Panels are new, you can expect the current to run about 10-20% higher than advertised! So we're gonna have to watch our batteries, we don't wanna boil them!
What we want to do is charge our batteries quick enough to be useful, but slow enough that we don't damage them. We also want a good even charge in ALL the cells that make up a 12 volt battery. What we want to do is called "Peak Charging". Most all 12 volt batteries are actually made up of six 2-volt "cells" (mini batteries) connected together in series to make 12 volts. Each hole in the top of the battery (where you add water) is a 2 volt cell (actually it's about 2.13 volts, but let's not get anal about it). We want ALL of these cells fully charged. You'll learn more about this in a moment.
In other articles on home power I've discussed "automatic peak chargers" that "top off" a battery and then shut off.... But how does the unit know when the battery can't take any more charge? There are several ways, but the two most common are voltage and temperature measuring... the jury is out on which is "better" but I prefer the voltage measuring method myself for reasons we'll get to in a minute.

In an electrical system, batteries included (no pun), Heat is just voltage/current with no place to go... it's waste. When a battery can take no more charge, it starts to heat up. A little warm is ok... hot is VERY bad. So with the temperature sensor method, when your battery is fully charged, it starts to warm and a temperature sensor attached to the battery cuts off the charging current. By the time the battery is warm enough to trip the sensor, all of the cells (Theoretically) are "full" of charge... Don't you believe it buddy! What typically happens is that the first and last cells that make up the battery get overcharged and this will damage them over time... not good. Usually when your car has a dead battery (just plain worn out) that just won't start the car, the first cell (connected to the positive post) has been fried over time from being "quick charged" by your alternator... what you show on a voltage meter is a battery with a voltage of about 10 volts (or a little more)... which means the first 2 volt cell is cooked.
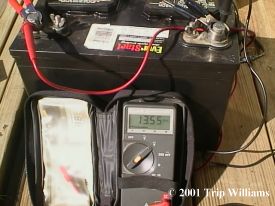
When you peak charge a battery using the voltage checking method, you can tell the precise instant that the battery is "full" and turn off the charger. Then you let the battery sit for a few minutes to "even out" and then peak it again. This second "peaking" only takes a few minutes, and is not necessary actually, but I got into the habit of "double peaking" when I raced Radio Control cars where you needed every single drop of power you could get into a battery. Anyway, my racing prowess aside, now you've charged ALL of the cells with no damage to the battery at all. How do you tell when it's peaked? You hook a voltage meter to the battery and watch it. You'll soon learn how long it takes to charge a battery so you don't have to waste hours watching a battery, you can just check it every once in a while as it charges.. your voltage meter reading will climb fast at first, then slow down as the battery charges and finally it will stop rising. THEN you'll see the meter drop back one number (as shown below). When the meter drops back one number, the battery is "peaked". If you leave it charging past that point the meter will continue dropping as the battery heats up and loses it's conductive properties.
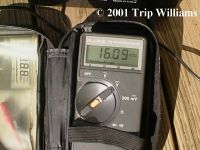
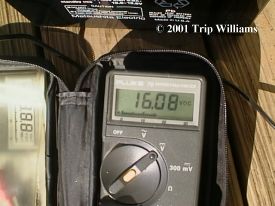
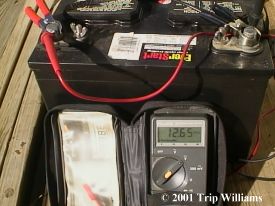
I know, I know... "Jesus War! Charging a 12 volt battery with 16 volts?!?!?" Yeah, this is a little 12 volt sealed gel cell battery. A little battery doesn't have as much current resisting the charging current, so the charger can force a LOT more current/voltage into it. This battery was dead when I started and it read 13.5 volts when I began charging it since it was sucking in everything the solar panel would give it... as it began to get "full" it needed less and less current but it couldn't resist the current that the solar cell was pushing in it.. so the voltage rose WAY up which shows as a rise on the meter. This solar cell is 16 volts Max, so as you see, the little battery couldn't stop it from reaching it's full output. The next set of pictures is a big 12 volt deep cycle battery rated at 115 amps... notice that it "peaks" at a much lower number.
I have several gell cells for "in the house".. mostly in the UPS's since they are far safer to charge indoors. All they do is "catch" the computers before they go off due to a power failure and give me time to get the main batteries online.
As you can see, one 21 watt solar panel can fully charge a big battery pretty quickly. Normally for a solar cell of this size, we'd use a charge controller to keep the voltages from going up so high (as was the case with the small 12 volt gel cell), but I wanted to make a point about how much voltage these solar cells can put out in full sunlight, and how quickly you could ruin a battery if you aren't careful... leaving that gel cell charging at 16+ volts for even a few minutes after it's "peaked" could cook it, and since it's sealed... BOOM! However, there's not a lot of risk charging a big deep cycle battery with one 21 watt cell, it could probably sit there all day and take it. Could it sit there and take current from two solar cells all day? Probably not, which is why we'd use a charge controller like the one shown below.

Charge controllers start out about 30 bux for a basic 4.5 amp model, and run up to over 200 dollars for a 30 amp model which would typically be used in a "whole house system".
Now that we've charged our batteries, it's just a matter of hooking an inverter to them and powering our appliances. Do you have to charge your battery and THEN hook up the inverter? Nope, you can leave you solar cell connected to the battery and allow it to charge while you run your appliances off the battery... at 21 watts, one solar cell wouldn't keep the battery charged if you were running, say, a 60 watt bulb, but it would take a lot longer for the battery to discharge to an unusable point. Since smaller solar arrays can't keep up with normal house needs, we charge batteries all day, and then use them to power appliances at night before we go to bed... the next morning when the sun rises, our batteries begin to charge again... and the cycle continues. Need more power longer? Add more batteries and solar cells. Simple as that.
A note of warning! BE SURE to check the water levels in your deep-cycle batteries EVERY MONTH, they will dry out quick if they are on a continuous charge! Mark it on your calendar!
In my next article on Solar power, we'll start getting into "arrays" of solar panels and show how to hook them together to charge bigger banks of batteries. It's not difficult at all, you have the basic knowledge to do it from this article, but a little "hand holding" never hurt any one ;)
Warlord
All materials at this site not otherwise credited are Copyright © 1996 - 2001 Trip Williams. All rights reserved. May be reproduced for personal use only. Use of any material contained herein is subject to stated terms or written permission.