*Battery Connections*
10-26-02
By Stryder
Like many folks, I’ve been trying to reduce my dependence on the grid for power and ensure that I have power if the grid is unavailable for some period of time (long or short). I’ve also been working like crazy to get my safe room in order, knowing that I will need it and need the battery bank in it to power my air filtration equipment and lighting for 30 days or more, potentially without any grid power. There are a number of great articles here about connecting batteries to panels, and connecting charge controllers, etc. One thing that I found missing was the simple "How do I literally make the connecting wires info, so I thought I’d show what I do.
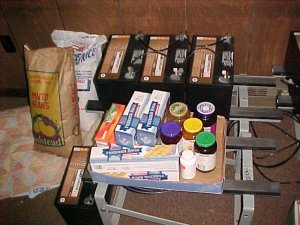
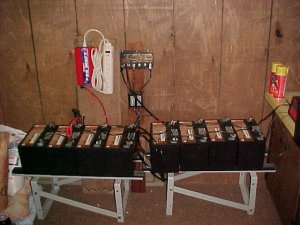
Well… Here’s a shot of my basement battery setup at about 2100 hours one night. I am using C&D Technology model 12-310 batteries for this application. They are sealed UPS batteries (no worries about venting or adding water for the safe room), 12 volt, 88AH, deep cycle. I plan to add some capacity because I will need more than the three you see there and set that up so it really works for me as a part of my safe room. I only have an hour to get it done. Can I do it? Sure! And here’s how I connect the equipment.
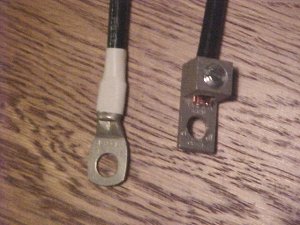
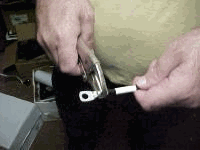
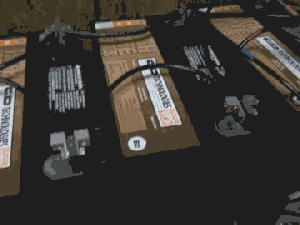
I use two different types of connectors to make my battery connection cables. I always use 6AWG wire so, (pretty obviously!) I use 6AWG connectors. The two types of connections are in the picture above.
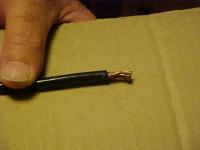
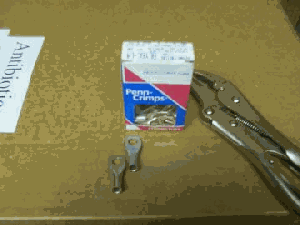
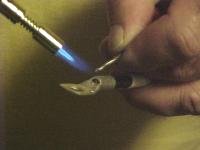
On the left is the Penn-Crimp BLY6C-L4 with a 5/16" stud size. Stud size is the size of the hole in the connector (the round hole) that connects to the battery. This is a much more secure and permanent connection than the one on the left, but a little trickier (not much!) to make. Cut your piece of wire to the length you need and be a little generous. Then strip off 3/8 inch of insulation and slid on a piece of shrink tubing about ½ inch long (I use Velvac ¼ inch ID, thin wall just because I like it). Insert the stripped end of the wire into the Penn-Crimp, crimp it down TIGHT with a set of vise grips (there is a crimping tool made for this that looks exactly like vise grips and costs about five times as much). After that, slid the shrink tubing back into place covering the end of the wire where it goes into the crimp connector. Use a soldering iron or small torch to heat the end and run some solder down in there, then gently heat the shrink tubing if it needs any more heat (the soldering heat will usually tighten it up good). Walla ... You end up with a connection like the one on the left in the picture above.
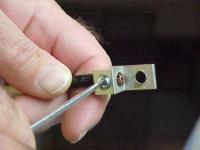
The other connector is a very easy connector to use; the Burndy KA2U for 6AWG with a 5/16" stud size. This is especially handy if you are wiring up some batteries fast or temporarily and want to see how the setup will fit, or work and intend to take it down or rework it again later.
First, just like the other connector assembly, cut your piece of wire to the length you need and be a little generous. Then strip off 3/8 inch of insulation – I don’t use shrink tube on these because of the size and shape of the connector. Insert the stripped end of the wire into the Burndy and tighten down the setscrew that holds the wire TIGHT with a screwdriver. Walla.. An even faster connection.
Now, I wire the batteries together, add anything extra I need like a charge controller, inverter, connection block, DC fuse, etc. mounted on some old boards behind the battery bank and by 2210 hours I’m done.
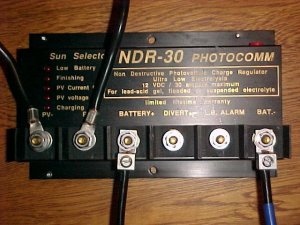
What do I end up with? 700 Amp Hours of sealed storage battery, a Photocomm NDR-30 thirty amp charge controller with low voltage alarm, a DC connect block with 30 Amp DC fuse, a 700/1000 watt inverter with six fused and surge protected outlets. Should run my safe room fine for the duration!
Connecting batteries is VERY easy. Take it easy and slow though so that you don’t short anything out. When you’re working around batteries with tools be very careful that you don’t drop a tool and short the battery bank. There is not much voltage here but there is a LOT of current. So get your safe room or home power setup working that’s what we call getting a chance to -
Get out and train!
Stryder
All materials at this site not otherwise credited are Copyright (c) 1996-2002 Trip Williams. All rights reserved. May be reproduced for personal use only. Use of any material contained herein is subject to stated terms or written permission.