1). Drain the sediment cup at the fuel shut off valve (don’t forget to turn the fuel to the off position first).
*Honda generator Storage Prep*
A hard lesson learned, I hope this will allow you to learn from my mistake. I purchased a nice Honda generator pre Y2K and thought I was ready. I had filled it up with gas and tried it out. I followed the manual which came with the generator to put it away until I needed it. The manual said to drain the sediment cup at the bottom of the fuel shut off valve and drain the carburetor float bowl. It shows a diagram to remove the needle valve and the fuel will drain out.
I followed these instructions and when I went to restart the generator I filled it with gas and pulled and pulled and it wouldn’t go. I tried hooking a battery up and it cranked but wouldn’t work. So off to the dealer and it cost me a carb rebuild. It ran after this but never quite the same as new. It didn’t seem to have that Honda 1 pull and away it goes. So being part of the Rubicon now I regularly test and run my systems so I am not ever caught by surprise. Again I wasn’t happy with the starting so I took it to a different dealer near my work. He took one look and said the choke mechanism is backwards. It will run but the auto governor will never let it work right. It was a very subtle position change flipping a connection over 180 degrees and it now run’s like a charm. It starts on the 1st or 2nd pull every time.
It was the next thing he showed me that is the purpose of this article. We talked about fuel stabilizer and generator storage. I was doing things right except he said what was being missed is completely emptying the float bowl every time. He then showed me what to do:
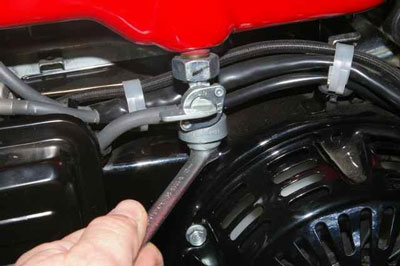
1). Drain the sediment cup at the fuel shut off valve (don’t forget to turn the fuel to the off position first).

2).Remember to hold a container under the valve to catch the fuel that will be in there.

3). Remove the needle valve from the bottom of the carburetor float bowl.
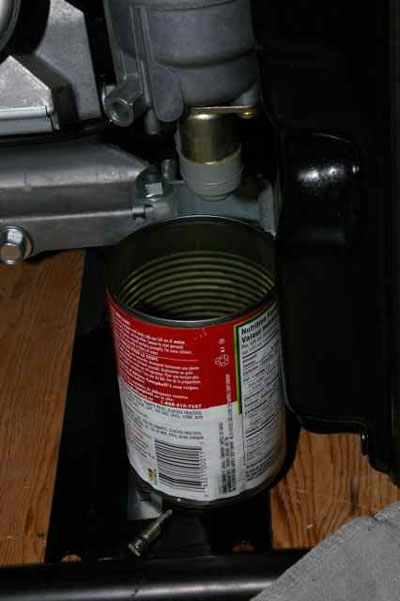
4).This is not a valve which you adjust to speed up or slow down the idle. It simply is removed then later reinstalled until snug. Do not over tighten. Notice the valve now removed sitting on the black frame piece beside the bar code on the can. It does have an O-ring on it and is small and easily lost so be careful. You can’t run your generator without it.
5). This is the missing and most important part. With the valve removed, pull out the choke and then try to start the generator with a couple of pulls on the cord (or a few cranks with the electric start). It may actually try to run but will die immediately. The next pic shows the remaining gas that comes out. It is this gas which, if left in place evaporates and dries up plugging the idle valve creating a problem.

www.alpharubicon.com
All materials at this site not otherwise credited are Copyright © 1996 - 2009 Trip Williams. All rights reserved. May be reproduced for personal use only. Use of any material contained herein is subject to stated terms or written permission.