*Lifting Water - Part 3*
Part 1 of this series describes how it is sometimes possible to connect a hand pump to an existing deep well pump to obtain water when the power is out. Part 2 describes how this same setup can be used to pump water up into the house’s plumbing. A key discovery was how difficult it is to pull and push water that far vertically. This part shows how to use a small 12 volt battery powered pump to provide running water throughout the house.
One of the first steps is to select a pump. The unit used in this setup is a SHURflo diaphragm pump (p/n 2088-343-135), purchased many years ago from Northern Tool It is rated for 3.0 gpm while pulling 5.0 amps at 12 volts. The internal pressure switch is set at 45 psi. It is described as an agricultural pump – mainly meaning that it is made with materials that are compatible with harsh farm chemicals. This pump is the one on the left in the picture below:
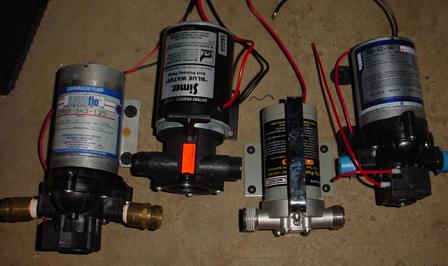
The other pumps shown, from left to right, include a floor / sump pump from Menards, a small pump from Harbor Freight, and another SHURflo pump (p/n 2088-422-144) obtained from eBay. Both the Menards and Harbor Freight pumps have a rotary pump design rather than the diaphragm design used in the SHURflo pumps. The SHURflo pump on the right has ratings (2.8 gpm, 7 amps, 45 psi) that are similar to the agricultural pump. The agricultural pump on the left is the current favorite in this application. The floor / sump unit works acceptably well to be considered as a backup. The small stainless unit does not have enough guts to pump the water up into the house at anything more than a small trickle. The RV pump on the right has not been tested but is expected to work well. Note that the two SHURflo pumps have built in pressure switches to turn off the pump when the water pressure reaches a high enough level. The middle two pumps require an external pressure switch or careful attention when in operation.
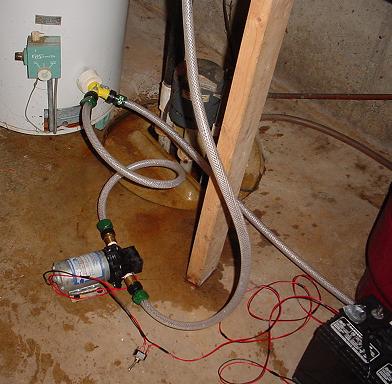
Hookups for the 1st test were quite simple. Two short hoses were made up with female hose fittings on both ends. One hose runs from the output of the hand pump to the input of the 12 volt electric pump. The other hose connects the output of the electric pump to the house plumbing. Two adapters are needed on the pump to accept the garden hose threads.
A 12 volt marine battery was used for the tests. Similar in appearance to a regular car starting battery, it is made to run a trolling motor for an extended time. (A regular car starting battery is not a good choice in this application - These are made to put out large power levels for a short time. In this use they will probably run down quickly and can be damaged in a few cycles.)
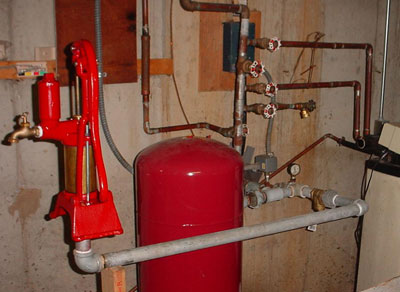
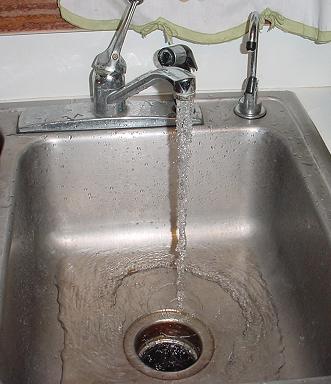
Time for the Big Test: After turning off the AC well pump, releasing the pressure in the system, and setting the valves to the proper positions (see Part 1), the pump was turned on. It started humming. But no water. About two strokes on the hand pump got water to the electric pump, which then primed and started pumping properly. Pressure in the house plumbing built up and the pump turned off. A quick check at the upstairs faucets showed that the pump provided nearly full pressure and flow to any one faucet. With two faucets on, the pressure was lower but still quite usable. Faucets off, and back in the basement the pump started to chatter or cycle on and off rapidly. With no expansion room in the system (the pressure tank in the picture is plumbed to the AC well pump and not used here), a little bit of pumping pushed the pressure up rapidly and turned the pump off. The pressure then dropped just a bit, allowing the pump to come on again. It was annoying noisy, and can’t be good for the pressure switch or pump motor.
Test Result: This setup works and is quite simple. It provides convenient running water without requiring a generator or utility power. When you get your system to this point, consider it a major success. Congratulations!
But it can be better.
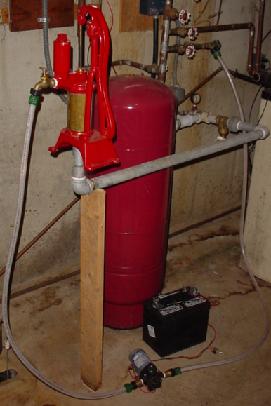
The next step tried was to add a pressure tank (or accumulator) to smooth out the pressure surges and let the pump run longer and stay off longer. As it turned out, an old water heater with a good tank was available and used for this application. First, the normal inlet and outlet pipes were capped and soldered shut:

A garden hose “Y” was put on the tank drain, which is left open. A third short hose was made to run from the pump outlet to the water heater. The new connections are shown in the picture below.
(Yes, is does sometimes leak a bit when in use.) As you can infer from the picture above, the water now flows from the well, to the hand pump, to the 12 volt electric pump, to the water heater, and then to the house plumbing. Quite a bit of water goes into the water heater, compressing the air above it. This provides the cushion to smooth out pressure variations. A diaphragm pressure tank may work better, but this project was done on the cheap with items on hand.
Time for Another Big Test. With the tank in the system, the pump was started. Again, it needed the hand pump to get primed but then ran fine as pressure built in the water heater tank. After about 15 minutes the pump turned off. A check at the kitchen faucet again showed full pressure and flow. Success!
The pump cycles much less often when the water heater tank is in place. The pressure tank also makes the system much quieter – the pump can’t be heard at all from upstairs.
CONCLUSION: In these three parts, you’ve seen the development of my alt water system, from a hand pump in the basement, to a successful 12 volt pumped system. Please note that this scheme won’t work in all locations – it needs a relatively high water table. (See Part 1 for more details.) But where it does apply, the results are most satisfactory.
ReadySet
www.alpharubicon.com
All materials at this site not otherwise credited are Copyright © 1996 - 2009 Trip Williams. All rights reserved. May be reproduced for personal use only. Use of any material contained herein is subject to stated terms or written permission.