*MOBILE/PORTABLE PANEL STAND*
My youngest daughter came to me this morning and said "dad, lets build something together today",
Translated ='s dad lets spend some time together today and we can do something that YOU enjoy.
So we are thinking of fun stuff to build while we are eating a most wonderful breakfast (darn its good to be home : ) )so we decide that we need to design our solar panel stand.
We jump in the truck and we are off to Home Depot. We get in the store and she asks "dad what are we gonna build the stand out of?" Hmmmm good question.
Since we don't have a ton of extra room around our house, we have built our alternate energy system to be "mobile/portable", The battery bank resides on a furniture dolly, it sets low to the ground and has heavy duty wheels to carry the load should we want to move it around (4 deep cycle batteries).
The "port-a-power" panel has our 2 inverters mounted on it along with a "ready charger"(just incase we want to use the grid to charge the bank). On the upper right side of this panel is a receptacle box that holds four 110v receptacles. This "panel" allows us to just "grab it and go".So we figure that we should make our solar stand in the same manner.
We walked around and looked at some wood etc etc and decided against a wood design.
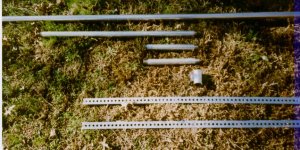
We ended up deciding on using metal pipe(threaded) as our stand. We picked up a 10' section of 1 1/4 OD pipe. This is used for the Main part of the stand, the base. we picked up a 36" 1" OD pipe for the piece that would mount to the panel and slide down in the larger pipe. Not that you would need it but this allows you to swing your panel 360 degrees around a center axis. We used a 1" tee and 2 12" pipes to screw into the tee, these are your horizontal supports. Now all that’s left to do is get something to fasten the supports to the panel. We ended up with 1" pipe hanger brackets. (2 hole)This allows you to be able to "tilt" your panel approx 340 degrees.
First we took the longest piece of pipe and cut it to length, approx 8 feet long. This will give you enough pipe in the ground to make the base pole stable. You should use concrete in the hole for the base. (non was used in this installation, we pounded the pipe three feet into the ground).
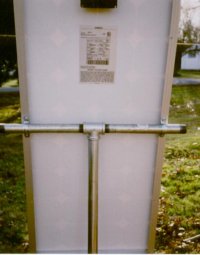
Next we assembled the “T” section
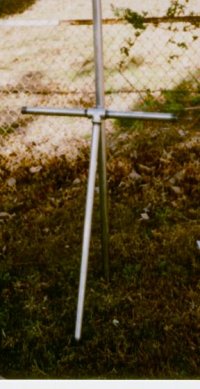
Next we took the 36” piece of threaded pipe and screwed it into the “T”, next we took the 2 1” x12” pieces of threaded pipe and screwed them into the sides of the “T”. This will give you both your vertical axis and your horizontal support arms. When this is inserted into the Base pipe, the bottom flange of the “T” rides on top of the base pipe allowing for the 360 degrees rotation.
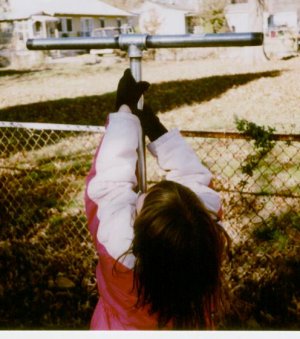
(My little helper sliding the “T” section into the base)
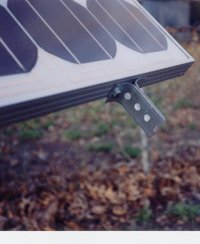
Ok now its time to do some fun stuff : ) Now we are ready to mark and drill our holes for our pipe hanger brackets. Lean your panel against something sturdy, with the back of the panel facing you (we used the garage.) Next we measured the height of the panel, its 47 Ľ. We measured half that distance and placed a mark on panel frame about 1/8th of an inch from the inside rim of the frame. Next we put our pipe hanger bracket over the center of our mark and then marked the holes in the brackets. (repeat this on both sides : ) We are using Ľ 20 bolts (hex head) so use a slightly larger drill bit for your holes. NOTE, take care when drilling these holes as you only have about 7/8 of an inch clearance between the frame and the back of your cells. It would not be a good thing to go just a little too far on this : ). The pipe hanger bracket holes don’t come large enough for the Ľ 20’s to fit through so you will also need to enlarge them a bit. Ok with that done We are now ready to attach our “T” support to our panel.
We used flat and lock washers on the pipe hangers. Tighten nuts and bolts until they are good and snug. OK, whatya say that we go ahead and put this thing in its base J
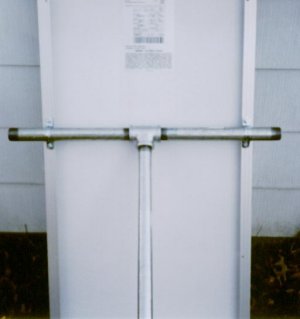
Now that’s better : )
Here you can see how this all comes together.
Lets test this rig out and see how good it will “pan and tilt”.
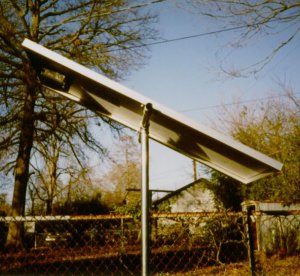
Yep I am just as shocked as you are, IT WORKS.
Ok sure this is all well and good, the pipe hangers are tight and it seems to stay where you put it. Yeah right, like its going to stay that way…NOT : )
Lets put us an adjustable bracket/brace on this thing to keep it at the degree of tilt that we need. Hmmmmmm this might even help in keeping the panel oriented in the direction that we want it to face.
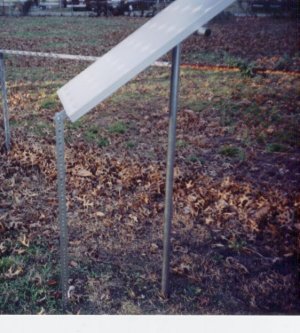
In the first picture you will notice the metal strips with all the holes in them.
Yep this is going to be what we use for this support bracket. First we tilted the panel to its “normal” position. Then we just held the support bracket up against the bottom of the panel and took note of how much length was needed to give us the full motion of tilt that we wanted to achieve. The other end if this support bracket will be attached to the base pole. The metal strip is rigid enough to support the panels tilt as well as its “pan” position. We marked our strip and cut it to length. Hmmmmm now how do I fasten this to the panel in a way that will let it pivot at its contact point?
AHAH I got it, lets cut a couple pieces off of the leftover strip, about four inches each, and then measure down from the top of them (about ľ of an inch) and make a 90 degree bend in them making sure that one hole is in the center of the short side of our “90” . Next we went over to our panel. We are looking for the best spot to mount our brackets. We look at our setup and realize that these 2 brackets need to be slightly off center since the bottom of our support strip is going to be hooked onto one side of the base pipe. So we look under the panel and see that in the bottom center of the panel, rests the junction box for our wire connections. Cool we are going to be slightly off center of the panel so we are going to miss the junction box when we drill our holes in the frame.
We placed our brackets against the frame and used a pencil to mark our holes.
We drilled our holes and fastened the brackets with two more Ľ 20 nuts and bolts.
Next we slid our support strip between the 2 brackets and put another Ľ 20 bolt thru the holes. ON this one we used one of the self locking nuts since we don’t want this to be a real snug fit, this is our pivot point. Tighten the nut until it is about 1/8th of an inch from being tight.
Now we have our support bracket fastened to the bottom of the panel. All that is left to do now is figure out what we are gonna do with the other end that fastens to the base pipe. We decided on just drilling 2 holes thru the base pipe (thru both walls of the pipe, one set of holes slightly higher than the other set) and we slid 2 pieces of 1/8th all thread thru the holes. Now we have a place for the other end of the support strip to lock onto and we still have our adjustability. If we want to change the tilt all we do is pull the support strip off of the base pole and adjust our panel and then just slip the support strip back onto the all thread and we are done.
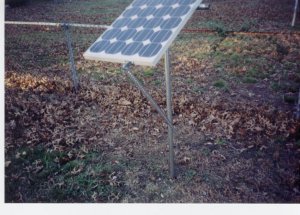
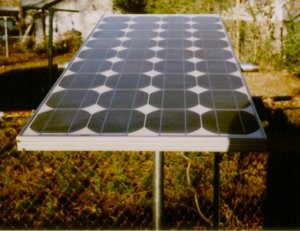
Here is what the finished product looks like. Miss little Marcinko deserves a final shot beside the project.

Well gang, I sure hope that this article is of some help to you, and most of all I hope you have as much fun as we did building it.
Now if we want to just “up and leave” we can just disconnect our power lines to the panel and lift the panel from its base, load up and go. We also keep another base pipe cut to size in the truck so that we will have someplace to put the panel should we leave the house.
The next article will include the pictures and assembly instructions for the “port-a-panel” as well as the battery bank cart. We did a small test run today with all of the components, loading them into the truck. It took less than 10 minutes to have all three modules of our alternate energy system on the truck, tucked nice and neat into one corner of the bed. “MOBILE” it’s a good thing!!!!!!!
Marcinko
All materials at this site not otherwise credited are Copyright © 1996 - 2002 Trip Williams. All rights reserved. May be reproduced for personal use only. Use of any material contained herein is subject to stated terms or written permission.