*New HEPA Filter*
Part One of Two
With all the recent scare over Bird Flu, I decided it was time to improve the shelters positive air filtration system. When I built the first filter box in early 2003, I was concerned about Anthrax, which is a relatively large contagion and pretty easily filtered out with multiple layers of commonly available high MERV rated furnace filters. Viruses are a whole lot smaller than Anthrax and I had no confidence that the old filter would be effective. The next 2 pictures are the OLD filter box, just for some background. DON’T build one like this and expect to filter out viruses! In fact, don’t build one like this at all. The new design further down the page is a true HEPA filter, easier to build and service and it costs about the same. I’m only including these 2 pictures so you can learn from my earlier experience and save yourself a lot of unnecessary trouble.
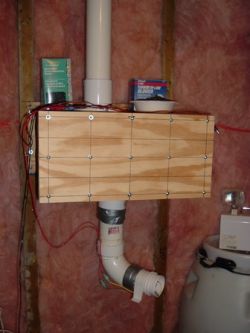
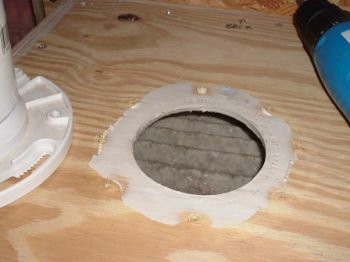
This is the OLD filter box from the outside.
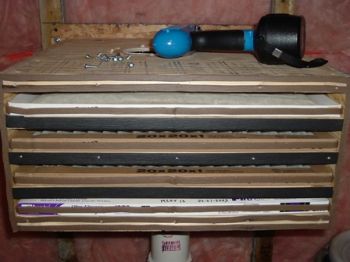
This is the inside of the OLD filter box. I had high confidence that the multiple layers of MERV 12 filters would catch most if not all Anthrax spores, but viruses are another matter all together. For one thing, I couldn’t be sure the foam tape I used around the filters would stay in place over time (if did, but it’s still a weak point) plus, even 4 layers of MERV 12 can’t guarantee something as small as a virus won’t get through. I could have used MERV 14 hospital grade filters but then the cost got to be more than a commercial HEPA filter and I still had doubts about sealing it all up.
So, let’s move on to the better solution. Let me say first that this general design isn’t anything new, at least to the Rubicon. Sarge published an excellent article in 2003 with what he came up with. I just modified the design a little to make it easier for me to build and service.
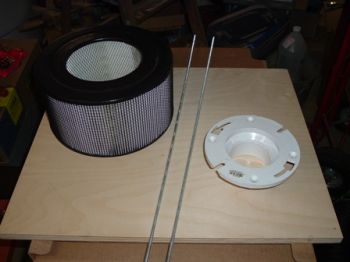
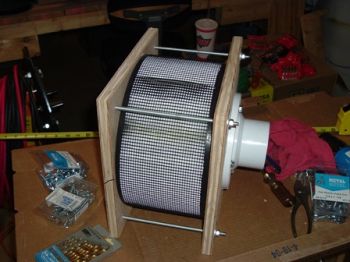
Here are the main parts for the new filter. The round HEPA filter in the upper left corner is a "get it almost anywhere" Honeywell 20500 type. Home Depot sells these, as do numerous web-based companies. The rods in the center are 36" long, 1/4x20 all thread (threaded along the entire length of the rod). These are also available at your favorite home improvement store. The white PVC fitting is called a toilet flange and can be found in the plumbing department. The plywood is ľ" cabinet grade, sanded both sides. Don’t skimp here because you’re going to be counting on that piece of wood to hold the filter and toilet flange tightly together.
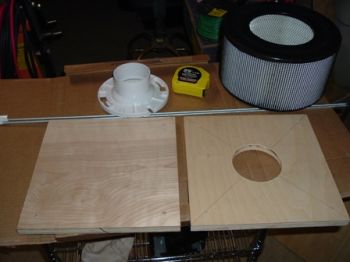
I started by ripping two identical squares, 11.5" on each side on the table saw so that the plywood would be just a little wider than the filter diameter. If you use a different filter, adjust the plywood sizes to fit it. Then I drilled four 5/16" holes in the corners of both pieces for the Ľ" rods to fit through. I drilled the holes an equal distance between the corner of the end plate and the outside of the HEPA filter. Finally, I made a 4" diameter hole in ONE of the pieces of plywood. This is where the toilet flange will go. I used a hole saw and a drill press to make this hole, but if you don’t have one you can use a jigsaw. You’re just trying to make a hole a little smaller than diameter of the inner hole in the HEPA filter that will match up with the toilet flange.
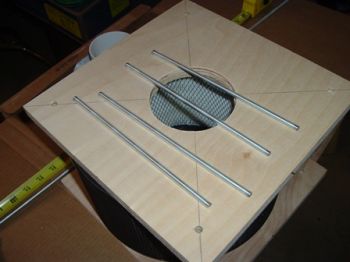
Next, I cut one of the 36" pieces of threaded rod into 4 equal length pieces. These rods will be what hold the filter assembly together.
TIP: When you cut threaded rod, the threads get messed up and you’ll need to fix that or the nuts won’t go on. I used a tap and die set because I have one, but an easier way is to put a nut on the threaded rod before you start cutting. Now cut the rod with a hacksaw, clean the burrs off with a file or grinder and then back the nut off the cut end. The nut will "chase" the threads (clean them up as it goes over the cut end).

Put a Ľ" fender washer (a fender washer is a large diameter washer with a small hole) and nut on one end of each rod and start them through the holes in the end cap with the big hole in it. When I made the prototype, I started on the end cap without the hole, forgetting that the filter would ultimately be mounted "upside down", which is why the pictures don’t match the words. Start the threaded rods on the big hole end. I wanted the nuts on this end not to move so I used Goop on the nut and under the washer.
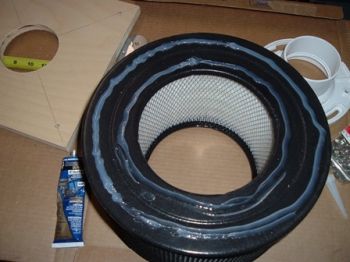
I put two Ľ" beads of 100% silicone caulk on one end of the HEPA filter and then pressed it firmly onto the end plate with the threaded rods sticking out of it. I used silicon here instead of Goop because I wanted to be able to change the filter. Silicone makes a good tight seal but will break loose with a little twisting and prying - if you use Goop it isn’t going to come apart.
Quickly put two more beads of silicone caulk on the other filter end and put the other end cap on over the threaded rods.
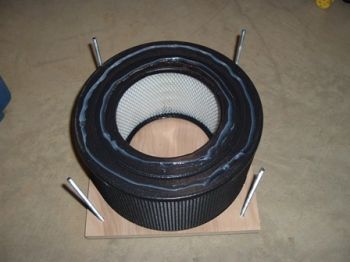
Put fender washers and nuts on the rods and tightened them down. Be careful when tightening the nuts, you can easily apply enough pressure to crush the HEPA filter. Tighten them just enough so that silicon caulk begins to come out around the edges of the filter.
Most PVC toilet flanges you’re going to find will have text molded into them on the side that will seal against the end cap of the filter assembly. This is a picture of the old filter box where I ripped the toilet flange off. (Might as well learn how well things worked) As you can see, it sealed fine around the text, but I wanted to do better.
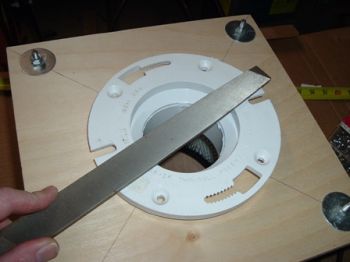
I took a mill bastard (no, I am NOT cursing, it’s the name for this type of file!) and filed off the raised letters to make a better seal. You can use sandpaper if you want.
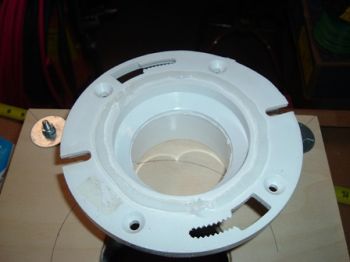
There, all the text is filed off and the plastic dust removed. I applied more silicone, a very healthy 5/16" bead all around the inner surface.
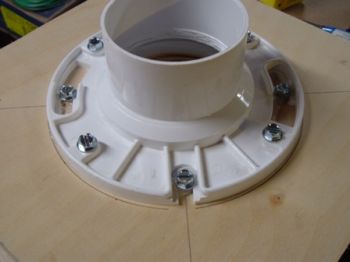
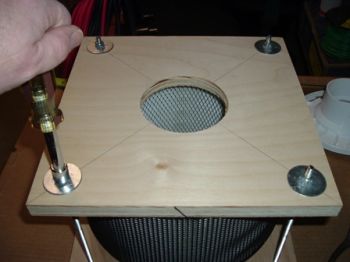
I centered the toilet flange and pressed it down on the end cap over the big hole, then drilled some pilot holes for some Ľ" hex head sheet metal bolts, put silicon caulk into the pilot holes and screwed the flange down. Be careful that your screws aren’t so long that they penetrate into the HEPA filter.
Here’s the finished filter ready to be mounted in the attic.
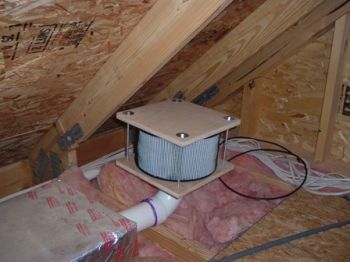
This is the filter assembly installed in the attic. Note that all PVC pipe fittings have been properly primed and glued together so that the whole length of pipe and all the joints are airtight. A prefilter will also be stapled to the outside edges of the plywood to prolong the life of the HEPA filter.
In the next article I’ll show how I plumbed everything up.
Parts List:
1 each 2’x2’x3/4" cabinet grade plywood $?? (already had it lying around) (enough for two filters)
2 each 1/2x20x36" threaded rods $3 each (enough for two filters)
1 each Honeywell 20500 HEPA filter $50 (enough for one filter)
1 each 3" PVC toilet flange (enough for one filter)
8 each Ľ" fender washers $0.25 each (enough for one filter)
8 each 1/4x20 nuts $0.10 each (enough for one filter)
8 each 1/4x3/4" hex head sheet metal screws $0.10 each (enough for one filter)
1 tube 100% Silicone caulk $3
1 tube Automotive Goop $ 4 (if you want to permanently attach one end of the threaded rods to the end cap - optional)
This project worked out really well. I’m looking forward to getting it plumbed into the shelter and having true HEPA protection.
Spitfire
www.alpharubicon.com
All materials at this site not otherwise credited are Copyright © 1996 - 2005 Trip Williams. All rights reserved. May be reproduced for personal use only. Use of any material contained herein is subject to stated terms or written permission.