*Trouble light*
Fabricate a trouble light for later use
Here is a small project to make a trouble light for use in the field. This light has been discussed in magazines since I first read about it as a child. The materials used in its fabrication (at least the one I built) are as follows:
One caveat before we start. Be electrically safe when you build this device. You know, the usual things. Keep one hand in your pocket when connecting and disconnecting, and don’t short the battery. Wear safety glasses when soldering, and don’t do it in a puddle of gasoline, the usual stuff. Remember this is a potentially lethal circuit you are constructing. It may be only a 12-volt battery but you only need a tenth of an amp to stop your heart. If you have a 1000 cold cranking amp battery you can theoretically kill 10000 people with a turn of an ignition switch. If you are using a moderately sized storage battery the numbers can go up dramatically. So stick that in the back of your mind and act accordingly.
You probably won’t hurt yourself but people do win the lottery you know. You might get lucky.
Also since this is a crude device and uses incandescent lamps the current draw from it is more than what you would see in a fluorescent lamp application. But in a pinch you could build the equivalent device in a post event situation with nothing more than what was in the automobile you used as the basis for your fallout shelter.
Hint hint.
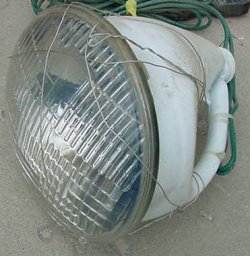
I used a headlight with the low beam lamp filament burnt out of it. As almost everyone knows the high beam filaments usually never burn out because they are rarely used. The backs of these lamps have 3 connection points. They are wired in the shape of a "Y" (Wye). If you think of the 2 angled parts of the Wye being the filaments and the vertical section of the Wye being the wire to the automobiles ground you have a good idea of how the lamp is wired internally. I used a voltmeter to find the burned out low beam filament and the good high beam filament. You can do the same thing by connecting your cable to the posts of the lamp and bolting one wire to the frame of your vehicle or the negative post of your battery. You then touch the other wire to the hot positive post of the battery. If the light works mark the connectors of the battery. If the light doesn’t work then swap one of the wires to the connectors and try again. Just be safe when you are doing this.
If you mark the connectors on the lamp as A B C then the only combinations of wiring possibilities to make the lamp light are as follows:
AB
AC
BC
One of those pairs will work if the high beam filament is intact.
Once you have the lamp circuit identified, strip the wire you are going to use for the cables and brighten them. Brighten the connectors on the lamp and solder them to the cables. Use electrical solder to do this because plumbers’ solder is corrosive and will fail in this application with time. By the term brighten I mean scrape the corrosion off the wires and connection posts of the lamp. This will reduce the soldering time by reducing the amount of time the flux has to work on the connections to get the solder to flow.
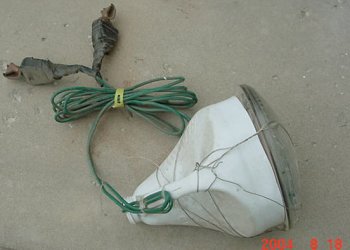
Next take the Chlorox bottle and cut the top out of it and thread the newly soldered wires through the spout. Use the zip ties (Tywraps) and secure the wires to the handle of the bottle after you have positioned the lamp into the bottle top.
Take your fine wire and finish securing the lamp into the lamp holder. Duct tape or string works too.
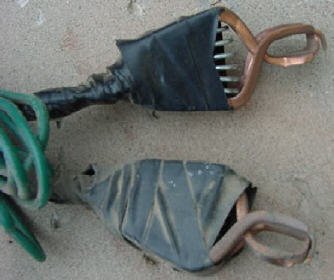
Solder the wire/cables to the clamps and insulate the clamps with the electrical tape.
You are done!
If you were fabricating this light in a post event situation from scrounged parts you could get by without the lamp holder if you took the lamp socket out of the automobile you were salvaging. You could also get by without the clamps. Just a thought.
The nice thing about this light is if you are a tinkerer and packrat by heart you probably have everything to assemble it on hand. I had to go to the automotive parts house when I built mine to get the clamps. But I think the total cost was less than 3 dollars American at that time. These trouble lights are tough. The filaments are very heavy duty so they can stand up to the vibration of being installed in an automobile without failure. Ask yourself, how often do you replace the headlights in your vehicle? I think I’ve only done 3 or 4 in my lifetime. So that makes a stout tool if you need it. And if you find yourself in a post event situation having the ability to cannibalize automotive parts to make needed things (an area lamp for the bunker) might be useful. I built this particular light about 20 years ago and I use it at least twice a year. It could use a push button on/off switch but at the time I made it there were no junk cars with high beam floor switches available. It will be bequeathed or tossed into the garbage because I don’t think I’ll wear it out.
Thanks for the read.
serger
www.alpharubicon.com
All materials at this site not otherwise credited are Copyright © 1996 - 2004 Trip Williams. All rights reserved. May be reproduced for personal use only. Use of any material contained herein is subject to stated terms or written permission.