Electrode Selection and Preparation
TIG Welding Preparation (mild steel)
Weld Joint Preparation
There is only one type of weld joint that can be TIG welded.... A CLEAN WELD JOINT!
Cleanliness cannot be stressed enough. Thoroughly clean the area to be welded and then thoroughly clean it again. Clean, clean, clean, clean.
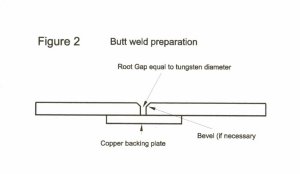
Next, arrange and clamp, if necessary, the parts to be welded. Butt
welds should have a root gap
equal to the diameter of the tungsten electrode and be beveled if necessary.
(Fig. 2). A clean copper backing plate must be used on all open root gaps.
This backing plate insures a clean atmosphere on the backside of your weld
puddle. (Fig.2).
Electrode Selection and Preparation
Choose a pure tungsten of the proper diameter. My rule of selection
is 3/32 diameter for all welding
100 amps and lower and 5/32 diameter for over 100 amps.
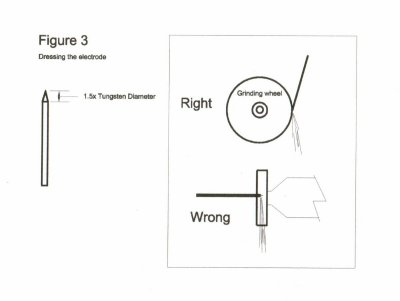
The tungsten must be dressed prior to use. This is accomplished by grinding
the end to a point,
like sharpening a pencil. There is a right way and a wrong way to do
this. (Fig. 3). If the dressing is done the wrong way, erratic arcing and
short tungsten life is the result.
After dressing the tungsten properly, place tungsten in the torch collet and adjust the tungsten as shown in Fig. 4 leaving approximately 2x the diameter of the tungsten exposed from the nozzle. (It may be necessary to leave more tungsten exposed when making a fillet weld).

Machine and Shielding Gas Settings
Set the polarity of your welder to Straight Polarity (electrode negative).
Turn the power on to your welder and HF attachment. Make your initial voltage and amperage settings. Open the valve to your flow meter. Be sure the ground cable is clamped to your work piece.
Keeping the tungsten away from yourself or the work piece, tap the foot pedal or arc start button and adjust the gas flow to 15-20 on the Argon scale of your flow meter.
Your machine should have a postflow timer. This allows the shielding
to flow after the arc is stopped
to keep the tungsten from being contaminated during cool down. Set
the shielding gas post flow to approximately 3-5 seconds corresponding
to the tungsten diameter. An easy way to remember this setting is 3 seconds
for 3/32 and 5 seconds for 5/32 tungstens.
Your machine should also have a HF "start" or "continuous" toggle switch.
When welding steels
you only need to have High Freq. during the start of an arc. You're
now ready to weld.
TIG Welding Procedure
Nothing I can write here can compare to practice. This is only a starting
point. By now you should know what a good weld looks like. The following
instructions should get you going in the right
direction. Be sure you are sitting down and your arms and legs are
comfortable and that your hand that holds the torch is supported by something
other than your other hand.
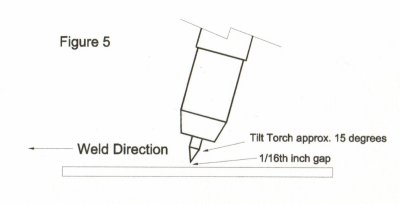
Hold the torch approximately 15 degrees from vertical (Fig 5) and the tungsten is about 1/16th from the weld joint. Strike the arc and watch for it to stabilize and form a puddle on both pieces to be joined.
Apply the filler metal to the forward edge of the puddles until they join together. Keeping your hand steady, guide the puddle along the weld joint. Keep the puddle uniform in shape and size.
TIG Welding Precautions and Tips
Be careful not to touch the tungsten to the filler rod at any time while welding. The filler rod will become "live" and capable of giving electrical shock to bare skin. I am speaking from experience and have a nice scar on my neck as a result. (don't ask)
Always use a copper backing plate behind all welds where shielding gas is not applied. The result of leaving the backside exposed to the normal atmosphere is a beautiful weld on top and extreme porosity inside the weld.
When you come to the end of your weld pass and stop the arc, allow the shielding gas post flow to cool your weld puddle. This eliminates any fish eyes at the end of your welds and keeps the weld uniform in strength and appearance.
If you see sparks or smoke coming from the weld puddle, you either have a dirty weld joint or contaminated tungsten. Stop what you are doing and clean the weld joint again. Check the tungsten.
Don't try to TIG weld over an old MIG weld or oxy-acetylene bead...these welds are not compatible with each other and must be removed from the TIG joint prior to rewelding.
Millwright
Return to The Alpha Group Web Page

All materials at this site not otherwise credited are Copyright © 1996, 1997, 1998, 1999, 2000 Trip Williams. All rights reserved. May be reproduced for personal use only. Use of any material contained herein is subject to stated terms or written permission.