*Baking Bread*
Baking bread is both an art and a science, and it can be approached both ways; however, I find the best approach is a blend of the two. Use the science side to get the measurements and ratios of your ingredients, and then use the art side to combine them until the look and feel is right.
Since I've been home and not working, I've been doing a lot of baking, mainly bread. We no longer purchase any bread at the grocery store, as I bake everything we need for sandwiches during the week. The only time we buy bread is buns for burgers and dogs, as I haven't got that one figured out yet. However, I thought I'd share the things that I have figured out through experimenting for the last several months.
First of all, flour. All is not created equal. I'm not to the point of storing and grinding my own wheat yet, so I purchase flour at the grocery store. I've tried every brand that our local store(Ingle's) carries, and looked at the different results I get. The best and most consistent results, at least for me, have come from King Arthur flour. I use a mixture of the Whole Wheat, and the All Purpose flours. From what I've been able to discover, the All Purpose flour is about as close as I'm going to get to the Type 55 flours used in Europe, without going to great expense to special order stone ground flours.
I use about a 1/3 WW to 2/3 AP flour mix for my sandwich loaves, and get good texture and crumb that is moist enough to hold together well.
I also use Kosher salt in my bread recipes. I don't know if it's just in my head or not, but I feel that I get a better result when using Kosher salt.
As for yeast, I was always a big fan of the little individual packets. I would find them on sale and stock up on them and, until recently, they always seemed to work fairly well. I don't know what has changed, but I've been having poor results with them for the last few months; always getting a rise but nothing consistent and nothing outstanding. I've tried the Fleischman's, the Red Star Active and Quick Rise, and the new Platinum yeast (that one might be Red Star too).
I recalled using a jar of yeast years ago with good results, so I went to the store and picked up a small jar of Red Star Quick Rise yeast, which I keep in the refrigerator to extend the life of the yeast. Using this jar, I have seen outstanding results with expansive rises. These rises have sometimes caught me by surprise, as I wasn't expecting them to rise that far, that fast :) Even though I'm getting a good and fast rise, I'm still keeping a fairly tight crumb on the bread itself. Slices are a little more open, but not as open as store bought bread and certainly firmer than the squishy store bread.
I use hot water, straight from the tap, to start my yeast. I generally add half again, to twice the amount of sugar called for to the hot water, as I feel the yeast proofs a little better with the extra sugar. I warm the measuring cup up with water (rinsing it a few times). Then I measure in my water, sugar, and yeast, stir it all together, and let it do its thing for 5-10 minutes while I get the rest of my ingredients ready. Not all recipes call for proofing the yeast but with a couple of bad packages causing no rise in my dough, I've started proofing all yeast before adding it in.
I have done full hand mixing from start to finish, used no-knead methods, all the way up through the all in one bread machines. I have settled on using my Kitchen Aid mixer (with the dough hook) on its lowest setting to mix my dough. I add in my flours and salt and mix those up thoroughly, so that everything is evenly distributed, then add in my yeast/sugar/water mixture, and let it do its thing. I do use a spatula to scrape the side a little, just to make sure all the flour gets involved. The hardest part is not adding more water :) The recipes always state to add water, a teaspoonful at a time, until the dough looks to be the right consistency. Always give it several minutes of mixing before adding additional water, as I've found that a very dry looking, crumbly mess in the mixing bowl, will pull together nicely after a few minutes, which I'm assuming gives the flour time to hydrate thoroughly.
On to the first rise. I've tried a number of different things to coat the bowl with in the first rise. Grease, oil, Pam spray, margarine, butter, lard, etc.. I've gotten the best results when using softened butter to coat the bowl. I use unsalted butter for everything. I also don't just plop the dough in there, flip it, and let it go. I roll the dough ball around to ensure that it is thoroughly and evenly coated with the butter. I actually drop the dough in the bowl, pick the bowl up, and start playing with the bowl - making the dough ball roll around and over inside the bowl to get a good even coating. It's kind of fun :)
After the first rise, I flip my dough out, and give it a few gentle kneads to pop any large air bubbles, and to get it into a roll/log shape to go into my loaf pan, also buttered. Once in the loaf pan, I use the backs of my fingers to press the dough down gently, and repeatedly, until it's making full contact all the way around the pan. Then I will slide my fingers down the inside of the pan, sort of tucking the edge of the dough down just a little bit. Finally, I use a regular squirt bottle, set on mist, to spray the top of the dough with water to keep it moist during the second rise.
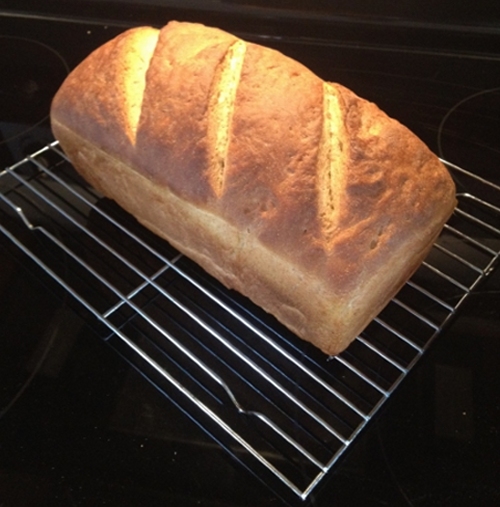
I will periodically check on it during the second rise, and give it another little mist of water if it is looking dry. Once it's risen up to the desired level, I take a very sharp knife, and make three diagonal slices across the top of the loaf, about a half inch deep or so.
I spray the risen loaf liberally with water before I put it in the oven, to the point it's practically dripping. I read that this will allow the dough to rise a little better in the heat of the oven, before the crust forms and prevents further rising, and have found this to be true.
In the oven, I set the rack to the bottom third of the oven - basically putting both racks as low as they will go. I keep a pizza stone on the lowest rack and bake the loaf on the rack just above it.
All of these things have been the results of a never ending series of small changes while trying to get a loaf that was more like store bought bread (so that my girls would eat it better). My first loaves on this journey, while looking very pretty, were very heavy and dense. They tasted good, but I had to make the slices an eighth inch thick or less, or your jaw would get tired chewing them. I'm now at a happy crossroads with the loaves, getting a good open crumb, while maintaining a softness or moistness that means the kids will eat it right up. The only thing they don't really care for is the crust, which is the best part to me. You get a very firm, and crisp crust, with wonderful flavor.
Anyway, these are the little things I've discovered in my bread making journey toward replicating a good loaf for slicing for sandwiches. Hopefully someone will pick up a tip or trick to improve their own loaf.
Here's the recipe I use for my loaf bread, taken originally from Beard on Bread by James Beard. I've modified it a little but it's basically the same.
Mix the above three together, and allow yeast to proof.
Add the proofed yeast/water/sugar to the flour and mix thoroughly. Give it a few minutes to absorb the water into all of the flour, and pull together into one ball. Knead for a few minutes until you get smooth dough, and place in a buttered bowl, coating all sides, allow rising until doubled.
One raised, gently knead dough (to remove large air bubbles), shape, and place in a buttered loaf pan for second rise. Move oven rack to lower third of oven and preheat to 400 degrees Fahrenheit. Spritz dough with water to keep from drying out during second rise. When completed, use a sharp knife to cut three furrows across the loaf at a diagonal to allow for expansion as it bakes.
Bake at 400 for 30 minutes, and then look at the loaf. Allow to bake until desired darkness of the crust. Then, remove from the oven and the loaf pan and cool on a wire rack.
Enjoy!
Casey
www.alpharubicon.com
All materials at this site not otherwise credited are Copyright © 1996 - 2013 Trip Williams. All rights reserved. May be reproduced for personal use only. Use of any material contained herein is subject to stated terms or written permission.