*Electric Fence for Horses*
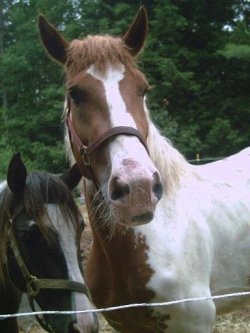
After the rains that caused so much flooding and damage, we needed to either relocate our horses or extend their area due to the unbelievable amounts of mud. While we are clearing more area on another part of the property, it is still far from ready for fencing. Rather than go through the work of digging holes and setting posts, I decided to put up electric fencing. Now, when I was first thinking about this I asked a few different people what they used. Many times I was told "it will never hold YOUR horse (meaning the other Kachina) and once theyĺre through it, theyĺre through it". Keeping this in mind, let me tell you about my horse. She is big and beautiful, but full of the dickens. She has climbed out over a round pen panel to find me (at least, thatĺs what she appeared to be doing as she neither went for food or grass), she has stood on the bottom rail of an aluminum tubing gate and when she couldnĺt climb over that, she got a running start and jumped it, and she has put her head through the boards of a wooden fence and popped a board off as she brought her head back in.
Now that I had decided on electric fence, it was time to do my research and purchase my materials. First and foremost, decide on how much area you want to enclose. With this in mind then you can go to a farm and feed store and they should be able to help you with what you need to purchase.
Here is my list of materials:
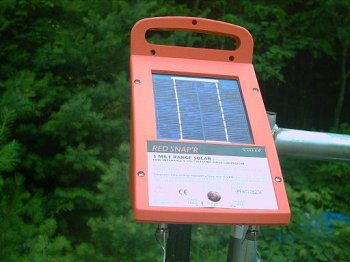
Fence Charger
Electric wire/rope/tape
17 Gauge Aluminum Wire for connecting charger to the fence and the grounding rod
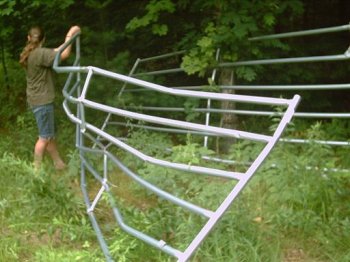
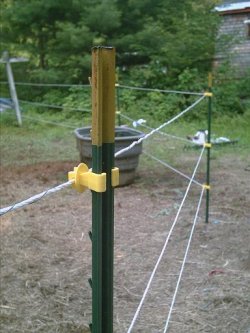
Heavy Duty T-Stakes
Plastic Insulators made for T-Stakes
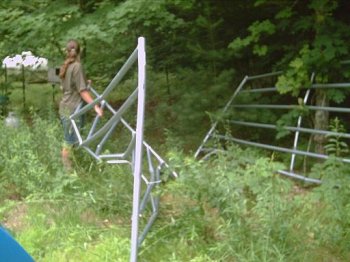
4"x 4"x 6ĺ wooden posts (I didnĺt need to place wooden posts as there were already
some in place, however, when I relocate the horses, I will be using between 4-8
posts to help add security and tensile strength to the rope)
Screw-in Plastic Insulators to use on the wooden posts
Post Hole Digger
Splice connectors
Metal grounding rod
Grounding rod clamp
Wire cutters
Mallet for driving in stakes (donĺt forget and smack a bug biting your leg while holding
this tool in the same hand you are going to smack the bug with! Need I say
more?!)
I chose to go with a solar power, low impedance, pulse fence charger.
I chose heavy duty t-stakes and the plastic insulators that are made specifically for this type of post. I chose electric rope, white for better visibility and added 17 gauge aluminum wire, wrapped around the top two strands of rope, for extra "insurance".
I also used three wooden posts (already in place), making it easier to keep the rope tighter than just using the t-stakes. This way, although you want some slackness in case there is a run through, the rope will not sag as easily and fall out of shape. Once the rope was strung I hooked the charger up to the fence. When you do this, you need to make sure you have a grounding rod that you can hook one post of the charger up to (donĺt forget the clamp so the wire doesnĺt "spring" off of the post) while the other post is connected to the electric rope with additional 17 gauge wire.
Now came the final test. I turned the charger on and waited for the clicking noise, indicating it was on (there is also a red indicator light that flashes, but this was in the middle of the day and the sunlight prevented me from being able to see this red indicator light). We took the round pen panels down that were part of the original enclosure and watched. Each of the horses checked the wire out, cautiously. My daughterĺs two touched their noses to the wire and that was all they needed to understand. As expected, my mare had to go a step further and tried to bite it! Needless to say, she regards the fence with the utmost respect and we have had no problems at all.
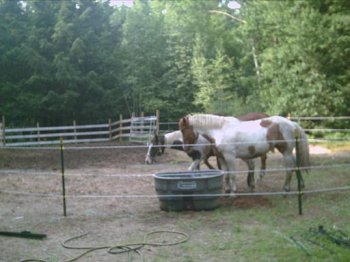
Now that this Kachina is in where she is suppose to be, the other Kachina (myself) can rest and not worry about finding round pen panels bent, wooden posts popped off, but most importantly, these members of our family are safe.
Iĺd also like to note that, this fence also works well for smaller animals. How do I know this? Well, we put the bottom strand approximately 16 inches off of the ground and our cats keep walking under the lower strand and either trying to rub against it with their face or allowing their tails to curl around it and/or rest against it. We love our pets and donĺt like to see these things happen, but Iĺm afraid they still havenĺt learned. I wonder how many lives theyĺve used up?
Kachina
www.alpharubicon.com
All materials at this site not otherwise credited are Copyright ę 1996 - 2006 Trip Williams. All rights reserved. May be reproduced for personal use only. Use of any material contained herein is subject to stated terms or written permission.