*Changing The Fill Valve In A Toilet Tank*
By: John1lt
30 March 2017
Sometimes a fill valve on the toilet will fail. Wont turn off, wont turn on, leaking float that causes the toilet to run on and off, stuff like that. Changing the fill valve is a fairly simple task and takes only a few tools. Before going for parts make sure the fill valve is the problem and not the flapper not closing properly making the toilet constantly run. Every situation is different so you'll have to determine the cause before buying parts.
Tools required:
Parts required:
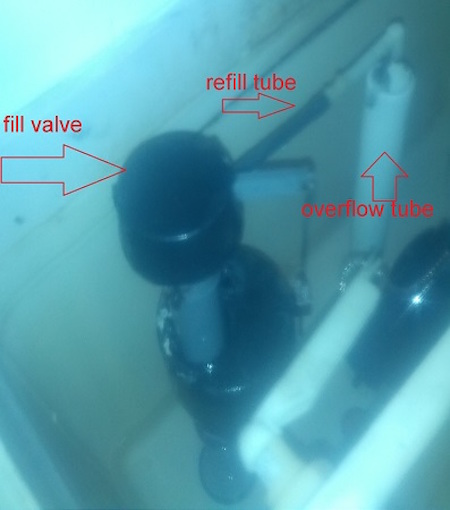
Before going to the hardware store check the parts inside the tank, the flapper, the flush handle, the overflow tube and such, to make sure you don't need more than the fill valve. Now is the time to change any of these other items if those parts are severely worn or broken. Remember water is a universal solvent so it can damage some things over time. Also moving water causes friction and wears parts which is why pipe elbows are thicker on the outside corner, or at least they used to be.
Check the kit you buy at the hardware store for broken or missing parts before buying. My local hardware stores carry various kits from just the fill valve to kits with every part that can be replaced in the tank. Pick a kit that suits your situation.
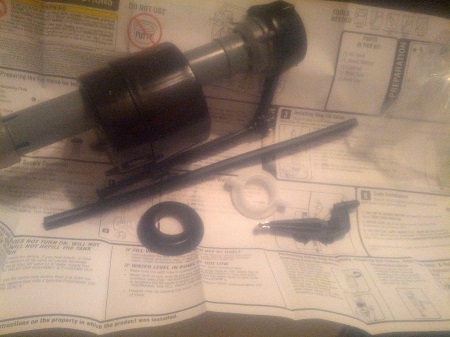
First read the instructions that came with the new fill valve before messing with anything. You might have a different fill valve from the one I describe in this article. I know it's not manly to read the instructions but you don't have to read the instructions in public just closed the bathroom door so you don't get caught reading the instructions first. The fill valve I describe in this article will replace an old style ballcock, you know the ones with the small ball attached to a rod that opened and closed the fill valve; just bend the rod to adjust the level of the water. You may be able to find parts for those but I've always just changed the whole valve and been done with it.
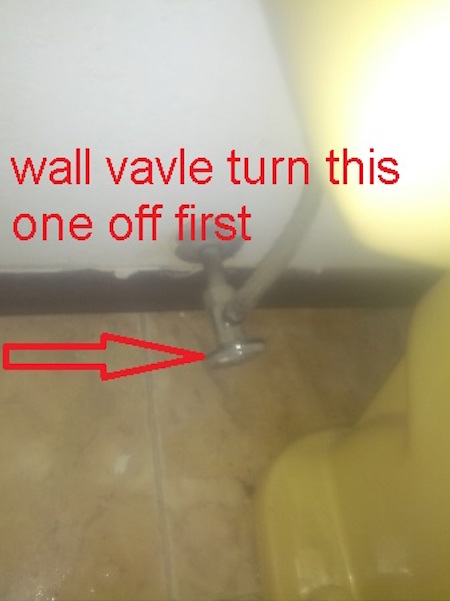
After reading the instructions you can now turn off the water at the valve coming out of the wall below the toilet tank. Pull the lid off the toilet tank and set it some place where it wont be knocked over and broken. Flush the toilet, hold the handle down to empty the tank as much as possible. There will still be as much as an inch of water still in the tank. This doesn't seem like a lot until you have to clean up all that water off the floor. I use a sponge or rag to soak up this water and ring the water out into the bucket or into the toilet bowl. Be sure not to leave any rags or sponges in the tank, you don't want the rags going past the flapper valve.
Once I have almost all the water out of the tank I slip the small bucket under the inlet pipe to the tank and unscrew the inlet pipe, this connection is normally just hand tight but it might be stuck if so use a pair of pliers or a basin wrench to loosen the connection. If your replacing the fill line go ahead and disconnect the end at the valve and set the line aside. I usually replace copper pipe lines with a new braided flexible line.
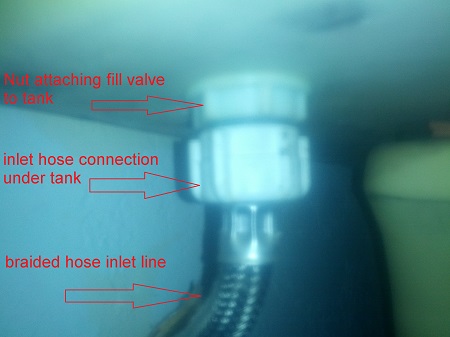
Disconnect the refill tube from the overflow tube. Now from the bottom unscrew the nut holding the fill valve onto the tank, this nut should be hand tight but also might take pliers or a basin wrench to loosen. Once this nut is off lift the fill valve out of the tank from the top. Makes sure the rubber washer at the base of the valve came up with the valve and isn't stuck to the bottom of the tank, normally not an issue.
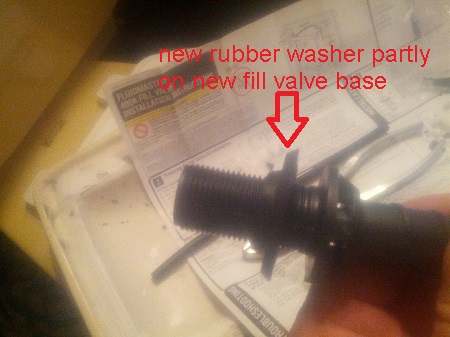
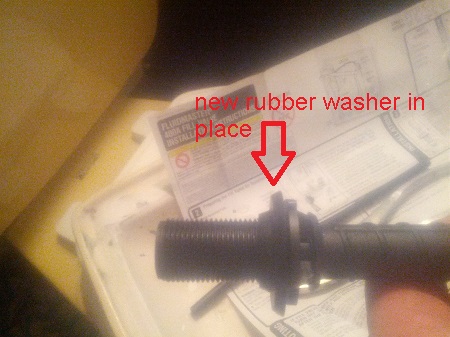
With the old fill valve out of the way you can begin installing the new fill valve. Adjust the height of the new fill valve according to the instructions that came with the new fill valve. Place the new rubber washer on the new fill valve and then put the new fill valve into the hole in the bottom of the tank. From the bottom put the new nut on the fill valve, hand tight you don't want to crack the porcelain tank. That said all the fill valves I've replaced have been on the left side when facing the tank. This means I usually have to use my left hand to remove and replace the fill valve due to tight work spaces so I use a pair of pliers to tighten the nut slightly more, not much more just slightly I don't want to crack the porcelain tank by over torquing the nut I just want to make sure the rubber washer is compressed enough to seal the hole.
With the fill valve securely attached to the tank you can now reconnect the pipe from the wall valve or put in a new line. I make the connection at the wall valve first using the correct wrench, basin wrench or pliers, snug this nut down firmly with the wrench. I then connect the new hose to the bottom of the fill valve hand tight, then like the nut holding the fill valve to the tank I slightly tighten the hose connecter a little more with pliers or a wrench. Just a little more the new fill valves I've installed all had threaded plastic tube bases and you don't want to strip the threads.
Connect the refill tube from the fill valve to the overflow tube, you may have to cut the new refill tube to length no problem household scissors should do the job nicely. A little elbow came with the kits I buy, the elbow directs the water from the refill tube down the overflow tube. I've seen repairs were people have discarded the elbow and not shortened the refill tube, just stuffing the refill tube down the overflow tube. I don't recommend doing this because the tube can become kinked or worse the water pressure can force the refill tube out of the over flow tube when this happens water spits around the inside of the tank with water being sprayed around the water finds it's way out from under the lid causing a leak that only happens when the tank is filling with water. There is a clip that holds the elbow of the refill tube to the side of the overflow tube use it. The refill tube refills the bowl thru the overflow tube. The water for the tank actually comes out of the bottom of the fill valve. You can see this when you turn on the wall valve. Turn on the wall valve to fill the tank and check for leaks while the tank fills and after it fills.
Before you put the lid back on the tank you need to adjust the float so that the tank fills to the proper level, there is usually a mark of some kind denoting the full level on the back wall of the tank. Some floats adjust by a screw connecting the float to the shut off lever or adjust with a wire clip attached to the float and a rod attached to the float and the shut off lever, check your instructions that came with the new float valve ( I know it's not manly to read instructions JUST CLOSE THE DOOR first). You want the water level below the overflow tube but high enough that there is enough water in the tank to completely flush the toilet bowl.
If there are leaks tighten the connections if needed. When there are no leaks, the water level is correct and the toilet flushes correctly your done and you can put the lid back on.
John1lt
www.alpharubicon.com
All materials at this site not otherwise credited are Copyright © 1996 - 2017 Trip Williams. All rights reserved. May be reproduced for personal use only. Use of any material contained herein is subject to stated terms or written permission.