Our electric clothes dryer quit heating a few weeks ago. It would still come on and tumble the clothes, but would not heat at all.
Because we didn't want to take on a repair bill, especially right before Christmas, we went to "Plan - B" which meant hanging clothes out on lines to dry.
That worked ok as long as it wasn't raining or snowing or the temperatures stayed above freezing, but this time of year does not always cooperate.
Now that Christmas is past and I've got a few days off, I decided to take a look at the dryer to see what the problem was and if it was something that I could repair.
I figures it was probably a bad heating element, but I have never taken a dryer apart to look inside.
Our dryer is a Kenmore Heavy Duty, Model Number 865740820, Stock Number 65748. You can usually find the Model Number on a plate either on the back of the dryer, or as was with our dryer, on a plate on the front of the dryer, just inside the dryer door. I found several good places to start looking. I found out that there is also a Thermal Fuse on electric dryers that could also have gone out.
I found out how easy it was to open our dryer. Ours needed to be opened from the back by removing the rear panel.
Safety First, always unplug the dryer and pull the dryer out to give you enough room to safely work. Disconnect the dryer vent and set it aside so you don't step on it and crush it.
Our rear panel was held on by 5 small machine screws. I removed these and set them aside and the rear panel was easy to remove. I sat the rear panel off to the side, out of the way.
The Thermal Fuse had 4 wires going to it, 2 Red Wires, 1 White Wire and 1 Purple Wire. I noted which wire went where and pulled them from the Thermal Fuse. The Thermal Fuse was held in place by 2 Phillips head screws. I removed the screws and set them aside and removed the Thermal Fuse, which was actually 2 pieces held by the 2 Phillips screws.
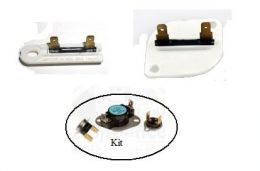
Ours looks like the one inside the oval in this picture
The Heating Element also had 4 wires, but all 4 were Red. I noted their position and removed these wires. The Heating Element was a little tricky to remove, but not that difficult. I found out that there was one machine screw holding a clip that keeps the Heating Element from falling down as well as the 2 metal brackets that hold the Heating Element at the bottom.
I could not reach the machine screw holding the top clip, so I had to "pop the top" of the dryer which is easy to do. First, remove the lint trap (only if yours is on the top of the dryer) and remove the 2 Phillips head screws holding the lint trap to the top of the dryer. Then you just slip something (I used a folding knife) under the top at the front of the dryer about 3 inches from the corner. Give the knife a slight twist and the front clips easily come loose, allowing you to raise the top of the dryer like the hood of a car.
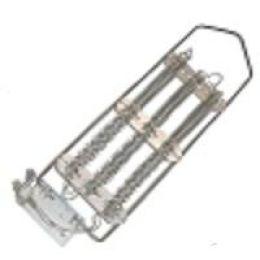
Here is a typical Heating Element for an electric dryer
I was able to remove the machine screw holding the Heating Element Clip and remove the Heating Element. I took both the Thermal Fuse and the Heating Element to an Appliance Parts store nearby so they could check these with a voltmeter.
We found out that it was the Heating Element that was bad and had broken one of the Heating Element Wires. The Thermal Fuse was fine and did not need replacement.
I bought the new Heating Element ($47.75, here in Tulsa Oklahoma) and took it home.
Installing the new Heating Element required undoing one more machine screw that allows the old Heating Element to drop out of it's metal box and sliding the old Element out and sliding the new Element in and replacing that machine screw.
Next, position the now repaired Heating Element back in the proper place. Make sure the oval duct fits in it's place and that the metal brackets on the bottom are catching the metal box that holds the Heating Element. "Pop the top" of the dryer and put the metal clip back on the top of the Heating Element and re-attach it using the machine screw. Push down on the top and the clips will take hold again, holding the dryer top in place. Make sure to replace the 2 Phillips head screws that hold the dryer lint trap in place and replace the lint screen trap.
Next, I had to re-install the Thermal Fuse that was still good and attach the wires back to the Thermal Fuse and the Heating Element, making sure that they were placed on the proper terminal.
Next, re-position the rear panel using the 5 machine screws. Next step is to re-connect the dryer vent tubing. I took the time to make sure it was clean and free of any lint that had gotten past the lint trap.
Our 220 outlet is above the top of the dryer, so I could now slid the dryer back in place and then plug it back in.
Time for the moment of truth! I started the dryer and let it run for about 30 seconds and then opened the dryer door and placed my hand inside. I could feel the heat, it's working!
Now I am starting to think about going on Craigslist.com and picking up free dryers that won't heat anymore. I can fix them and then resell them at a profit and keep any dryers that are better than the one we have now.
This is an easy fix and anyone should be able to do this themselves with only a few simple tools. Not only did I save a bunch of money by NOT calling an Appliance Repairman or taking it in to a repair shop, I learned a new skill that "could" even lead to something that could help us earn some money on the side by getting dead dryers, fixing them and selling them for profit.
We still have "Plan - B", the clotheslines as a back up, but this is SOOOO much better!