*Preserving the Harvest #1: Making Jelly*
Note: The North Texas Crew is an association of Rubies that have been working together for an extended period of time. As a result we have grown into a close-knit family unit.
For any individual/group that has a desire to become self-sufficient they are going to have to learn how to preserve the harvest, either from their own garden, their orchard, or the bounty of the land. This article is the first in a series of articles detailing and demonstrating the different ways of preserving food.
There are many ways to preserve food for future use. One of the easiest is by making jams or jelly. With almost any kind of fruit you can make delectable jams/jellies for use in the dead of winter when a sweet taste of summer is just the thing to start your day with.
The first choice you have to do is decide what kind of fruit you want to use? In this case we used prickly pears. There was a neighborhood cactus that we watched ripen for the last two weeks AND (since we just moved here) it was a convenient choice since we haven’t got an orchard! Also it’s an excellent way to show just what kind of range you have when it comes to making jams/jellies.
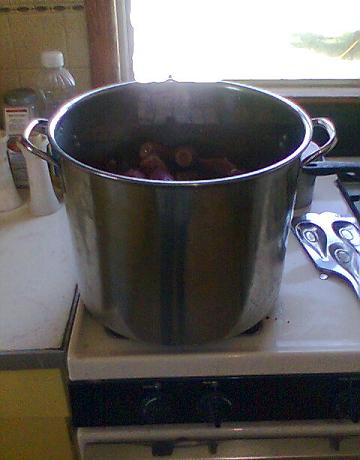
The next step is to wash your fruit and then cook it in a large pot (in our case we burned the prickly spines off of the pears first, lol!).
Here’s a picture of the prickly pears cooking in a large pot. Add enough water to just see it in the bottom of the pot, don’t cover your fruit! The water you add is also used when “juicing” your fruit.
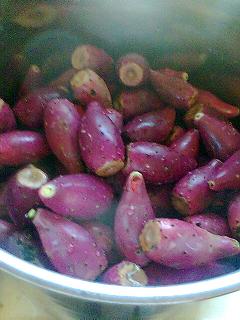
Here’s a close up, just in case you’ve never seen prickly pears.
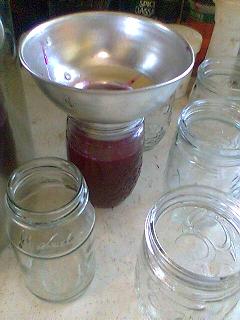
Cook the fruit long enough to soften it completely, you’ll see why in just a sec. While the fruit is cooking go ahead and set up your food mill (or whatever you use to juice the fruit). This food mill was passed down to NightWind from her grandmother. Now-a-days most of the food mills that you can find have a significant amount of plastic in them, hers is solid metal throughout! A definite heirloom!!
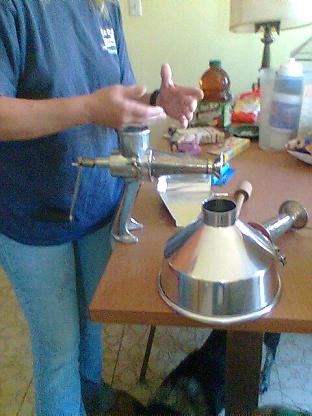
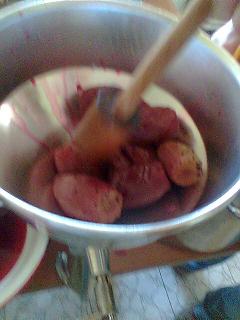
Once your fruit is cooked until it’s softened you slightly mash the softened fruit with a potato masher to start the juicing process. After that you will process small batches through the mill. The mill has a sloped drain to direct the juice into a container. The fruit pulp is sent out the end of the mill into another container. There are other ways to juice your fruit but a food mill designed for the job is DEFINITELY worth the cost in timed saved!
Here’s another picture of the juice flowing into a bowl. Note the container for the fruit pulp at the end of the food mill.
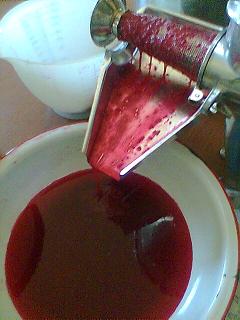
The excess water from cooking your fruits is simply used to rinse the mill and allowed to gather with the rest of the juice.
You’re just about halfway done at this point! Now you have to treat the juice so that it will jell. Now is also the time to add sweetener so that your jam/jelly is nice and sweet.
Note: Pectin is a canning product that is available in many grocery stores. It’s usually made of a natural substance found in some fruits (mostly apples). If you want to find out more about pectin you can read about it here:
http://en.wikipedia.org/wiki/Pectin
Also please note that there IS a way to make sugar free jam/jellies! Your diet is not a reason to avoid learning this easy method of preservation!
After you have juiced your fruit you will need to follow the directions on the packaged pectin that you have bought at your local grocers. Different brands may have differing directions so use the directions you find on your package! In our case our next step is to carefully measure your juice.
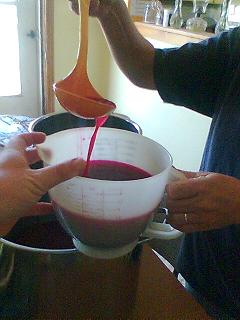
After measuring your juice you need to heat it up until it’s warmed through, add your pectin. At this stage you will need to constantly stir the juice as it heats to insure that the pectin is distributed completely throughout the juice. The juice will need to be heated to a rolling boil (a rolling boil is when the liquid continues to boil even when stirred). After reaching this stage you add your sweetener (unless following sugar-free recipes sugar is the ONLY sweetener you use. It helps the jelly to set.). Add your sugar gradually as you stir to keep the juice free of clumps. After adding the measured amount of sugar (as directed by your package) you will need to bring the juice back to a full rolling boil again and again stirring constantly. After the juice reaches a rolling boil for the second time you need to keep it there for a full 60 seconds (as directed by our packaging).
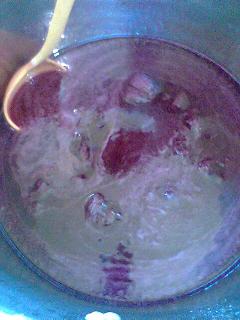
This picture is a little strange as light is reflecting from the interior of the pot. Note also that foam is forming on top of the juice. It will need to be removed before canning. What appears to be clumps is actually the bubbles forming on the surface.
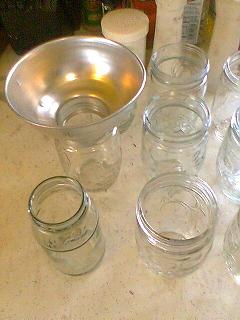
After your juice has boiled the required amount of time it is removed from the heat. The juice needs to be ladled into your pre-staged canning jars (I forgot to add that part didn’t I?). Guess I better describe that process now. Please note that this needs to be set up BEFORE you start boiling your juice!!!
Pre-stage your CLEAN, STERILIZED canning jars in preparation for filling them with your juice mixture. Canning lids need to be heated up so that the seal is softened enough to seal.
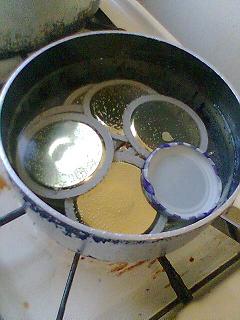
Note: If you’re familiar with canning then you already KNOW that there is a lid in the pot being heated up that ISN’T a canning lid. In fact it is a normal jelly jar lid. It will be used for the extra bit of juice that ALWAYS seems to be left over when making jelly. That jar will be refrigerated and used first.
Okay, got the pre-staged canning jars dealt with. Back to pouring your juice mixture. After reaching the required amount of time at a rolling boil you removed your pot from heat and quickly ladle the juice into your jars.
WARNING: The juice is HOT! It can (and WILL) burn you if you don’t take care! A canning funnel is almost a required tool when filling canning jars. Not having one will almost guarantee a burn when making jams/jellies! Not to mention a huge mess!
Once you have filled your jars you need to add the heated canning lids to the top and snug them down. Do NOT over tighten! Before placing the lid on the jars the rim of your jars needs to be wiped clean with a clean, damp towel to remove any residue from the rims. This helps to insure a good seal.
NOW, here’s where we diverge from USDA “recommendations”. The accepted practice is that jams/jellies are placed into a pressure canner (NOT a pressure cooker!) and processed for the “recommended” amount of time at the “recommended” pressure. The USDA has NO “recommended” procedures that don’t involve a pressure canner. The directions on our package of pectin recommended a water bath canner. We didn’t use that either.
What we DID DO was to simply rotate the filled and sealed jars (as seen below) and let them cool. That’s the way NightWind’s granny did it and that’s the way she showed us. After one hour the jars were flipped back to their normal positions, right side up to complete sealing.
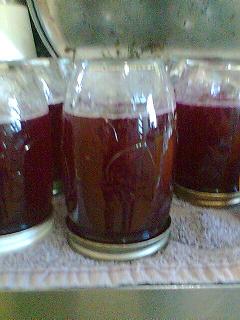
(NO – this picture is NOT upside down!)
Every jar sealed cleanly.
It can take up to 24 hours for your jam/jelly to set. It might even take up to 2 weeks! If your jelly doesn’t set up then not all is lost. The package of pectin should have directions just in case that happens, however, if you want you can always use your “jelly” as syrup instead!
Now for the “legal”...
This article describes and details what WE did. The information in this article is simply that, information. Before YOU decide to start canning it is recommended that you research the subject. You can find a lot of excellent information from the USDA, the Ball Blue Book canning guide, and many other sources. Canning is NOT hard. It doesn’t require hundreds of dollars of equipment. Some equipment IS necessary though for canning to be done safely. Canning is NOT the area to “experiment” in. A failed experiment can cause, at the minimum severe illness, at the worst it can kill. Undertake this skill only after researching and studying the subject. Canning has been used for centuries with very rare, very minimal negative effects. It has meant the difference between life and death over a hard winter up until a few decades ago.
Canning Instruction by NightWind
Photos by Isis
Formatted by Swabbie
North Texas Crew
www.alpharubicon.com
All materials at this site not otherwise credited are Copyright © 1996 - 2007 Trip Williams. All rights reserved. May be reproduced for personal use only. Use of any material contained herein is subject to stated terms or written permission.