*No Knead No Mess No Work Bread Addendum*
By: Pooch
06 July 2013
The original recipe:
The ingredients are:
Mix all dry ingredients thoroughly and then mix in 3 cups of room temp water. That's it; you will have a sticky, stringy batter type conglomeration that sort of reminds you of a sourdough mother. I mixed mine in a 5 quart plastic ice cream container (empty of course) so it didn't stick to the sides. Cover with a dish towel and let set for 8 to 24 hours. I let mine go the full 24 hours and it had a very nice sour smell too it. At the end of the wait, 8-24 hours, pour out into a greased glass or ceramic bowl that is oven proof. Cover and let sit 1 more hour, then pop into a 375* preheated oven for a minimum of 45 minutes or until golden brown.
The Addendum:
After posting the article on the No Knead bread recipe, I decided to do a little more experimenting with it and this is the result. My original loaves were made with all purpose flour, which was all I had at the time, and I liked the results. Since then, I have used whole wheat flour and bread flour and have had mixed results and mixed feelings on those results.
First, I made a loaf of whole wheat bread; I used 100% whole wheat flour, no white flour or whole wheat flour combination. As I mixed the called for ingredients, I found that more water was needed. In fact, it needed almost an entire one cup more. Once it was the same consistency as the original, I set it aside for 24 hours. The next day, I baked as usual and the loaf came out dark (as expected with wheat flour), very dense, and the flavor wasn't bad. It had more of a "Wheat Thin" cracker taste. I toasted some and, as with the other, it didn't brown readily but was good eaten warm with some butter (yes, real butter, none of that artery hardening margarine for this old coot) and homemade blackberry jam. All in all though, I personally feel that all wheat flour (and not a combination) makes bread that, though good, may not be to everyone's taste. You'll have to try it this way and decide for yourself. But, it wasn't a failure, just not my favorite.
The next loaf I made was 1/3 wheat flour and 2/3 bread flour. This came out a little on the less "wheaty" side flavor wise. So, though I was on track, it wasn't quite what I wanted in taste. The texture was the same as the other loaves (dense), and this required additional water, almost a cup again, to get the right batter consistency. Good, but not quite as much wheat taste as I like. I haven't made another loaf of wheat yet, but the next one will be 50% wheat flour and 50% bread flour. We will see how that goes.
The third loaf (and yes I made a third but until all bread is eaten will for now stop with three), was straight bread flour and it too required additional water to reach the right consistency. This batter though did something none of the others had done, including the mixed batch with wheat flour. Within 3 hours of making the batter, it rose in the container within 2 inches of the top, almost double in mass. By the time 24 hours was up, it had dropped back down but was still higher in the container than any others had been by at least a third. When I poured it into the bowl and covered it for an hour before baking, it rose again - though not as much as it had in its mixing container. When it was finished baking and had cooled, I sliced off an end and found that being made with bread flour gave it a better taste - though the texture was still a dense loaf. I also found that when sliced, the closer the slices got toward the middle there was a little doughy section about 14 inch deep on the bottom that didn't seem completely baked. It wasn't much – just a little. I think an extra 10 minutes or so wouldn't hurt this and will try that next time.
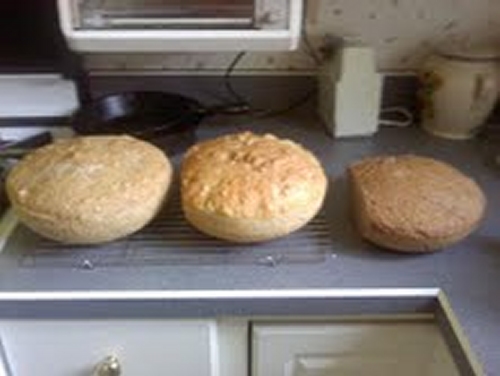
Here is a picture of the 3 loaves side by side, white in middle, 100% wheat on right and 1/3 wheat on left. I do have to say, this bread is not your store bought or normal homemade bread. By this I mean it is not soft; it is dense and heavier because of that. I find it good for toasting, if you remember that it won't brown as easily. I used the broiler in the gas oven to brown it the best. Three times through a toaster oven will brown it, but will singe the crust in the process. I don't have a regular toaster, so I have no idea how that will work. Unlike store bought, it doesn't contain chemicals to keep it fresh longer and, being moist, it may mold sooner. However, so far I haven't had that happen.
My next step was brought up to me by my brother. He suggested I try making it with rye flour and also to try and make some garlic and herb bread with the basic batter. So, those will be future experiments.
All in all, I like it, and I really like how simple it is. There is no big mess, NO KNEADING (big plus to me) and all the more time it takes, I'll keep this one and use it regularly.
Another addition – Garlic Bread:
[I made the 1/3 wheat, 2/3 bread flour recipe and added 1 TBS of garlic powder, I believe 1-1/2 TBS would be even better, but it made a nice garlic bread that was not overpowering. However, I have noticed that if you do use more than the 3 cups of water, your bread can be a little doughier when done and perhaps another 15 minutes baking time would help with that. Remember, I am experimenting here with the original recipe and it is trial and error, and finding too much water will make a tacky, doughy loaf. The flavor is still good, but the texture is different from the basic recipe.]
Pooch
www.alpharubicon.com
All materials at this site not otherwise credited are Copyright © 1996 - 2013 Trip Williams. All rights reserved. May be reproduced for personal use only. Use of any material contained herein is subject to stated terms or written permission.