*The Last Tomato Cage You Will Ever Own*
I sort of stole that line from a movie but it is probably true.
In everyone's list of preparations and plans is the word "GARDEN". Some where on the same page you will find the word "TOMATOES" followed by the reminder "buy tomato stakes."
You are now on your way to the lumberyard or garden center where you buy a bunch of wood to tie up your tomatoes. You now have to drive the stakes into the ground and return every few days tie up the tomatoes as they grow. This is a lot of work and eventually the stakes will rot or break and will need replacing.
The only way around this is to build a better tomato support. How about a self-supporting metal cage with spikes on the bottom to stick into the ground. If the cage was shaped like a cylinder the tomatoes could grow up inside. ???
My contribution to the world of tomatoes is made from the wire mesh that is used to reinforce concrete slabs. It is a common item and is available from construction supply depots around the country. What you ask for is 6 X 6 steel mesh. That simply means that the mesh is made up of six inch squares and is generally #10 steel wire. It is available in sheets as well as rolls.
For this project I recommend using a standard 6 foot X 100 foot roll which weighs about 150 pounds and can be brought home in the back of your pickup truck. A word of caution before we get started: this roll of wire is best described as ornery. Gloves are a must and for cutting probably a small pair of bolt cutters will make your life a bit easier. Band-Aids will also probably be involved.
When you get the wire roll home find a friend and an open area before starting to unwind the coil. When you have 10 - 15 feet uncoiled turn every thing over so that the natural curl is facing the ground. This will stop the wire from rolling back up (sometimes).
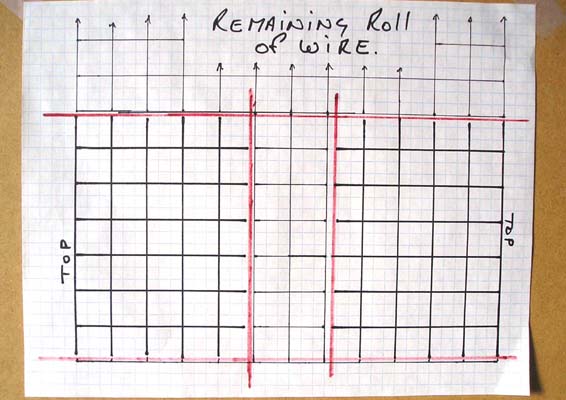
As you can see from the cutting diagram the width of the roll of wire makes two cages. The outside edges of the roll forms the top for a smoother finish to the cage. The bottom of the cage is towards the center of the roll of wire. This layout also takes advantage of the natural curl of the mesh when forming the cage cylinders.
Counting from the outside edge you have four complete squares and then the spikes that go into the ground. That means that the tomato cage will be 24 inches above ground when the spikes are pushed completely into the soil. My cages are made this way. Rather then waste the center section of wire, the cage height could be increased to 30 inches by altering the center cuts.
I have found the 24 inch height and the 12 inch +or- diameter suited most varieties of tomatoes just fine. The off cuts could be used to support climber beans or cucumber vines.
Grab your bolt cutters and a copy of the cutting diagram, it is time to begin. Make the first cut across the roll as shown by the red line on the cutting diagram, seven squares or about 42 inches from the end. Using the red line on the cutting diagram as a guide, trim the leading edge as shown and finally make the two cuts down the center of the roll. You have produced two blanks that will eventually be tomato cages. Set the blanks aside and continue the cutting process. The above cutting instructions will be repeated 27 more times before you are finished. Out of the 100 foot coil of wire you will end up with fifty-six blank tomato cages.
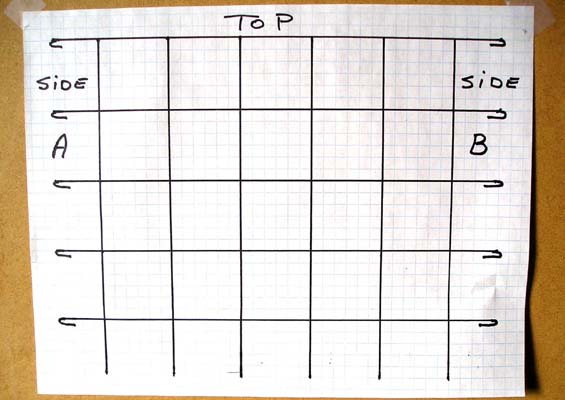
The next stage of the process is rather lengthy but it can essentially be completed in the workshop as time permits. A great winter works project. If you refer to the second diagram that is what your blanks should look like. It will be five squares wide and four squares high. The bottom or support spikes should be about six inches long. The spikes on side A and B are also about the same length.
Place a blank on a convenient non-combustible work surface. With a small propane torch heat the end of each spike in turn on sides A & B. While the wire is hot bend with a pair of pliers into a small hook as show in the diagram. Bend and trim the wire as necessary so that the hook length is about 3 inches from the first square. When the wire cools and can be handled safely roll into a cylinder using the natural curl of the wire. Connect the hook on side A with the hook on side B and crimp tightly with pliers. Because of the trimmed length of the hooks this section should be about the same size as the rest of the squares.
You now have a completed tomato cage that is probably anything but round. As I said earlier this wire is ornery and some persuasion will be necessary. Try placing the cage on a concrete floor and tapping it into a round shape with the flat side of a short length of 2 X 4. There are only 55 more to go.
Admittedly my instructions are a little tongue in cheek at times but make no mistake it is a lot of work. The result is probably one of the best tomato cages around and what did it cost. A the time of writing this article a 100 foot roll of wire was selling locally for $146.88 Canadian. That works out to about $2.60 per tomato cage. They may rust but they will last for years.
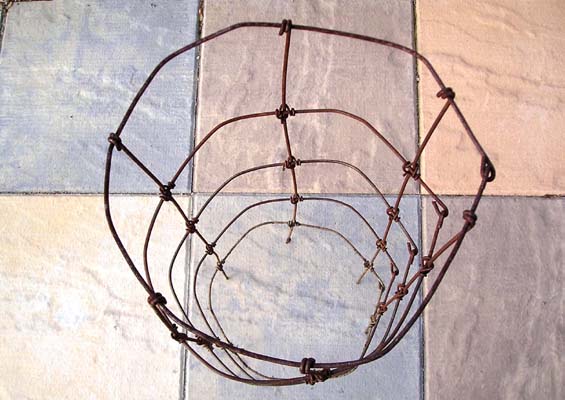
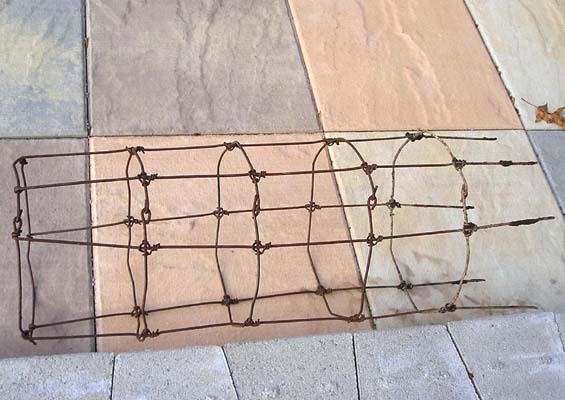
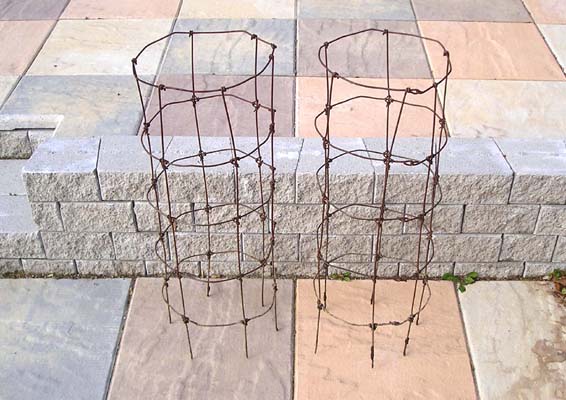

The above pictures will give you some idea what the cages look like after assembly. The rust is from being out in the weather. The last picture shows some of the cages in this years garden with new tomato plants growing in the center.
We still have about twenty cages left from my original batch. The missing cages did not rust away or break, they were simply given away. The story is simple. Our kids grew up, started lives of their own, and we did not need as large a garden plot.
Oh, did I fail to mention that I made my tomato cages when our kids were young. We are not sure of the exact year of manufacture, but my wife maintains it was 1980. You will have noticed in the pictures that they are well rusted. They have been outside in various gardens for twenty-eight years but the tomatoes don't care.
If I can find a larger garden plot, there are plans in the works to make a second batch next year and they will be the last tomato cages I will ever own.
Mysticraven
www.alpharubicon.com
All materials at this site not otherwise credited are Copyright © 1996 - 2008 Trip Williams. All rights reserved. May be reproduced for personal use only. Use of any material contained herein is subject to stated terms or written permission.