*BROWNING HI-POWER: TRIGGER JOB, AND SOME THOUGHTS*
Some Rubicon members have had thoughts about using a Hi-Power (or clone) as a tactical sidearm. It is an excellent choice, particularly for those with small hands. My wife prefers it over all other tested weapons, including revolvers and the 1911. It's a "natural pointing" pistol, simple to operate, and very robust and dependable. However, the factory trigger is very stiff and gritty, but easy to repair.
You may want to review the following webpage:
http://www.fnhipower.com/index.html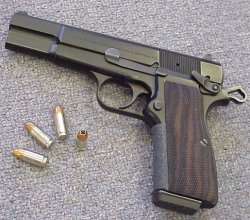
To do a trigger job, first review the following:
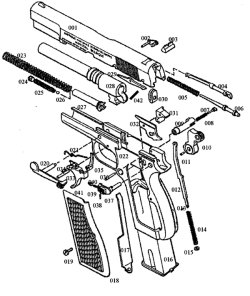
www.fnhipower.com/a_hi_power_schematic.html
Tools required for this job are:
1) a 1/16" punch (available from Sears or other hardware stores. Shorten the punch to 1/2" - otherwise, it will be prone to bend when you're removing pins.)
2) a pack of 1500 grit wet/dry sandpaper
3) a small triangular file -- jeweler's file, or similar
4) a chunk of 2x4, with a 1/4" hole drilled about 3/4" deep.
This board/hole will be used to receive all pins removed.
5) acetone -- maybe a bottle of nail-polish remover
6) Q-tips for the acetone
7) regular cleaning supplies
8) hammer
9) piece of coathanger, about 10"
10) Tequila and cigars, and a Border Collie. When in doubt, ask the Border Collie -- they KNOW things.
General: Use the sandpaper to polish all surfaces, and then clean and lube thoroughly prior to re-assembly.
Step 1: Clear the weapon, then remove the slide and handgrips.
Step 2: Examine closely the trigger assembly. Pull the trigger, and observe how the trigger lever moves in its well. Also observe how the trigger lever is mounted in the trigger block, UNDER the trigger spring.
Step 3: Place the receiver on the board with the trigger pin over the hole. Using the punch, push out the trigger pin and remove the trigger assembly. During this process, the trigger lever will fall off.
Step 4: Time to remove the magazine safety. Place the trigger assembly on the board, with the mag safety pin over the hole. Punch out this pin, and the mag safety/spring will pop out. Save them for future interests.
Step 5: Since the mag safety spring was a part of the "trigger return" force, you must now bend the rear of the trigger spring DOWN about 1/4". To make the bend, clamp the spring (using needle nose pliers) just ahead of the existing bend, and then move it down using another pair of pliers.
Step 6: Using acetone/Q-tips, remove any lubricants from the trigger assembly, from the trigger lever, and from the interior of the frame in the area of the trigger assembly.
Step 7: Cut a piece of the 1500 grit sandpaper, wrap it around the end of the small file, and carefully polish the trigger lever, all points where the trigger lever mounts to the trigger assembly, and the interior of the trigger lever well (on the frame).
Step 8: Clean and lube the trigger assembly, and re-install into the frame. (Gotta hold your mouth just right to make this happen.)
Step 9: Remove the barrel from the slide, and temporarily put it into position on the frame. Pull the trigger a few times, and observe the movement of the trigger lever against the side of the barrel. If you feel any friction, polish the pertinent surfaces on the side of the barrel.
Step 10: Time to look at the hammer/sear interface. It isn't really necessary to do further disassembly here, but simply cock the hammer, and then bend the piece of coat hanger so it holds the hammer at its rear-most position -- hook the free end into the magazine well. At this point, the hammer and corresponding sear hooks will be exposed so that you can polish them with the 1500 grit paper.
Step 11: Clean, re-lube, and re-assemble. Trigger should be smooth, and breaking at about 4 pounds.

All materials at this site not otherwise credited are Copyright © 1996 - 2001 Trip Williams. All rights reserved. May be reproduced for personal use only. Use of any material contained herein is subject to stated terms or written permission.