*M-69 Bolt Disassembly*
by serger
22 May 2003
I just recently read JonBot007’s article on the Romanian M-69 rifle and thought it would be a good gun to get for my families younger shooters. After I got them in I decided one was going to be sergers. I feel if they were produced today they would easily cost a couple hundred dollars and after shooting the one I claimed and the others in the lot they would be well worth that much. As it was I paid slightly under 70.00 US Dollars for each of the ones I bought.
I haven’t been able to find a schematic on this rifle yet so the descriptive words I use for the parts are my own and might not match with any you may have if you are lucky enough to have a schematic.
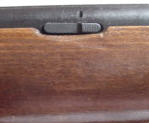
But the reason for this article is to show pictorially how to disassemble the bolt of the M-69. First get the Safety Stuff out of the way. Wear safety glasses because the sear spring is under enough pressure to launch the safety detent retainer across the room and might damage your eye when it hits it. This is a firearm and as such can kill you. Before attempting any work on it make sure it is unloaded. First open the bolt and verify there is no ammunition in it. Next remove the magazine by pushing the magazine release toward the barrel of the rifle and pulling the magazine out of the weapon. It’s the serrated thing in the middle of the picture.
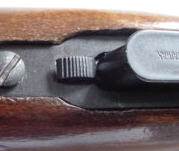
To remove the bolt, look on the left side of the rifle. There you will see the bolt release. Press on the serrated part of the release; pull the bolt toward the butt stock and the bolt should clear the weapon.
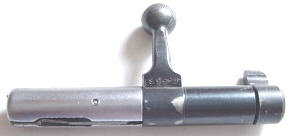
The weapon is now safe. Below is a picture of the bolt. Note the bolts chrome silver color in contrast to the blued bolt sleeve and safety.
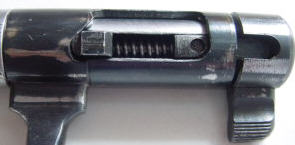
If you rotate the bolt and look at the underside of it you will see the slot that has the sear exposed. Note also that in this picture the sear spring is under pressure. If you look you will see the hole on the safety detent retainer. You will have to place the bolt in a vice and pull down on this retainer with a 7/64" punch or piece of rod stock to remove the tension on the safety to allow it to be removed from the bolt body.
But first you need to rotate the bolt sleeve to release the sear spring pressure. When you’ve done that it will look like this.
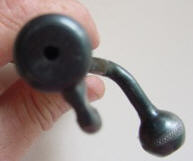
Next you need to place the bolt in a vice being sure to pad it so it is not damaged by the vice jaws. While using the 7/64’ rod in the hole of the safety detent retainer push down and rotate the safety to about the 4 O’clock position relative to the top of the bolt. In the picture below the bolt is at 3 and the safety is at 4. I know it’s a screwy picture but go with me on this.
The safety is really tight in the keyways coming out and you might have a hard time getting it to clear. Take you time and don’t be rough with it and you will remove it. Watch out for the spring-loaded parts. When the safety clears you’ve got the bolt apart. Here’s what the bolt keyways look like with all the parts removed.

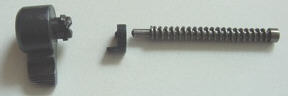
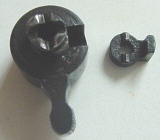
The lay out of the internal parts look like this First the safety, then the safety detent retainer, the sear spring and plunger came out of the bolt.
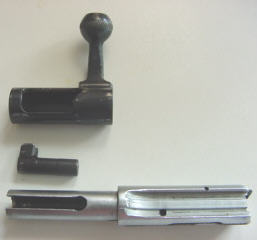
Then the other three parts, the bolt sleeve, sear, and bolt. Note: you have to put the sear inside the bolt sleeve and then place the bolt body inside the bolt sleeve to reassemble.
When you’ve finished looking at the parts and get ready to reassemble the note the safety detent retainer can be placed in the bolt either with its teeth toward the safety or toward the barrel.
The bolt will work fine either way and if you are training people with little finger strength if you place the safety detent with the teeth toward the barrel it will be easier for them to operate the safety. HOWEVER with the bolt retracted it is possible to rotate the safety and unlock it out of it’s keyway and the bolt will disassemble itself and since there is no detent to hold the safety in the "safe" position it can drift off safe becoming a hazard. So I recommend only doing this modification for training in a controlled environment. Once the training is complete then the bolt should be reassembled in the original configuration
When you reassemble the bolt remember the keyway for the safety is tight and you will have to work to get it reinstalled. The easiest way I’ve found is to place the safety detent on the sear spring plunger and use a pair of needle nose pliers to push it down into the keyway. Then you can take the drill rod and hold it under compression while you place the safety in the bolt. Take your time and don’t forget the safety glasses. ALSO make sure prior to replacing the bolt that you have placed the sear spring back under tension by rotating the bolt sleeve or when you try and replace the bolt into the rifle you will jam it. My son did this when we were first examining the rifle and it took a rubber mallet to get it unstuck.
Enjoy this little rifle. It’s a lot of fun and a great value.
Thanks for the read.
serger
All materials at this site not otherwise credited are Copyright (c) 1996-2003 Trip Williams. All rights reserved. May be reproduced for personal use only. Use of any material contained herein is subject to stated terms or written permission.