Figure 1
*Beginner shooting tips and tricks*
The new shooter is in a great position to learn the fundamentals of shooting. Being new you are a clean slate where as a person who has been shooting for some time may bring some old baggage with them that is often times difficult to correct. Over 99 percent of the time the inability of the shooter to hit the target is just that the shooters inability. A new shooter is willing to learn from this and take the corrective measures necessary to remedy the situation. Where someone who has experience is more likely to blame the problem on the firearm rather than themselves. I will also go out on a limb and say that 99 percent of firearms are more accurate than their handlers.
The first and most important thing in learning your new firearm is firearms safety! You hear things like accidental discharge all the time in the shooting world. I contend that there is no such thing in over 25 years of shooting I have never seen a firearm fire on its own. The only time I have ever seen a firearm discharge a bullet is when someone or something pulls the trigger be it intentionally or not.
With that said if you follow the four basic rules of firearm safety you will be able to enjoy your new firearm without problems.
The four rules are:
If these four simple rules were followed I will just about guarantee there would never be another firearm accident! Firearms are a big responsibility and should be treated with all due respect.
The only way to learn to shoot is to practice, practice and then practice some more! When you think about the actual process of shooting a firearm it is pretty simple. You need to do the following. Align the sights on the target and pull the trigger. There aren’t a whole lot of things that are easier than that are there. Well theory is great real world is another thing all together. The problem is that there are a lot of different muscle groups involved in the sight alignment and pulling of the trigger that it is very easy to take the sights off of the target.
Basic firearm description/locations:
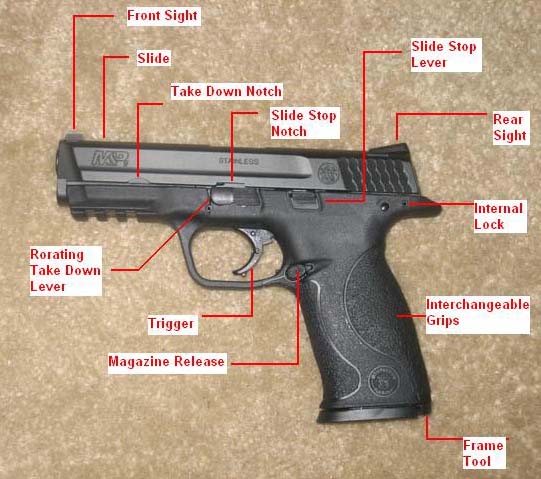
The following image (Figure 1) shows the basic locations of items on a semiautomatic pistol. While this is one type/model it is important to read your manual to find out exactly how your firearm works and is arranged.
Figure 1
The tips
Get instruction: While shooting itself is not a complicated thing having an instructor that can correct things that are being done wrong early will greatly help in obtaining accuracy and avoid having to try and relearn how to do something that has been committed to muscle memory.
Where to shoot: While it would be great if we all owned a suitable piece of property to be able to go out the back yard and shoot safely the majority of us are not that lucky. When you take into account that a bullet can travel well in excess of a mile after it leaves the barrel this can pose problems for even those in remote locations. For this reason Most of us will have to shoot at either public or private ranges. Check with your local gun shop as they can often direct you to a range or ranges in your area.
Safety: Before you load your gun, review the basic safety rules in your head. You are the one behind the trigger, you have the ultimate responsibility for handling your firearm in a safe manner, and you cannot blame anyone or anything else for an accident.
Ear and eye protection: Most ranges require you to use both ear and eye protection. Even if the range does not require them I strongly recommend that you use them! You were only given one set of ears and eyes so you need to take care of them.
Eye dominance: This is an issue that I have seen many experienced shooters have to overcome an initial assumption that they later found out was incorrect. A lot of people assume that if they are right handed they are right eye dominant. This is not necessarily the case and can lead to a lot of frustration when you are trying to line up your sights. There is a simple test that can be preformed to determine which eye is your dominant eye. The steps are:
Those who are same side dominant (right eye & right hand, left eye & left hand) will generally have and easier time adjusting to shooting. That is not to say that those that are mixed dominance (right eye & left hand, left eye & right hand) are going to have a more difficult time learning to shoot. It may only require a little shift in the grip or a slight change in the stance to put the sights in line with the dominant eye. It is a lot easier for a person to learn to shoot being left eye dominant and right hand dominant or right eye dominant and left hand dominant than it is to try and retrain your eye dominance.
Sight alignment: Sight alignment is how the sights are aligned in relation to each other. Using the most commonly seen “notch and post” type of sights as an example. The front sight should be visible through the notch in the rear sight. There should be an equal amount of light (gap) on each side of the front sight post. The top of the post and the top of the rear sight should be even (flush) If the post is off to one side or the other of the notch the bullet will impact the target to that side. If the top of the front site is below (lower than) the top of the rear sight the bullet will hit the target low. Likewise if the top of the front sight is above the rear sight the round will impact the target high. See Figure 2
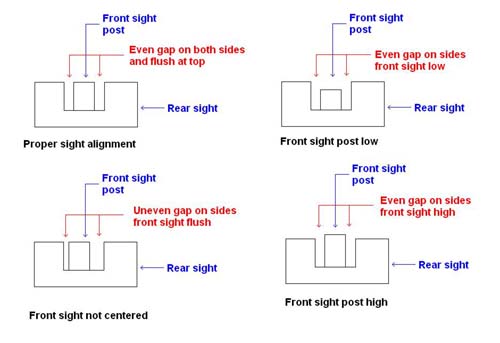
Figure 2
Sight Picture: This is how the sights are lined up in relation to the target. This will vary slightly from firearm to firearm, but as a general rule the bull’s-eye should sit on top of the front sight post. Figure 3 shows proper sight alignment and picture.
*NOTE* The human eye can only focus on one thing at a time. You can not focus on the rear sight, front sight and the target at the same time. You should focus on the front sight. The back sight and target will still be visible they will just be blurred. The reason we do this is the front sight shows the path the bullet is going to follow.
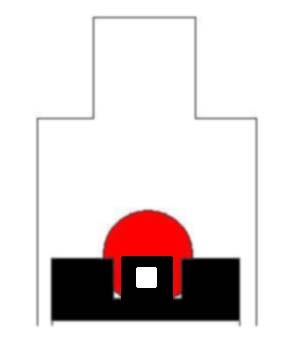
Figure 3
Griping the firearm: Getting a proper grip is one of if not the most important aspects of shot accuracy and recoil reduction. The following steps list how to acquire a proper grip.
*NOTE 1* Using this method of griping the pistol it is important to remember not to grip the firearm to death! The strong side hand is only responsible for approximately 40% of the gripping force while the weak side hand is responsible for 60%. The strong side hands job is to control the trigger while the weak side hand controls the gun.
*Note 2* This is not the only method of griping a firearm it just happens to be the one that works for me. If this does not work for you or is uncomfortable you may have to experiment with other grip options till you find one that works for you.
Trigger control:
This is another one of those real important skills if you want to obtain reliable accuracy with your firearm. If you just yank down on the trigger you are going to inevitably move the muzzle off the target. The trigger needs to be squeezed. The keys to a good trigger squeeze are.
What you are doing is continually adding more pressure to the trigger until it breaks causing the round to be fired. Ideally if don’t right the trigger break should come as a surprise every time you fire the weapon. When first starting out you may find it helpful to count backwards from random numbers while squeezing the trigger to take their mind out of the action of pulling the trigger.
When you place your finger on the trigger you should be contacting the trigger with the pad of your index finger. You should not use the first joint as this does not give you the feeling of the pressure on the trigger and lessons your control.
The shooting stance: There are hundreds of books magazine articles and websites devoted to the shooting stance. For the new shooter I feel that the “Weaver stance” is the easiest and most stable to start with. Images 4 and 5 show this stance.
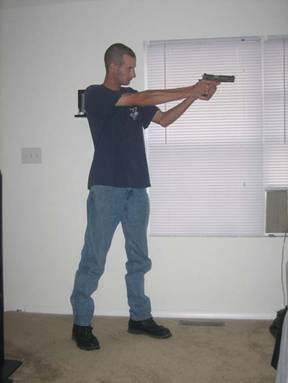
Figure 4 (side view)

Figure 5 (front view)
*NOTE* as with the grip there are many stances and variations of stances out there this one is what work for me and I am comfortable with. You need to experiment and find what works for you!
Dry Fire practice: Dry firing is the act of firing a firearm with out using ammunition. Most modern handguns will not be affected by dry firing. Dry firing allows you to practice sight alignment, sight picture, stance and trigger control without firing a shot. This is a useful option for the many of us who can not go to the range as often as we would like. Just remember to make sure the firearm is unloaded before any dry fire practice! I personally make it a habit to put all ammunition in a draw before dry fire practicing so that an additional step is needed to get to ammunition. Even though you have checked the fire arm and made sure it is not loaded and put all the ammo away remember to follow the 4 basic rules!
Well that is my intro hope it helps to make your first firearm shooting experience a pleasurable one!
Brian
www.alpharubicon.com
All materials at this site not otherwise credited are Copyright © 1996 - 2007 Trip Williams. All rights reserved. May be reproduced for personal use only. Use of any material contained herein is subject to stated terms or written permission.