*Sewless Drop Knife Sheath Carrier*
For the past few weeks I have been looking at various high-end tactical gear sites. One of the newest concepts in tactical gear is the drop pouch or sheath. A drop pouch/sheath is a piece of web gear that attaches to your belt and places the pouch, pistol, knife, etc. below your traditional web gear out of the way and closer to hand. The benefit of such a system is that if you have to abandon both your pack and your LBE you can still have a pistol or knife on one side, and a survival kit on the other (should you want to use drop pouch for that on your other leg).
The main problem with high-end gear is the high-end price. $25 or more for a single mag pouch compared to $5 for an army surplus pouch.
However, if you are crafty you can make very similar gear that will serve you well and fit within your budget. After all, what good is it if you can only afford one single high-end mag pouch and then get into a firefight?
What follows is my first attempt at making a drop carrier for a sheath knife. With some thought, you will likely come up with a better design, but for now I will enjoy my sewless drop knife sheath carrier and hope you will too.
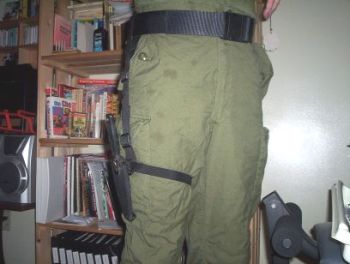
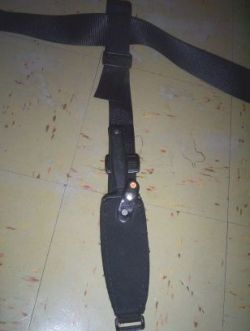
First, what it looks like with both a "boot" knife sheath and a regular sheath:
As you can see, it hangs away from the leg and can actually fall sideways if not tied down with a leg cord. This is a Gerber Mark I.

Here is a more secure Mark II with a leg cord. The Mark II sits up at the second buckle while the Mark I sits at the lower buckle. Both knifes are well within reach of a relaxed arm. The plastic tie is white for the photo only and would be trimmed for actual use (para-cord may also be used) Both buckles can be used to adjust the height of the knife to suit the individual user.
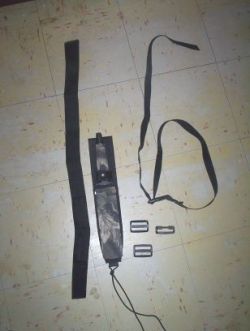
Here is what you will need:
1. piece of 1.5" webbing 29" long (I got mine at the dollar store)
2. slider buckles
1. open buckle
1. ˝"-1" webbing with a Fastex-style or ladder lock buckle already sewn own (see dollar or hiking store)
1. belt (either your pants belt or a duty-style belt)
1. knife with sheath
1. Zip-tie (or para-cord)
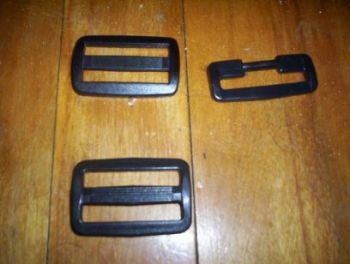
Below is a closer look at the buckles used. I had these in my bits&pieces box but you can get them from craft stores, hiking stores, or thrift stores.
Now to put it all together:
This is the loop for your belt. Simply thread the strap through the buckle and the double back through leaving a short end extending past and on the outside of the buckle. (Away from your leg)
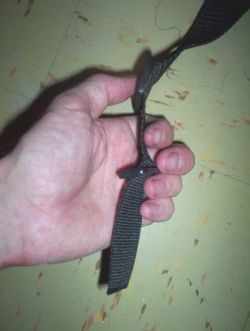
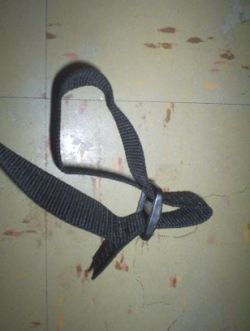
This is the start of the bottom loop. Put the other end of the strap through the buckle once then add on the open "buckle" before doubling back the strap as you did at the top. However…this time the short end goes in behind the buckle so it is facing your leg.
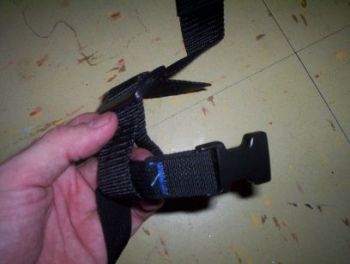
Here I have started to put the leg strap through the bottom loop. Once the whole thing is put together you can cut off the excess leg strap but leave enough for adjustability. Remember to melt the ends of all cut webbing so it does not unravel.
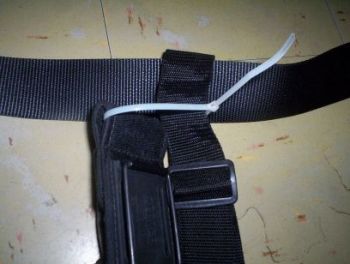
Here is the way the Mark II (and many other such knives) is fastened to the carrier. Simply use a zip-tie or para-cord to secure it above the top buckle (The zip-tie goes through the top loop). Done correctly, the top loop can easily be adjusted for belts of different widths. Cut off any excess zip-tie or para-cord.
The Mark I or other "boot" clipped sheaths are simply clipped through the open buckle. Depending on your knife, you may have to use a leg cord.
Well that is all there is to it!
It took me only about 10 minutes to come up with the idea and an hour to write the article.
So give it a try and perhaps see what you can come up with for a drop holster or pouch.
OhCanada
www.alpharubicon.com
All materials at this site not otherwise credited are Copyright © 1996 - 2005 Trip Williams. All rights reserved. May be reproduced for personal use only. Use of any material contained herein is subject to stated terms or written permission.