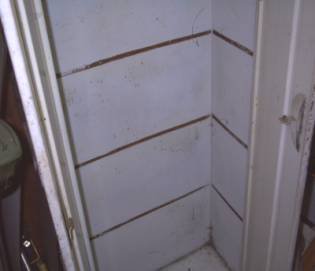
(File Cabinet after shelves are stripped out)
*Making a GunSafe*
It all started like this: I was accumulating a nice collection of firearms and was in need of a place to store them. I wanted to keep most of them in my barn but wasn’t in the position to purchase one on those nice, expensive gun cabinets that you see for massive amounts of money. That’s when it hits me: what do I “have” that could become a gun cabinet? I didn’t want it to look conspicuous so as I look around, there it is. An old metal cabinet in the corner that I basically store junk in. The process then began: measure the cabinet and make sure that what I have will fit into it after my modifications. Then remove all the junk out of it.
With the inside cleaned out, the next phase goes into effect. There were several metal shelves tack welded in place that were going to have to go. So taking a hammer and cold chisel in hand, I knocked the welds loose and removed the shelving.
Now came the time to figure out exactly which weapons were going in the cabinet and how much room was needed between each weapon so that the didn’t interfere with each other when I take them out. Lay out the weapons to get these dimensions. Once I had the weapons laid out so that they didn’t touch, I took a sheet of paper out to write down some dimensions. The dimensions needed are the thickness of each stock at the butt and the distance between the stocks. For the clear dimension needed for the stock, use the thickest stock and make all notches the same. This helps when you want to rearrange weapons later or you sell one and replace it with another. Then measure the distances toward the upper end of the weapons’ hand guard areas and the distances between them. This will work the same way as the butt stock measurements; with the widest dimension being your standard dimension.
Once this was all done, I got materials together for the modification. Remember, I wasn’t making a piece of furniture so materials didn’t have to be pretty.
My materials included:
2 x 2 and 2 x 4 lumber
wood screws of appropriate lengths
a 1 x 8 pine board for shelving
a lockable latch for the doors
The tools I used were, but not limited to:
A hammer a cold chisel
Tin snips
Drill/screwgun
Jigsaw
Tri-square
Cut several lengths of 2 x 4 to the inside width of the cabinet. Lay out the bottom piece first with the dimensions that have been taken. Then lay out the upper piece. Keep in mind, the centers of the cutouts must line up or you’ll be shaking your head later and it will just plain look better when it’s done right. My layout had my weapons starting at the right side so that I would have room for a mid shelf on the left side.
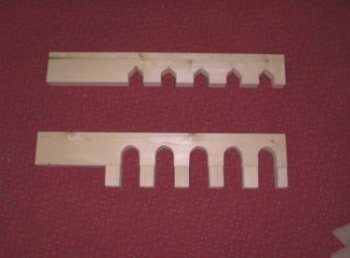
Round the inside of the cutouts where you weapons will fit into the rack. Make sure that the thickness of wood at the radius of the bottom piece cutouts are thicker that the upper piece cutouts so that the weapons have some rearward lean to them. I left 3 inches of wood at the bottom and 1˝ inches on the upper piece and this worked fine for my weapons.
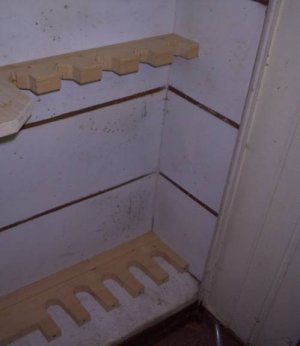
Once the bottom piece is in place, measure up from the bottom of the cabinet the distance you want the upper piece located. I used 28 inches for the centerline just because it worked for my weapons.
I used self tapping screws from the outside of the cabinet to attach the pieces to the cabinet. Attach the bottom piece first. This way it doesn’t have anywhere to go then put the upper piece in place. Depending on the fit, you may need to hold this one in place to start putting the screws in.
At this point, you have a basic weapons storage cabinet BUT I kept going. I wanted to have a place to lay other items that I wanted to keep with the weapons; magazines, scopes, etc.,etc.
I cut two pieces of 2 x 2 lumber as support cleats for a shelf. These run from back to front on each end of the cabinet. Make sure that the top of the cleats are above the barrel ends of the weapons. Line up your marks for the top to these cleats so that the shelf is parallel when installed. Attach these cleats the same way that the other pieces have been attached. Then cut the 1 x 8 shelving board to the length you need. Put this in place and attach with screws thru the shelf into the cleats
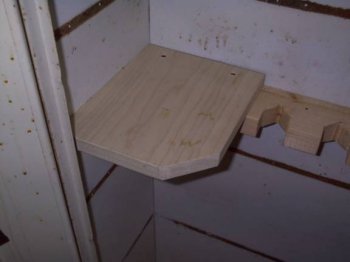
Now, if you want or need a mid shelf, this would be the last step. Measure the area you want to put the shelf and cut some more 1 x 8 shelving board. Attach this shelf the same way the upper shelf was attached.
Now, it’s just time to put a lock on it. A simple latch that has concealed screws when closed is all I used and the worked well for me. Since the doors are also thin metal, I had to put blocks behind where the latch was going. This way, the screws you use will have some meat to go into once they penetrate the thin metal of the doors. I used pieces of the shelving board and screwed the latch into place.
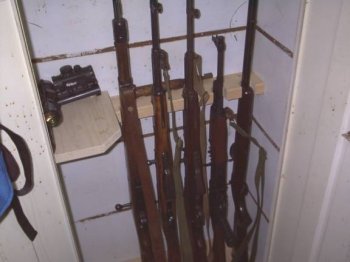

Now, you’re all done!! Enjoy the results.
KingCobra
All materials at this site not otherwise credited are Copyright © 1996 - 2003 Trip Williams. All rights reserved. May be reproduced for personal use only. Use of any material contained herein is subject to stated terms or written permission.