
*PVC Target Holder*
A few weeks ago, a small group of Rubies planned a Saturday gathering which included pistol shooting on private land. Knowing we didn’t have a dedicated firing range available, I picked up some scrap cardboard to use as targets, then came up with a way to hold the cardboard securely regardless of where we set up the range.
This is an ideal project for a small private firing range or for a range which is only used occasionally but serves another purpose, like your yard or pasture, the rest of the week.
My Requirements:
* A frame to securely hold a 3 ft x 3 ft piece of cardboard about eye level
* Portable, lightweight and easy to transport
* Quick and easy to set up or take down, preferably without tools
* Stable in light breezes without driving stakes in the ground
* Easy to repair or replace if a wild shot breaks it
My Results:
The frame described below was extremely easy to build. It took less than 30 minutes to construct two copies using only a hand saw and a drill. Being made from common PVC pipe fittings, it was also very inexpensive. Building two of these target frames cost less than $20. When disassembled, the entire frame can be carried by one person and will fit behind the seat of a truck if necessary.
Parts List
* 3 pieces of 10 ft long, 3/4" PVC pipe (schedule 40) - available at Lowes, Home Depot, etc
* 2 - Elbows, 90 degrees, 3/4" PVC (schedule 40) - also at Lowes, etc.
* 4 - Tee fittings, 3/4" PVC (schedule 40)

* 2 - Binder Clips found at an office supply store

* String, about 15 feet. Any cheap string will work.
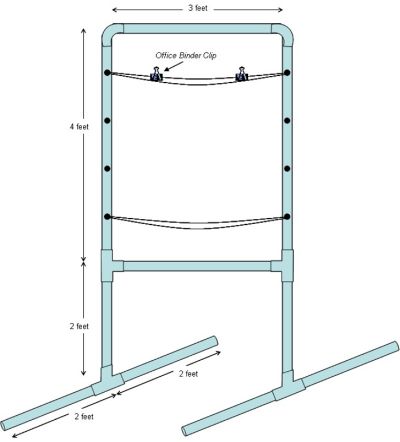
Finished Product
Here is a diagram and a photo of the finished product so you’ll have an idea of what you are building before you start. For many of you, this picture may be all the instruction you need.
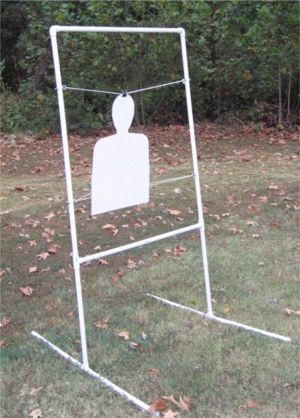
Note: In this picture, the frame is sitting on a slope and there is a breeze which caused the frame to lean. Notice however that the target board is still in perfect shooting position. The frame stands perfectly straight on level ground.
Steps For Construction
1. Begin by cutting the sections of PVC pipe. I would recommend the following cuts in order to have a large section of pipe left over.
From PVC Pipe #1, cut two 4 ft sections, and a 2 ft section (total 10 ft)
From PVC Pipe #2, cut two 3 ft sections and two 4 ft sections (total 10 ft)
From PVC Pipe #3, cut three 2 ft sections with a 4 ft section left over.
(Save this extra 4 ft section of left over because you can use it to repair ANY other pieces of the frame if they get damaged.)
2. I opted NOT to glue any of the pieces together. This makes replacing a broken piece much faster and easier in the field. The normal tight fit of PVC seems to hold the frame together just fine. However, for a more rigid structure, you could glue the feet to the bottom Tees since the odds of the feet getting damaged are slim.
3. Fit the pieces of pipe together based on the diagram shown above.
The 2 ft sections of pipe act as the feet and lower legs, connected with a Tee.
The 4 ft sections are the uprights, attached with a Tee at the bottom and a 90 degree elbow at the top.
The 3 ft sections are the cross braces.
4. To support the target, drill holes about 12" apart on the vertical 4 ft pieces. This allows you to run a string through the holes.
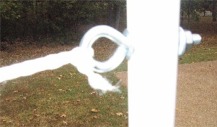
5. After using this design in the field, I have inserted an eye bolt in each of the holes to hold the string. These eye bolts are easier to thread when setting up the strings and don’t add significantly to the cost or weight of the frame. Make sure you use washers so the bolt won’t slip through the holes in the pipe.
6. Cut a section of string about seven feet long. Run the string through the eye bolts on each side and tie the string. This will actually provide two pieces of string to hang the target from.
7. Put another section of string in the bottom set of eye bolts. This loop will hold the target in place and stop it from swaying if a breeze comes along (as in the photo above).
8. Put the binder clips on the top string. Use these to clip the cardboard targets onto the string.
9. Fire away and have fun.
Modifications/Improvements
a. I have since attached an empty plastic jar (a peanut butter jar) to the side of the frame with a small bolt on one of the uprights. This cup gives you a place for a marker for spotting previous shots as well as target repair stickers, etc. Maybe I’m just lazy but I like having that stuff in a convenient spot off the ground so all the shooters know where it can be found.
Conclusion
This target frame was remarkably easy to build in about 15 minutes, cost only about $9 and is simple to repair. The set up and take down time was less than five minutes in the field and the entire package will easily fit into the trunk of a car since the longest piece is only four feet. The frame is very stable in a light to moderate wind since it has a 3 ft x 4 ft base and can securely hold nearly any type of target which can be taped to a piece of cardboard.
While I haven’t built a larger model yet, I’m sure it could be scaled up using 1" or 1.5" PVC to allow for four or five foot rifle targets with very few design changes and little additional cost.
Centurion
www.alpharubicon.com
All materials at this site not otherwise credited are Copyright © 1996 - 2004 Trip Williams. All rights reserved. May be reproduced for personal use only. Use of any material contained herein is subject to stated terms or written permission.