*The Swedish Ruck Revisited*
We’ve all seen them countless times at gunshows, Army/Navy Surplus stores and on the web at surplus retailers. They are the Swedish Ruck. An excellent sack surrounded by a nearly torturous frame and narrow leather shoulder straps, which bite into your collarbone under even light loads.
But have no fear; these iron maidens of cargo hauling can be made into a very serviceable piece of equipment. All you need are an old set of "H" or "Y" LBE suspenders and some copper rivets.
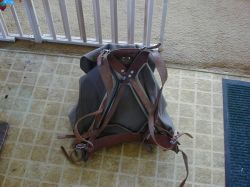
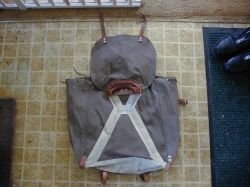
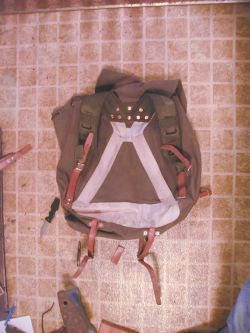
First, unbuckle the straps at the shoulder area, and down at the waist area. Next, look at the bottom of the ruck, you’ll find two leather tabs riveted to the sack which slip over a knob on each side of the frame behind the waist belt. Unhook those tabs. At this point, you should be able to simply remove the frame from the sack. Save the frame, we’ll be using parts from it later. Now, the ruck should look like the picture below.
Now, you’ll need a set of LBE suspenders. Most of you have an old set of these lying around. I had a set of "Y" pattern suspenders with a broken clasp, which I used on this pack. I have used "H" pattern suspenders in the past.
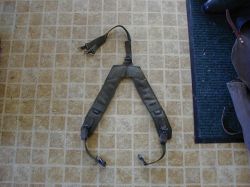
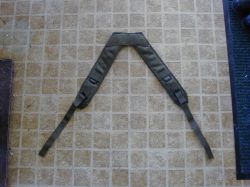
Now, cut the back strap(s) off of your suspenders, right where the two shoulder straps join. Also cut the clasps where the suspenders would attach to a web belt off. Just leave the webbing hanging down. The suspenders should now look like this.
Okay, now you need to cut the leather waist belt off of the frame from your pack. You need to cut a reinforcing plate out of that waist belt, which will help you to fasten the sack to the suspenders. Your reinforcing place should measure about 5 ˝ inches wide and 2 inches high. I usually cut mine in a "half-moon" shape. Now, mark the spots where you will have rivets going through this plate, you’ll use it as a pattern. Punch the holes in the plate so you can mark the suspenders and pack bag.
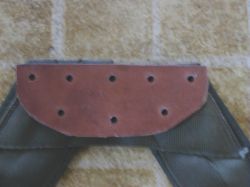
Above, you see the reinforcing plate with holes punched, sitting on top of the altered suspenders. At this point, punch the holes in the suspenders. If they are of nylon material, you can use a soldering iron or hot nail to seal the edges of the holes to stop fraying.
Okay, now you need to attach the suspenders to the pack bag. Remember that the suspenders will be upside down when you rivet them to the bag. The straps will be on the outside of the bag (duh), and the leather plate will be on the inside with the flat edge facing down.
(Outside)
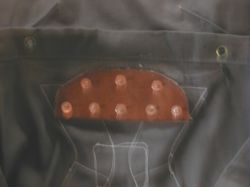
(Inside)
Go back to the old frame, you are going to need some parts for the next steps. Start butchering it by removing the old shoulder straps. Salvage the strap pieces indicated by the Sharpie marker in the picture below.
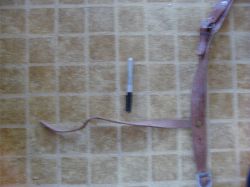
Also, remove the buckles from the old shoulder straps. They should fit the straps you just saved. Set those aside.
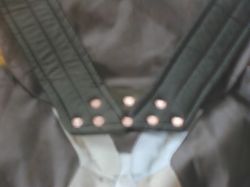
Take some scrap leather and fold it over on itself. Cut a strip out of the middle of the fold so that you can fit one of the buckles you removed from the frame into it. Duplicate it so that you have 2 identical leather tabs with buckles. Rivet these tabs to the straps from the LBE suspenders, where the suspenders used to attach to the web belt.
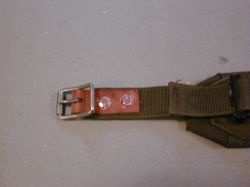
You should now have something, which looks like the picture above, at the bottom of the LBE straps. You usually need to shorten the nylon webbing on the shoulder strap. As you can see from this picture, I have shortened these straps to about 6 inches in total length.
Next, look at the bottom of the ruck. You’ll see the leather tabs, which used to secure the pack to the frame. You need to remove those tabs. I tend to cut the aluminum rivets with a set of wire cutters. Inside, you will find the remains of the old rivets, as well as a leather-reinforcing tab for each corner. Using these tabs as a pattern, punch holes in the leather straps you saved earlier. You will need to shorten those straps some. I just eyeball it based on how far down the LBE shoulder straps reach down. Now rivet the leather straps onto the pack. They should point "up" toward the shoulder straps. Go ahead and buckle the leather straps
to the LBE straps.
You are almost done. Along the top of the bag, you will see a series of grommets. These are there as a means to close the sack. Sometimes you will find a piece of leather thong or perhaps a boot lace there. Sometimes they are just empty. Either way, cut an 80-inch length of paracord. Seal the ends of the paracord with a match, soldering iron, or lighter. Thread it through the grommets so that both ends point toward the rear of the ruck. Now cut a small tab of leather from the scrap you have left. Punch two holes in the tab, threading one of the paracord ends through each hole. Tie a knot in the end of each end.
You have now got a usable rucksack, which is sturdy and quiet. Believe it or not, these are what I use as a BOB in my vehicles. It has plenty of room to keep you going for several days, especially when you remember that your blanket and/or poncho can be lashed to the bottom. All of this from an old pack you can get for under $6.00 (from Major Surplus & Survival), a broken pair of LBE suspenders, a piece of paracord, and $3.00 in copper rivets.
Some points-
I used rivets because they are fast, strong and cheap. Sewing with a Stitch-all would work as well.
If LBE straps are nylon, seal all cut edges with heat. If they are older cotton straps, seal cut edges with clear Super Glue.
Gluing pieces in place with contact cement (such as Barge Cement) adds strength and aids in keeping the parts in their proper place while you are riveting or sewing.
All materials at this site not otherwise credited are Copyright © 1996 - 2002 Trip Williams. All rights reserved. May be reproduced for personal use only. Use of any material contained herein is subject to stated terms or written permission.