*Taurus 85CHSS*
A model 85 Variant
Back in 1990 I wanted a small revolver I could carry in my coat that would fire from inside my pocket if I needed it to. It also had to be snag free if at all possible and be large enough in caliber to assuage my small bullet phobia. Back then, the smallest thing I felt safe with was the .38 Special. At that time I looked at the Colt Detective Special. It was too expensive, and snaggy. I looked at Smith & Wesson Lemon Squeezer and it was too collectable and therefore too expensive, but it didnĺt snag. One of my friends had bought a Taurus model 66 from my partner (We had a little gun business). When it came in for the amount he paid it was well worth the price. Taurus was at that time trying to crack the US market and they were fielding guns that looked to us Yanquiĺs like Smith & Wessonĺs or Barettaĺs and they worked as good and didnĺt cost near as much.
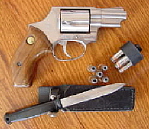
I saw they had in their product lineup a 5 shot J frame (a S&W moniker for their small revolvers frame size) revolver called the model 85CHSS. That stood for Concealed Hammer Stainless Steel. It wasnĺt expensive and it didnĺt snag and it was stainless (for those sweaty body parts). I called all over the country looking for a copy. By this time several people I knew also wanted one. I finally found out that Southern Ohio Guns had 6 of them in stock. I bought 4. I think I paid something like $305.00 each for them.(Being a dealer had itĺs advantages.)
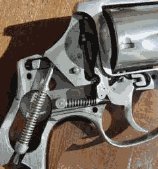
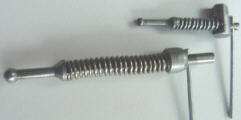
When they came in they were just what I wanted at a price I could live with. The actions were stiff because they were new. I played around with mine until I broke it in. In the photos below you can see the inside of the lock work of the gun in the at rest position and at full cock. I had to hold the hammer back with a button because these guns (the concealed hammer ones) are Double Action Only. For their intended purpose DAO is quite a good setup. You would use this gun for purely defensive purposes and even though it will shoot all rounds into a pie pan at 20 yards youĺll probably use it at closer ranges.
I carried mine in my front coat pocket FWIW and being left-handed I thought it might surprise people. When I bought mine they werenĺt rated for +P ammunition. Taurus has since changed that. The metallurgy hasnĺt changed but now they have given their blessing to the revolver. I donĺt shoot any more hot ammunition through it than I have to just because I donĺt get off on recoil. The recoilĺs not bad but I "Think" Iĺm getting arthritic in my thumbs and I donĺt need the wear and tear on my body. I usually shoot 148 grain lead wadcutter target loads. They work for my purposes just fine. The gunĺs inherently safe because it wonĺt go bang if you keep your finger out of the trigger guard and if you drop it on the hammer (fat chance with mine) unless the trigger is pulled at the same time the transfer bar wonĺt be where the hammer can hit it so it can hit the firing pin. I bought a Safari land speed loader model number CH7 from Dillon Precision in Arizona and I was set. That was in 1990, more or less.
Now fast forward to today with everybody and their relatives wanting a "gun" they can protect themselves with. Lots of them donĺt want the pump shotgun Iĺd recommend because it wonĺt fit in the nightstand or day planner, so hereĺs an alternative thatĺs just about idiot proof. And just recently I read an article about arming your mother in-law. Now I know there are those who might think this not to be a good idea. What the gist of the article was is there are people out there you care about more or lesss, who need access to a firearm. They donĺt necessarily want to know anything about the gun other than the bullets go in here, your point it at the bad guy, you pull the trigger until the bad guy stops.
That in essence is what a revolver does. They are very reliable. And other than loading them you just point and click (Shoot). For some one who couldnĺt care less about the gun other than it goes bang when they need it you canĺt beat the revolver.
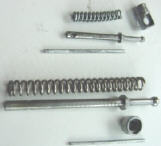
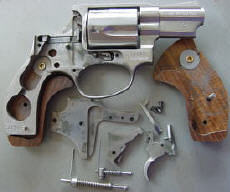
Now for something completely different, first youĺll get the exploded view of the gun. Then Iĺm going to discuss a little tune up.
First make sure itĺs unloaded and wear safety glasses. Remove abrasives from the weapon at each step to preclude premature wear.
As far as I know doing stuff like this Voids the warranty so donĺt do it if youĺre worried about that.
What Iĺm going to describe to you is what I did to slick up the action of my revolver and improve function and reliability (not that it needed much). It worked fine for me. None of the things I will tell you are unsafe but because Iĺm not there to watch what you do to your gun and therefore canĺt stop you if you do something stupid, I donĺt recommend you do any of them. Thatĺs why this is euphemistically called an academic discussion. If you donĺt feel competent working on your gun but want this stuff done to your gun then send it to Taurus and have them do the trigger job and tune up for you. If you can and do feel competent then read on.
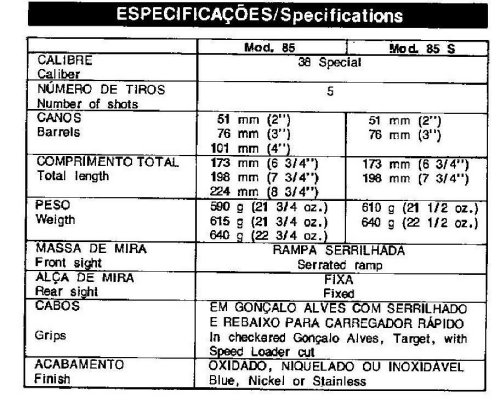
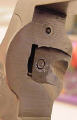
First youĺll have to remove the cylinder (3). To do this unscrew the side plate screw (28) closest to the barrel (9) then unlatch the cylinder. Line up one of the chamber flutes so the cylinder can clear the frame (12) and slowly pull the cylinder (3) from the frame (12). The cylinder stop plunger and spring (8) will come out also. They are small parts so donĺt lose them. When you get done the gun will look like this.
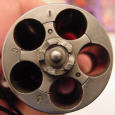
The first thing you can do to slick up your weapon is to smooth the shield area on the back of the frame (12) that the ammunition rides against. To do this you take and polish this area. I used a flat piece of plywood I had glued a piece of Crocus cloth to. All I did was smooth it out and provide a slick surface for the shell cases to drag against. You can still see machining lines on the shield, I wanted it smooth not mirrored.
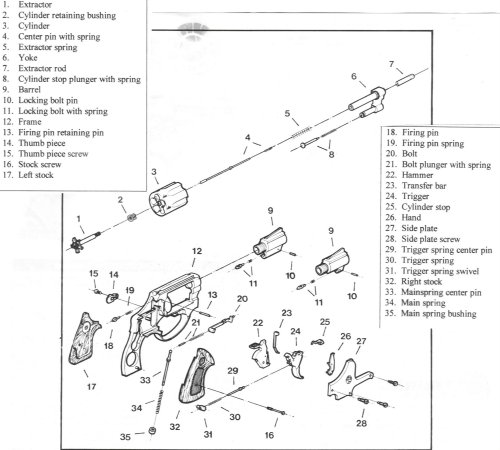
Then take the cylinder (3) and look at the end the shells go in. The chambers are cut at sharp 90-degree angles where they clear the cylinder face. What you need to do is just barely break the edge of the 90. You can do this in various ways. Some people use a dowel thatĺs got a larger diameter than the chamber, which they bevel in a pencil sharpener. They take lapping compound (tooth paste will work) and put it on the dowel and spin it in each chamber to just break the sharp edge. I used a RCBS case deburrer and got the same result. Remember just to break the edge, no more. Look at the chamber in the 6 0ĺclock position of the picture and see how it reflects light on itĺs edge. Thatĺs how much you break the edge. The purpose of this is to minimize the chance a round will stick at that point because the soft lead had dug into the chamber mouth that acts like a chisel without this edge breakage. (Yeah I know your Jacketed Hollow Points only have a little or no lead showing but they will stick there when you try loading them in the gun in the dark after youĺve shot and need to reload, and breaking the edge minimizes that.)
Replace the cylinder and lock it into the frame.
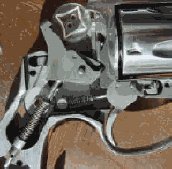
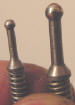
The next thing you do is to remove the grips (17&32) by removing the grip screw (16). Then you remove the other side plate screws (28) and lift the side plate. Inside youĺll see the guts of the gun. What you do next is to get a paperclip and break it in half. Then you cock the gun and youĺll see two holes: one in the main spring center pin (33) and one in the trigger spring center pin(29). Put the paper clip in the holes of the two pins and pull the trigger the rest of the way through. The gun will cycle and the two pins will come loose from their respective places.(Take a look at the pic above of the action cycled with the button holding it. You can see the pin hole for the mainspring pin quite clearly.)
Tear down the assemblies and then chuck em(the pins) up in the drill press at the lowest speed you can. Or do the same thing with an electric drill. The hammer spring is under a lot of compression so watch out and donĺt let it poke you in the eye . Using a piece of Crocus cloth or red rouge or a big green childrenĺs eraser polish the top of the ball of the pins until they shine. Carefully put assemblies back together.
While the pins are out carefully take the hammer (22) and lift it from the frame (12). You can then use crocus cloth and polish the pin the hammer fits on. I think itĺs called the hammer axis pin but Iĺm not sure. Brighten it up but donĺt grind it.
Next pick up the transfer bar (23), trigger (24) and hand (26). They come out as a group cause they are all pinned together. Polish the pin the trigger fits on and polish the transfer bar (23) on both faces, the side that the hammer (22) hits and the side where it runs on the cylinder side of the frame (12). Then polish both wide sides of the hand just a tiny, tiny bit. This part is real critical and if you screw it up you knock the timing out on the gun and will have to send it back to Taurus with some lame excuse how you found it that way or "A guy brought it into the shoe store where I just happened to be"ů.. Theyĺll know what you did so go lightly with it. The gray blotches on the wood and metal are Molybdenum Disulphide Powder I used as a lube. Itĺs dry and has very little buildup.
While you have the trigger (24) out of the frame (12) then polish the face of the trigger where your finger pushes on it. I donĺt know if Taurus fixed that but on my gun when they built the trigger (24) it was fairly right angled on the trigger face and when I pulled the trigger rapidly (24) it hurt. SO I took the old crocus cloth and smoothed out those sharp edges.
Thatĺs it. Now you have to put the whole thing back together. When you put the trigger and associated goodies back inside make sure they slide smoothly. Just cycle the gun through without the hammer in it. That will give you an idea of how those parts mesh. Then replace the hammer and again cycle the gun watching how it all works together. Next replace the spring and pin assemblies one at a time, cycling the gun to loosen up the paper clips so you can take them out. Replace the side plate (27) and the associated screws (28). Put the grips (17&32) back on and screw down the grip screw (16). Clean up your mess and now go out and fire that puppy.
Thanks for the read.
All materials at this site not otherwise credited are Copyright ę 1996 - 2002 Trip Williams. All rights reserved. May be reproduced for personal use only. Use of any material contained herein is subject to stated terms or written permission.