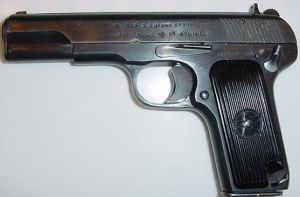
*Tokarev 213*
A Chinese variant of the Soviet Tokarev
After the Communists consolidated their hold on Russia in the middle 1920’s they realized they needed to up grade and modernize their Czarist arsenal. They had seen the benefit of semiautomatic pistols in the trench warfare of WWI. The Soviets wanted a pistol they could use to replace the 1895 Nagant revolver that had proven less than stellar in it’s performance against Germans in their heavy winter greatcoats. The round the Nagant shot wouldn’t always penetrate the German winter clothing and that result was at times disastrous for the wielder of the revolver. Fedor V.Tokarev was tasked with the job of producing a pistol.
The Soviets had another problem as well. They were very short on industrial machine tools and regardless of how many counter revolutionaries they bayoneted and shot they couldn’t change that fact. What they did have at Tula Arsenal were a few barrel making machines that could produce .30 caliber barrels and some mills and lathes that could produce limited machined work. So Fedor started to work and designed the TT-30 and later the TT-33.
This pistol was chambered for the 7.62X25 round and had an 8 shot magazine. The designers got around some machining problems by using flat springs where possible. They also used split pin assembly to simplify design and fabrication and had much of the external finishing done by hand. One thing to note about that time frame; all the Soviet small arms used .30 caliber (7.62mm) barrels. The PPD-34 and PPSH 41 sub machinegun, M-91, M-44, SVT-40 infantry rifles, 1926 Degtyarev light machinegun and 1910 Maxim Solokov belt fed machineguns all were .30 caliber. The Soviet reasoning was .30 caliber was adequate for their needs and having some gun in combat was much more preferable than having no gun as the ax handle carrying troops of WWI had learned the hard way.
To make the pistol more peasant proof the designers built the gun with a "hammer mechanism " (I call it a hammer group) that had the hammer, sear and disconnector assembled into a module that the soldiers in the field would never tear down. This hammer group also had the advantage having the bullet guides (feed lips) built into its massive body. This allowed the operator to use less than pristine magazines and still have the reliability needed in a military weapon. When a defective pistol came in to a field armory more often than not all the armorer had to replace was the hammer group, or barrel assembly or recoil spring to send the pistol back into the field. Western military observers bemoaned the lack of a safety in the TT-30 and TT-33 but the Soviets knew the best safety of all was keeping the trigger finger out of the weapon and having the hammer down on an empty chamber. And anyway a safety required more machined parts, a waste of resources.
The Soviets gave the technology to produce the Tokarev to their satellite countries and Poland, Czechoslovakia, and Hungary produced the weapon as the type 48. Hungary exported their type 48 to the Egyptian National Police as the Tokagypt model 58 and rechambered it for 9mm Luger because of the predominance of that cartridge in North Africa. Egypt was a former British colony, the Brits used 9mm and they had a lot of it. The Hungarians modified the Tokarev by placing a sear block safety on the gun. (I guess Egyptian troops weren’t as smart as Warsaw Pact troops). They also added wrap around grips to the pistol to replace the scale type ones. Supposedly this was to allow the user to handle the gun in the hot desert without burning their hands. Whoever thought that one up must have been a real winner, but everyone knows Gamal Nassar wasn’t the ripest date on the palm. Maybe it was his idea.
During the 1950’s the Soviets and the Chinese had very friendly relations and the technology to produce the TT-30 was exported to the Chinese. They started producing the 9mm version of the pistol as their type 54 (supposedly the year the weapon went into production in China) without the frame safety. The type 54-1 was in 7.62X25. They also incorporated design elements of the TT-33 a later version of the TT-30 into the type 54. One thing they added was a series of thin slots for gripping the slide and did away with the wide slots. And they added the wrap around barrel lugs the TT-33 had to add strength and compensate for their hit and miss metallurgy. As they continued production of the type 54 this wrap around barrel lug remained if for no other reason than it required less machine work. You turn the lugs when the barrel is on the lathe and just don’t mill the bottom of them off.
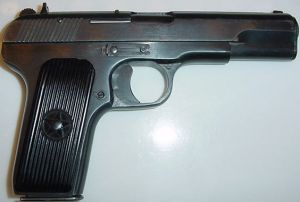
When the trade barriers between the United States and China were relaxed the Chinese found the Americans had an insatiable appetite for firearms. The Chinese also found out American law required a physical safety be in place on pistols to get enough "points" to pass the importation requirements of the 1968 Gun Control Act. They modified the type 54 by adding a sear block safety ala Hungarian Tokagypt (it’s good to have spys). Once the Americans were satisfied the pistol had enough points the Chinese started importing the pistol with the blocked magazine well and short magazines as the model 213. Later Norinco decided the Americans like the wraparound grips and they started importing a variation as the model 213-B that was pretty much a spot on clone of the Hungarian gun the Egyptians had bought almost 30 years earlier.
The 213 in this article is one I bought soon after moving to Podunk. Since firearms availability is regional I guess one of the retailers in this area brought a lot of them here because they were common. I paid $130.00 for the gun after it had been used as a guard’s gun for the local K-Mart during a labor dispute. He had cleaned it and in the process lost one of the safety retainer screws. I’ve shot slightly over 450 rounds through it without any problems and even though is looks a lot like the 1911 pistol it is different and handles differently. One bizarre thing is the frame safety is pulled toward you to fire and pushed toward the target to be "safe". That is backwards to what I’m used to. I’ve thought about taking a plastic plug and removing the safety and plugging the hole but as of yet don’t have the nerve to do it. Mostly I leave it in the fire mode and try real hard to ignore the safety altogether. Being left handed and having the safety where it is, isn’t a big deal but I think if a right-handed person shot this gun for any amount of time they Would do something about it. (Or bandage up their thumb) Another big turn off is the rough machining. Esthetically it’s real bad but the gun functions well and I suppose beauty is in the eye of the beholder.
One thing I especially like about this gun is since it is close to a 1911 Government Model it feels comfortably familiar even though the grip angle is different. Also it is quite thin. That’s a plus around here because I’ve carried it in the breast pocket of one of my winter coats and it didn’t print at all.
Since there have been imported in recent months another batch of Tokarevs, this time Polish 48’s, I thought you would like to see one of their relatives disassembled and some of its interesting features described. The Poles used a trigger block safety that’s just behind the trigger. Other than that it’s just another Tokarev.
Schematic
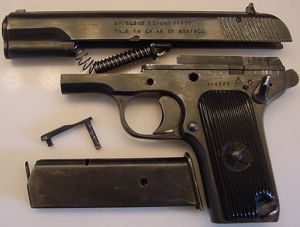
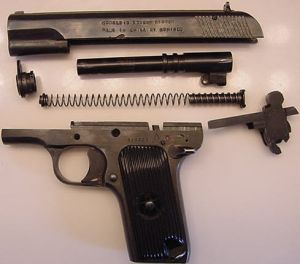
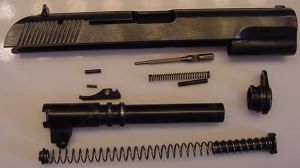
Field stripping
To field strip the 213 remove the magazine and clear the action. The basic take down is quite similar to that of a 1911. With the action cleared turn the weapon and on it’s right side unclip the slide stop. To do this you use the base of the magazine.
Next push out the slide release and slide the barrel off the frame. The top end will come off in your hand.
Supposedly you can remove the recoil spring retainer and recoil spring by rotating and removing the barrel bushing but I haven’t found this to be the case with this particular pistol. Come to think of it I’ve never tried it that way.
Next you remove the recoil spring and recoil spring guide from the slide. Then rotate the barrel bushing 180 degrees and remove it from the slide.
After the barrel bushing is out the barrel assembly comes out of the slide just like a 1911. Note how heavy the barrel bushing is compared to a 1911. I don’t know if that’s a good thing or a bad thing but it probably couldn’t hurt anything.

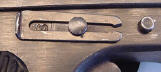
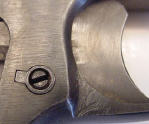
To finish field stripping the receiver, rotate the frame safety until the cuts in the frame match the milled "T" on the safety and remove it. Note: if this pistol wasn’t missing the safety retaining screw you would have to unscrew that screw prior to rotating the safety.
Lastly, remove the hammer group (hammer mechanism) from the frame. The pistol is now field stripped. (I stuck the safety back into the frame so I wouldn’t lose it. Otherwise it would be out of the frame in the picture.) The angled piece of metal sticking out of the top of the frame directly above the triangle factory code stamped into the frame is the top of the magazine well spacer. On 7.62X25 pistols this piece isn’t there.
To continue on with detail stripping you will need two split pin punches. I make these out of rod stock or heavy wire on an as needed basis. There is a pin in the slide that retains the firing pin and spring. And there is a pin that retains the magazine release. They are different diameter and require different punches. If you are lucky you might be able to drive these pins out with a regular flat pin punch but I wouldn’t recommend it. The split pins don’t like being driven out without being compressed prior to their removal. They tend to crack.
To make a split pin punch, take the rod of your choice and a lathe or drill press or drill. Chuck the rod up and file it to the diameter of the pin being compressed, then take a triangle file and cut a notch in the rod. You now have a split pin punch.
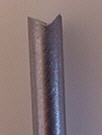
Yes I know the notch is not perfect but it still compresses the pin and that is what counts.
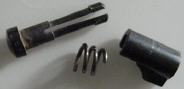
To finish detail stripping the slide, take the split pin punch you just made and drift out the pin that acts as the firing pin retainer.
The firing pin and spring will come out. Note the orientation of the firing pin to aid in reassembly. The notch is up. The split pin acts as a retainer and to prevent over travel of the firing pin.

Next you need to drift out the extractor pin. It is tapped out from the bottom of the slide. Once you have it out the extractor and extractor spring will be removed. You can’t tell it from the photograph but the extractor claw is quite wide for the round it is designed to move. It’s almost twice as wide as that on a 1911. That gives a lot more bearing surface to prevent torn rims. There is some slight bluing rust here also.
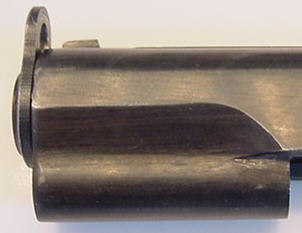
The slide is now detail stripped. Note how stout the barrel is. There is no contour to the underside of it like on a 1911. When the 213 was being imported there were barrels for .38 Super being reamed out of the 9mm ones and I’ve been told the gun with the appropriate recoil spring can handle +P+ 9mm ammunition. I’m not going to shoot anything like that out of it and I don’t recommend you do either but that’s what them that know tell me.
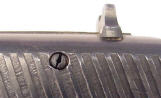
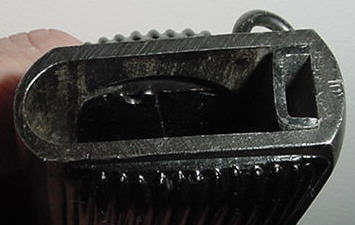
There is a stud in the bottom of the slide that is used to strip rounds out of the magazine. It is dove tailed and held in by a blind pin and is not to be removed. Here’s a picture of it, note the coarse mill work on the interior surfaces of the slide Above it you can see the bottom of the extractor retaining pin and to the upper right is the extractor claw.
.
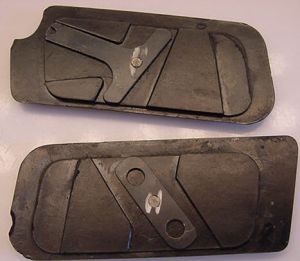
To finish detail stripping the lower receiver you need to first remove the grips. They are made out of a crappy phenolic plastic and the ones on this gun have already chipped. I’m considering getting another pair, cracking the plastic off them and using plexiglass, making another pair. To remove the grips, look in the bottom of the magazine well and you’ll see a lever. Push this lever away from the barrel end of the gun and the right grip panel will come loose. Then look through the magazine well and you’ll have to spin the other lever to unlock the left grip panel.
If you look at the end of the bottom grip panel you’ll see where the plastic has chipped.
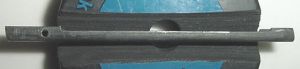
With the 213 you have to remove the magazine spacer to continue, an enhanced feature the 7.62X25 Tokarev’s don’t have. A pin holds it in and when the pin is driven out it can be slid out the top of the frame. Here’s a picture of what it looks like.
The magazine release is held in by another split pin and once you compress it, it slides out easily (at least this one did). The pictures are of the magazine release split pin and the magazine release components. One thing I’ve noticed on this and other Chinese weapons is they did a poor job neutralizing the bluing salts the guns were blued in. I had one SKS that had a tablespoon of bluing salt under the magazine follower in the magazine well. In this weapon the light brown friable rust was on the magazine release split pin and extractor.
To remove the trigger you first have to drive out the pin that holds the trigger spring. Then the trigger will retract enough to clear the frame. To get it out you must tip the stirrup down into the magazine well until the trigger pad clears the frame. Note the trigger spring pin protruding from the frame just above the magazine spacer pin hole.

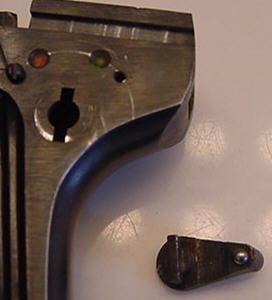
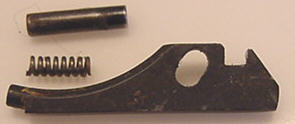
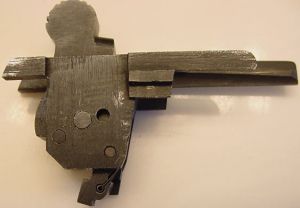
The last part of the disassembly procedure is to tear down the hammer group. The schematic calls it a hammer mechanism but I learned it as the hammer group. Note the rough machining and the hammer sear engagement inspection hole. This hole allows the armorer to see the positioning and wear (if any) between the hammer and sear. This aids greatly in troubleshooting problems. You can also see the cartridge guides that take the place of magazine feed lips on the right side of the group.
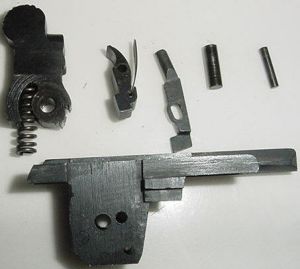
The sear uses a flat spring held in a slot of the hammer group. Drive out the sear pin and remove the sear and disconnector. You can next either remove the hammer pin or remove the hammer spring retainer pin. I decided to remove the hammer pin. Be advised it has a fairly heavy spring and might get away from you and hurt something if you don’t watch what you are doing. The hammer is then removed from the hammer group.
At this point I stopped. The hammer spring retainer pin was still in the hammer group and I muscled the hammer back in when I reassembled the weapon. After checking with my sources I found out it was better to drive out the hammer spring retainer pin and remove the spring and hammer. Then when you reassemble the weapon you clamp the hammer into a vice (after replacing it in the hammer group housing) and push the hammer spring into the well in the hammer. Once it is compressed you push the hammer spring retaining pin back in and that part is done. Always look at the reference material. Anyway here is a picture of the hammer group parts. The disconnector is the part in the middle with the elongated hole in it.
I didn’t show how to tear down a magazine but it is very easy. There is a small piece of the magazine spring that protrudes below the bottom of the magazine bottom. Push this spring end up and the magazine bottom will slide forward. Then there is a small plate that the magazine spring rests on. Remove it and the magazine spring and follower will slide out and you can then clean or work on the magazine.
That’s it, you’re done and have a shoebox full of parts to take to the gunsmith. Not! The hardest part of the whole reassembly procedure is getting the hammer and its spring back inside the hammer group. If you put the hammer in after removing the spring retainer pin and clamp it in the vice you will be able to depress the spring and replace the pin without having to curse too much. The rest of the gun goes together easily.
There were many of the Norinco Tokarevs both in 9mm and 7.62X25 imported. And then there are all the Polish, Egyptian and Russian ones. I’m sure as soon as one of the big gun peddlers can figure it out the Czech and Hungarian ones will show up too, if they haven’t done so while I was writing this. You may run across one and if so now you can deal with it.
Thanks for the read.
All materials at this site not otherwise credited are Copyright © 1996 - 2002 Trip Williams. All rights reserved. May be reproduced for personal use only. Use of any material contained herein is subject to stated terms or written permission.