*Home Brew CNC Milling Machine - Collet Holder and Coolant System*
 This article is part of a set for modifying a cheap(!) Harbor Freight mill to a programmable CNC machine. This first article shows how to add a coolant system for better cuts and change the chuck to a collet holder for more precision, and to keep the damn chuck from falling
out during operation.
This article is part of a set for modifying a cheap(!) Harbor Freight mill to a programmable CNC machine. This first article shows how to add a coolant system for better cuts and change the chuck to a collet holder for more precision, and to keep the damn chuck from falling
out during operation.
The other articles detail how to motorize each axis, and how to set up a computer to drive the motors.
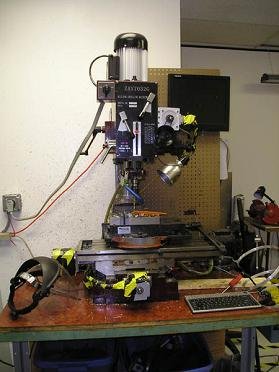
The machine I used to modify is a Harbor Freight 1.5 HP 6 speed gear head. The travel is approximately 20x8x5 stock.
Spindle
Removed the 3/4" chuck and replaced it with an R8 collet holder. The chuck kept falling out of its taper, so this was a must. Tradeoffs are that you must have the right size collet for the tool you want to use. They generally come in 16ths, but can be special ordered down to the 64th. I have a set that includes: 1/8", 3/16", 1/4", 5/16", 3/8", 1/2", 9/16", and 5/8". For the most part the set is great, the tools I use generally have 3/8", 1/2", or 5/8" shanks. The largest tool I use had to be special ordered, a 1" mill with 5/8" shank.
This mod is quite easy, just shift the mill to the lowest speed (makes it hard to turn the spindle) and remove the retaining rod from the spindle at the top of the gear head. Then drop out the chuck MT2 taper and insert the collet holder. You have to use the other retaining rod since the MT2 and R8 holders have different retaining threads. The mill came with one of each, so this isn't an issue, just something to remember.
Coolant
Milling stuff creates a bunch of heat, and without coolant, you get hot chips on your arms (always wear safety goggles). Additionally, the coolant makes the cuts come out nicer and clears the chips from the toolpath. It also prolongs the life of the tools by keeping the cutting edge cool.
You'll want to use a rust inhibiting coolant at the proper water/concentrate ratio to prevent rust. The mill is primarily steel/cast iron and happily rusts, requiring more force to move the table, and WILL cause the motor to miss steps.
Drainage
Fortunately the mill table is designed for coolant; it has a drain port stock on the right side. Unfortunately, it's not very effective and leaves a pool of coolant on the mill table that never drains. The mill is also not quite level on its mounting table, so coolant flows more towards the end that doesn't have a drain port.
I unscrewed the stock drain port and drilled it out so that the port sits below the level of the pool, all the coolant now drains out. I also drilled a new hole on the left side of the table so that the coolant pooled there will drain too.
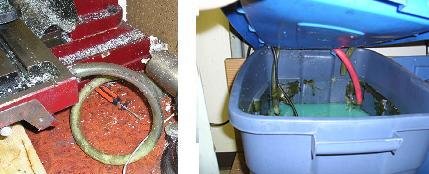
I made aluminum drain spouts on the lathe that slide fit the holes, sealed with silicone or epoxy. The hoses fit over them (make them whatever size is convenient). Ideally, the hose will fit around the entire port, so coolant will happily flow. You can also just use short lengths of pipe to hook the hose to. Use hose clamps to keep them in place. Coolant spills are annoying.
Hoses flow into a big Rubbermaid tub below the machine. These tubs are great for coolant reservoirs, 5 gal buckets work also.
Clean the reservoir occasionally. Oil from the machine gets in there and can clog the drainage hoses. Since this is a low budget system, I don't have a filter, but one could be installed on the pump if you're ambitious.
Pump System
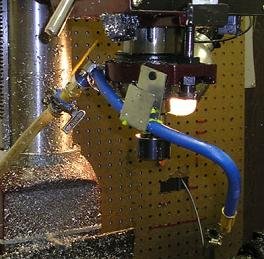
A decent pump is important; pick one that can lift the coolant high enough. The one I'm using is (I think) the 258 GPH pump from Harbor Freight. It has a lift of 6'4" which is at the minimum of acceptable lift, but it works fine. Using hose clamps I attached some 1/2" ID clear cheap hose to the pump output and it goes up to a brass flow valve, stretched over the input and silicone sealed with a hose clamp. The output of the valve hooks to a piece of nitrile hose with a nozzle at the other end, this short piece has a copper wire inside that lets you bend it and it will stay, this is essential.
You want the nozzle attached to the spindle assembly so that the spray of coolant will follow where you're cutting. I drilled and tapped two 8-32 holes in the assembly and used a hose clamp and a bent steel plate to hold the hose in place. Make sure to leave enough hose so that you can position it anywhere around the spindle to minimize splash.
With this setup, you have controllable coolant flow, and it flows back into the tank for reuse. However, a lot of the coolant ends up on the floor, or you.
Splash Guards
These are great and useful for everything from stopping sparks from hitting you while grinding to stopping coolant from getting you wet.
Cut a piece of clear plexiglass or Lexan to what ever size you want. (I have several from about 6x6 to 16x8. Glue a few magnets across the bottom edge and let dry. You can just put them on something steel and they'll prevent splash or hot chips.
I have another that is mounted on an arm with a magnetic base (stolen from a broken shop light). This allows it to be placed higher up. Additionally, you can rivet or glue some pieces of rubber to them to stop splash where you don't care about visibility. This one is great for the lathe, as it gives you a window up high, and stops splash below the window.
Quick and dirty, if you don't care about visibility, just take some pieces of rubber (12-18x6 is best) and use magnets to attach it to the table or vise to stop splash.
I'll have some pictures of the splash guard soon.
Part 2
ixupi
www.alpharubicon.com
All materials at this site not otherwise credited are Copyright © 1996 - 2007 Trip Williams. All rights reserved. May be reproduced for personal use only. Use of any material contained herein is subject to stated terms or written permission.