*Wheat Mills*
By serger
24 February 2003
When I decided to begin a long-term food storage plan I was living in Idaho in the Navy. Since at that time I couldn’t afford the food I did little to obtain it. I could however, buy a book to learn how the Premier food storage people in the area did it. The book I got was "Project Readiness". In it the author described the basic four method of food storage. One of the key components of this system was hard red winter wheat. But to use the wheat in most applications you had to grind it into meal or flour. The devices used to do this are the basis for this article.
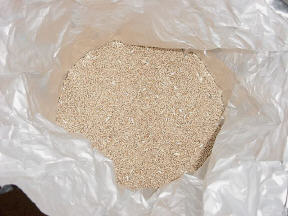
But before I get into the machinery here’s what bulk wheat looks like:
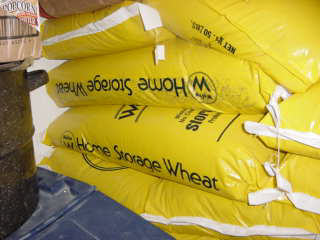
The wheat I get comes from Walton Feed. This variety is the double bagged in polyethylene 50-pound sacks. Nice to store but not real convenient to mess with.

They also peddle the wheat in 6-gallon poly super pails. They are heavy but you can open and close them with out too much fuss.
Inside the pail is the mother lode. They pack the wheat in an aluminumized Mylar bag. I find this method of storage quite convenient for me.
But anyway, back to the main story, wheat mills.
The first wheat mill I got was a stone mill that came out of Idaho. It was and is quite simple to use. You pour wheat or what ever you are going to grind into the hopper and start cranking. Be advised this is a long tiring drawn out procedure. And since the lightness of the bread is a function of how fine you want to grind it, you will work about 15 minutes of steady grinding to produce the flour needed to make a loaf of bread.
With the stone mills, you have to be careful what you grind. Grains, beans and seeds with a high moisture and oil content will plug the stones and glaze them over. This will ruin their ability to grind wheat or other fine flour grains. Most people who grind high oil things use a mill with steel grinding surfaces. The grinding surface is also known as the burr.
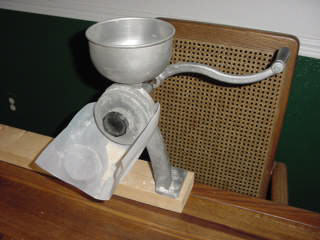
As you can see the mill has a long crank. This is to give you sufficient torque to turn it to produce the flour. Note I have it mounted on a 2X4 that can then be clamped onto a table or bench to allow it to be stored out of the way when not in use. I have made a hopper out of a 1-gallon milk container and it is held in place with bailing wire. This allows you to place a bowl to collect the flour next to the mill and not have the flour spill onto the table or floor. Believe me, when you grind your own flour by hand it becomes precious indeed. And if I had to grind wheat for more than my own family you can be sure I’d get the miller’s wage (a tenth) of the grain I ground. Grinding flour by hand is hard work. As far as I know this mill is out of production.
Another couple neat things about this mill. It has the capability to be powered by a pulley that is powered by an electric motor or a bicycle. If I had to use it on a daily basis I’d get an alternate power source than Armstrong. And this mill I purchased in Denver from a preparedness store during the same time frame that MadDog and Freya were moon lighting as workers there. It’s a real small world now that 20 some odd years later we gravitated to the Rubicon.
My brother in law knows I’m "strange" and he bought me an electric mill for Christmas a few years ago. It’s real nice (no Armstrong), produces a decent amount of flour in a reasonable amount of time, and it is fairly quiet. I still use my earplugs because that’s the way I am.
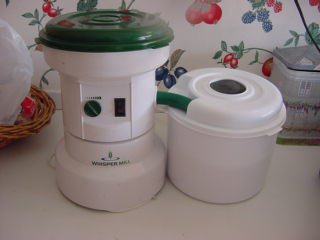
The mill has the following controls. On the left is the fineness adjustment. I grind as fine as it will go because that makes the best bread for me. On the right is the power switch. To operate it you place the green discharge tube from the wheat bowl into the white gasket to make a tight seal. If you don’t flour will fly all over the kitchen and you will have to clean it up. (Rule number one for fluid flow, verify tight mechanical connections). The dark gray circle in the top of the wheat bowl is the exhaust filter. Make sure it is in place. If you don’t flour will fly all over the kitchen and you will have to clean it up. (Rule number one of air filtration, verify seals.)
You turn on the mill and place the wheat into the hopper. If you sealed up all the places the flour can get out go away until you can hear the pitch of the blades increase. If the unit is not sealed you’ll know it.
The mill will grind in one filling enough flour to fill a #10 can with flour. I usually can make 2 loaves of bread with that much flour and have a couple cups or so left over.
If you want the electric mill I have above, here’s a link to a peddler. whispermill You can probably get them cheaper elsewhere but this is a start. If you want to know more then do a google search for wheat mills. That will point you into the direction of more information than you will ever want to know.
Thanks for the read.
serger
All materials at this site not otherwise credited are Copyright (c) 1996-2003 Trip Williams. All rights reserved. May be reproduced for personal use only. Use of any material contained herein is subject to stated terms or written permission.