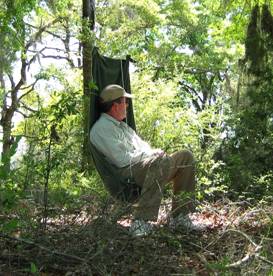
*Improvised Seating With a Towel and Para-cord*
Situation- You're on a camping trip, boating, or having a picnic and for whatever reason there aren't enough chairs to go around. The ground is wet or not level. You are looking for a place to park your derriere and there's not a rock or log in sight...but there are a few trees.
Your MacGyver mindset clicks into gear and you take a look and what you have on hand. Among those items are a large towel and of course you have a few yards of 550 Para-cord. "No problem", you say to yourself. "I read this article on the Rubicon that explained the versatility and strength of the sheet bend. There's a tree branch in the perfect spot." You set about your work while curious bystander's gaze with amazement and your best friend begins a long bantering session about all your failed efforts on previous camping trips. (This, you already know, is an attempt to hide the fact that he only knows how to whip out the credit card and has no practical outdoor skills.)
In mere moments, you are swinging gently in the breeze, off the ground, repelling request to try out the "chair" you just made with a towel and some cord. You simply smile and say, "While you are standing, could you get me a cup of ice?"
The Details- This article should probably be called, "Creative uses for the Sheet bend", but I got so many accolades the first time I did this, that I thought it would be worth sharing. I'm a card carrying member of the IGKT (International Guild of Knot Tyers). Yes, there is such an organization. I am continually amazed at just how much can be done with knots, rope and cordage. In the age of plastic buckles, carabineers, grommets and the like, we should all be mindful of alternatives. Practice your knots, folks.
So here we go. The first thing you will need is a large towel. A beach size towel works great. There is a towel called the "oversized towel" that measures in at about 32 inches by 60 inches. The width is more important than the length. I prefer at least 30 inches wide. Stay away from those cheesy promotional beach towels that are thin. You want the biggest thickest fluffiest towel you can find. You will also need some good ole 550 Para-cord. My best source for this stuff is still The Sportsman's Guide. Other rope or cordage will do fine; just keep in mind that it needs to hold the weight.
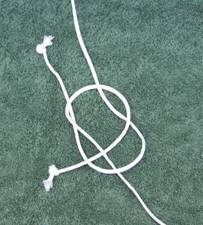
The Sheet bend- As a brief refresher, a knot is tied in one piece of rope or cord and a bend is used to tie two pieces of rope or cord together. The Sheet bend is the same thing as a Bowline, the only difference being one or two pieces of cordage. Its origin goes way back to the early days of sailing and the first printed reference was probably around 1794. As you might know a sheet is the line used to control the lower corner of a sail. I can imagine many improvisations where this bend was used at sea until a proper grommet could be sewn. It simply is the best bend when using two ropes of different sizes or stiffness. Some argue that if the two ropes are too dissimilar, the stiffer rope will cause the bend to collapse. This can happen, but we are only talking about making a quick seat, not saving life or limb. If in doubt, tie a Double Sheet bend. But I digress. Let's make a seat.
For ease of understanding, I've tied the bends in cordage so you can get a better visual reference. When tying the towel and cord together, as with all Sheet bends, the "bight" must be made in the larger of the two cords. This is something to always remember. Also note that a Sheet Bend has the "tales" hanging out on the same side. If they aren't, you have tied a left-handed sheet bend and it is not as secure.
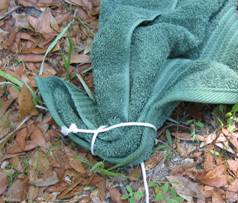
Here is what it looks like when the towel and cord are tied together. Note the bend has not been drawn tight.
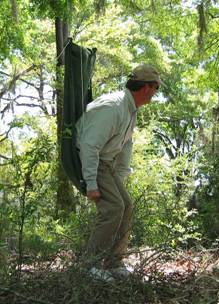
So with the understanding of the sheet bend, we are back to our situation of erecting the seat. You've found a good branch, you've got your cord and you've got the towel. Toss the cord over the branch and begin tying the sheet bends to the towel. You only need to be concerned with tying the bends even on the left and right sides of the seat. As you will see, the seat is adjustable from sitting to reclining. I think you can get the picture. Here's the seat empty and hanging after it has been tied.
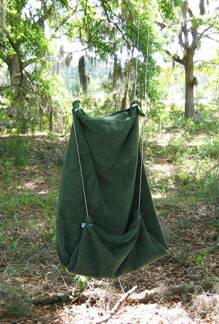
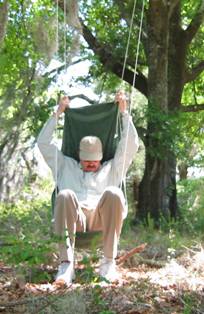
At this point the curious onlookers are wondering just how you are going to use this contraption. And now for the entry...
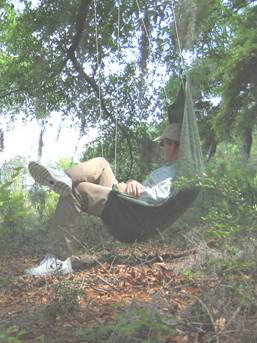
Simply grab the lower corners of the seat and slowing sit down. This is point in time when you will find out if your knot tying skills are working for you. Once you have a seat you can sit in a semi-upright position or reach back, grab the upper back corners and give them a stern pull. You'll notice your feet and legs being lifted up...presto...you are reclining!
With very little practice you can set one of these babies up in about three minutes. The beauty of the Sheet Bend is that, like the bowline, no matter how much weight has be put on the knot, it is very easy to untie. As a side note, I find myself tying figure of eight stopper knots in the ends of the cord. If you find that the sheet bend slips then you need to get more "bight" out of the towel.
So there you have it. Give this little gem a try and I think you'll find it useful and fun. The Sheet Bend can be used for tying off a tarp when there's no grommet, making a sling out of a bandana or just "fix'n stuff". To quote Trip, "If it hasn't been tested, it doesn't work." This thing works. Enjoy...
All materials at this site not otherwise credited are Copyright © 1996 - 2003 Trip Williams. All rights reserved. May be reproduced for personal use only. Use of any material contained herein is subject to stated terms or written permission.