* Stock Removal Knife Making *
By serger
Cutlery From Junk
Most people look in awe a custom built knife and to be brutally honest some of the blade smiths out there are artists and visionaries in steel. Unfortunately I’m not one of those and that’s not what this article is about. I’m going to show some of the crude hand made cutting devices as I have fabricated them and to give some pictorial evidence that you can built them at home. They will not win the American Blade Smith Award but will give decades of use without complaint and probably have the real possibility of being heirlooms.
There are basically three processes I am aware of that will produce metal knives:
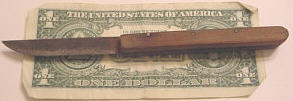
The first knife I ever made was sanded out of a piece of hacksaw blade. I had just read the book "One Day in the Life of Ivan Denisovich" by Aleksandr Isayevich Solzhenitsyn. This novel was about a zek (political prisoner) in the Gulag Archipelago, or Soviet Political Prison System. In the novel the knife Ivan had was called a "fiver" because if you were caught with it you had five years added to your sentence in the Siberian wasteland you were carving a home out of for the Mother Soviet. I was fifteen years old and just learning how brutal the world could be.
This knife now lives in the garage in a tool can. I use it for cutting string and small things like that. To make it I took a hacksaw blade and placed it in a vice. Then I cut off the teeth with a fine-toothed file to make just a strip of metal. To get the contour for the tip required placing that part in a vice and judiciously breaking off metal until the rough outline of the curve was obtained. As I recall the next thing was to use the concrete curb in front of my house as an abrasive and grind the curve smooth. I then took the knife blank and placed it in a clamp and ground the edge bevels with a file. The final sharpening was done with 220 grit sand paper and finally a sharpening stone. There are three pins holding the scales (wooden handle pieces) in place. Those pins are made out of 14 gauge electrical wire. To penetrate the hacksaw steel I used a hand drill. The scales themselves are just some walnut scrap I got from the trash bin in the schools woodshop. It was as close as I could come to make a fiver.
Then during the same time frame I was cleaning horse stalls and there was an industrial hacksaw blade that had been in a fire I found. The blade had been broken and the temper had been knocked out of the steel by the heat of the fire. Still back then, with my almost stone age methods of metalworking, it was very tough to make. I took a file and spent a couple weeks filing away. The Gulag knife had impressed my friend Mike as we called it and he found some brass rod stock that we drilled and used to attach the scales. We went to the hobby shop to get some nice wood for scales and pinned them on. Later I tore the knife down and tried my first baby steps at case hardening to put some temper back into the blade. I knew nothing about that process other than what I’d read in books so what I did was to grind up some charcoal into powder and mix it with Vasoline into a paste.
I then took the paste and heated the steel with a torch and painted the mix onto the edge area. After several applications (I recall three) the edge of the knife was hard and would hold an edge while the back part of the blade called the spine could still be cut with a file. That was when I took off the teeth from the front of the top of that blade. Later I tried my hand at home bluing and this steel took a nice blue. By that time I was using a motorized drill and I drilled out the blade and attached the scales with the brass rod and epoxy.
.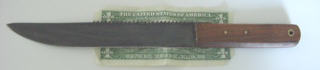
This butcher knife cuts well but being over thirteen inches in length is kind of awkward. I did find a brass plug that fit the original pin hole and after drilling it out for several years this knife hung from a lanyard and was used to cut bread. Kind of a tough way to end up considering I had dreams of using it like a Bowie. In reality the thickness of the steel being about 3/32nd of an inch makes this a good food knife but a lousy fighter.
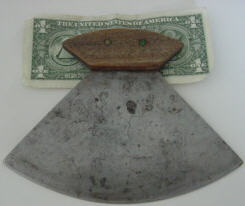
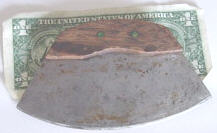
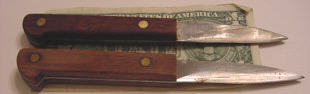
While we are on the subject of kitchen knives I’ll show you the next two. They are of the ULU patterns that are predominately from the far northwest. The Indians up there originally made knives out of seashells and these patterns were later transformed into steel. They were both made from circular saw blades and they were both cut out with power tools. I used a dental drill with a sectioning blade to cut the rough patterns out. They were then finished with a disc sander attached to a 3/8th inch drill. I used walnut for the scales and epoxyed and pinned them in place. You can sharpen both with a file if you need to. The large scalloped one will easily chop bone and break up frozen meat. The smaller one is good for scrapping meat off bone and I use it when we butcher Elk to get the most meat off the bones (hey, they don’t give that stuff away). Since they both have large curved blades, the large one with almost ten inches of cutting edge, they cut meat very well and can dice vegetables very easy. The large one could easily amputate whatever appendage bothered you up too and including shoulder disarticulation, it chops that well. FWIW they were made out of chromium steel. And it’s about time to scour the light surface rust off them. They are both well over twenty years old.
At one point I made a set of steak knives. As I worked on them I used the prior knife as the pattern for the newest member of the family. That is a gross mistake and now if I’m going to do something like that I make a pattern and use it. In the picture below you can see the first and last of the knives. See how the error was amplified. There are six in the set. And they all work fine, it’s just they are different sizes.
Now that you’ve seen the house knives I’ll show off the fighters with a little discussion on each. The first is a punch dagger. They were used in the Middle Ages to allow you to defeat body armor. They still work the same way. The one in the picture below started life as a section of leaf spring out of a ¾ ton truck. The section was flattened out prior to the failure of the spring because it was flat when I found it. The idea for it came out of a book on medieval weaponry I read while in Conroe Texas when I was in high school. Its fabrication process was similar to the ULU’s with the exception I broke out the pointy edges after scoring them. It took a big sledgehammer and a big vice. I then finished the edge bevels with files and made the cutouts for the handles with hacksaws and breaking out the waste metal. After breaking out the waste the contours were filed out with round files.
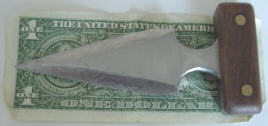
The whole idea behind the punch dagger is to concentrate the force of a mans blow into the area covered by the blade. In this case the blade is over a quarter inch thick and at widest about an inch and a third. The bevel of the edge is so thick it’s not really good for cutting except at the tip. It could easily have a Kevlar vest for lunch.
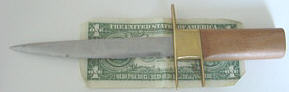
The next one is a double-edged dagger I made during one six-month deployment in the navy. I used a table grinder to get the contour for the edge. The handle area is just steel. I took that part and annealed it with a propane torch to make it easier to cut. The blade is thick but very sharp. I removed the brittleness by heating it and the quenching it in oil. We then put it in a bearing heater to make the temper hard and tough but not brittle like file steel. The rest of the forming is just a piece of oak hardwood backing 400 grit wet/dry sand paper, and sanding, and sanding, and sanding.
I’ve also tried to home blue this knife but the steel is different than the big butcher knife above and the bluing wouldn’t take as well. If I had to really use this I would have no qualms at all. One last thing, the handle area still has the teeth. That makes the thing easy to grip.
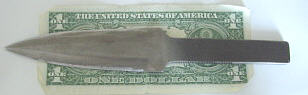
The next knife was an experiment in boredom, and revenge. I made this knife on the deployment after the last knife. It started out as a file I was making into a hunting knife. After I had roughed out the shape I got a letter from my wife (we’re still married by the way). A neighbor we knew had starting making unwelcome advances toward her. This guy was about to get out of the navy in a few months and had sent his wife and children back home. In the mean time he was hitting on my wife. My ship was due to come home in 4 months and there was nothing I could do about it. SO I went to the propulsion plant, stood my watches, did my maintenance and ground this knife out with 220 grit sand paper. The cross guard was a discarded dogging lug pad from a weapons elevator door and the wooden handle was from a broken long handled scrub brush that all the ex military readers remember as those they cleaned garbage cans with. It’s glued together with some aviation epoxy I scrounged.
I got so weird my LPO (Leading Petty Officer) finally asked some of my friends why and what was going on. They told him and after a talk with the legal officer the guy who was hitting up on my wife got restricted to his ship until his discharge. He was then escorted to the Virginia state line by a couple of Brig chasers. I never had the joy of sticking him and now looking back, it’s for the best. But I wanted to real bad.
The last knife is a skinner I made after I had handled a Schrade Sharp Finger. This knife is a circular saw blade that’s been cut down with a disc sander on a drill. I made the nice curves and contours with a file and the scales are Walnut because I like the look and feel of it. In fact walnut suits me.
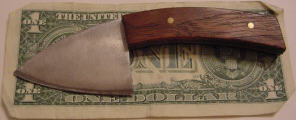
I call it Leonard Skinner and it peels the game out of their hides. You hold it with your index finger extended on the spine of the blade and draw with it. It works well.
Now that you’ve seen some knives I’ve made let me show you a couple things that are in the process of becoming cutting instruments. The first is a leaf spring that I’ve started working on to become a cleaver. It weighs slightly less than four pounds and I haven’t started grinding the edge because I’m still working on the handle area. I used a cutting torch to anneal and soften the handle area to save on the files. It’s still tough but not to the point of rapidly dulling files. The blade area is spring steel, imagine that One bad thing about this part is there is still some of the arc left in the metal so I had to place the curved side to swing away from my body whils chopping.
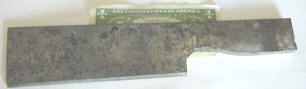
It’s about 15 inches long and will be quite effective when finished.
The last piece is right now just a rusty file but inside it is a very nice fish gutter. Can you see it? Kind of long and thin with a thick enough spine it’ll slice without bending too much.
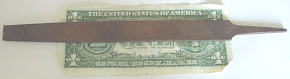
Doesn’t look like much does it? There’s a knife in there trust me.
Now to the methods I use. First things first, I try real hard to stay away from heat-treating metal because I’m not that sure of my skills there. because I’ve never taking the time to learn the ways of it. I also never grind or sand the steel until it’s so hot I can’t hold it. That way the temper stays in the steel. If I have to temper a piece I do oil quenching and then pack the piece in lime and bake it in the oven at about 500 degrees for a while. What happens there and why I’m not going to explain here. An old guy I respected said to do it that way and if you had good steel and enough of the right oil temper the blade would be good and tough. It would hold and keep an edge without too much trouble. I do the monkey see, monkey do thing and it works to me.
Next to do the grinding, you need a place that you can grind or file or what ever you need to do. I use a piece of 3/8th X 1.5-inch wide flat stock steel. This steel is bolted to a workbench that I can rest my hands on without leaning over. The strap steel acts like a tongue and protrudes off the edge of the workbench about ten inches. I can then clamp the knife blank for cutting flat on the strap and make a pass with my cutting instrument. I use C clamps and Vice grips to hold the work. I then unclamp the blank and rotate it for the next cut. That way the contour of the sides of the edge end up matching and you have a balanced blade. The fixtures to do the cutting and grinding are not much more than this for what I do. I use either a smooth or bastard cut flat file for most of the rough work and a triangle file for the tight areas. To grind I use a disc sander on my drill with sand paper. I also wear the safety glasses and that’s all there is to it.
So what did the little above exercise do? Well it showed you that someone with almost no specialized tooling and no training could make things that can cut. You can do it also. And if you’re like me and are leery of heating metal to soften and harden it, if you start with a decent grade of good old carbon steel and take you time you can make very nice and functional tools that can give years of service (the Gulag knife is almost in the third decade). I really hope you look at this stuff and maybe try and cut out a knife blank out of a worn out saw blade. They make nice knives and you really get a kick out of being able to do it your self. The self-reliant applications are obvious.
Thanks for the read.
serger
www.alpharubicon.com
All materials at this site not otherwise credited are Copyright (c) 1996-2002 Trip Williams. All rights reserved. May be reproduced for personal use only. Use of any material contained herein is subject to stated terms or written permission.