My Minimum Wilderness Survival Kit
We all train and prepare for as many emergency scenarios as possible, and I'm sure many of us have accumulated a sizable quantity of gear. One of the scenarios that I presently occupy my time with is long term wilderness survival with as little equipment as possible.
Now, some primitive skill enthusiasts may chastise me by saying that I should learn to survive with just the clothes on my back and NO equipment. The only reply I can make to that is that I know my limitations. I've tried learning flint-knapping and can't do it. For me that is a skill someone will have to teach me face to face. My cordage making skills are barely passable- light duty and short (I have problems with the splices that I'm still working on). Making fire with a bow drill is about 50-50. I want something that will get my fire going every time…
Because of the above problems, the kit I developed for myself is what I feel comfortable with in a minimum gear situation;
1. Fire kit and Arrow fixins' + ; This is a soft leather pouch that hangs around my neck and contains (mostly in a soap dish):
Arrowheads
I'm not a fan of expedient arrowheads and I'll avoid them if I can. Also, all of the manufactured 'heads that I've seen are just too bulky (IMO) and that might tempt you to carry only a couple. If you miss your target (hey, it happens) you can expect your arrow to locate, close with, and destroy itself on the nearest hard object. The following arrowheads are easy to make, light, and don't take up a lot of space, so I believe they are worth the effort.
I make mine out of used 7 1/4" and 10" saw blades that are beyond being resharpened. I think size is a matter of personal preference but from the 7 1/4" blades, I make small points for small game, and from the 10" blades I make broadheads for both large game and self-defense use against two-legged predators.
They are cut and shaped using a cut-off wheel and grinder, cleaned up with a file, lightly sanded to get rid of the rough edges and then sharpened. You can heat treat them (I do with the large ones) but the little ones get too brittle and you don't want them to break easily.
Fletches
There are three ways to go about this. You can buy them, you can scrounge for feathers when you are in the field, or you can make them. I chose to make my own simply because I like making stuff and you can never be sure if you will be able to locate usable feathers in the field.
I made mine from empty 1-qt oil jugs. I always have a couple boxes of empties sitting around. Just cut the sides out with a knife, clean the oil off, then with scissors or a razor cut them to the shape you want.
Since I don't like slitting shafts I take the fletches and set the edge
on a moderately hot piece of steel until it begins to form a thicker "bead"
of plastic (like a feather quill). You can then trim it until you are able
to bind it to the shaft, much like a feather.
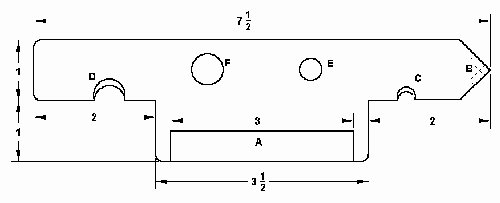
The BArrow Tool
BArrow stands for Bow and Arrow… It is a multi-purpose device used to aid me in the construction of bows, throwers (atlatls), arrows, atlatl darts, and anything else that requires extensive scraping and shaping.
*Dimensions are in inches
BArrow Tool Features
Other Options and Uses
The above is the tool at its most basic. I'm sure that you can think of other features that could be incorporated into the design. I am going to make another one and this time I plan to add:
I made this from a piece of 3/16" thick O-1 tool steel (annealed) although I'm sure that steel from leaf springs or thinner stock can be used as well. All holes (C, D, E, and F) were drilled before cutting/grinding to the shape I wanted. Make sure that the straightener holes are chamfered slightly on both sides before heat treating to prevent stress cracks. Once all the bevels were applied and I was satisfied with the way it looked, I fired up the forge and slowly brought the steel up to temperature.
The way I understand it (for O-1 & other carbon steels at least), by testing the steel with a magnet you can tell when the steel is ready for quenching. Once it reaches a nonmagnetic state, let it set for a minute or two longer (for thick pieces this will ensure that the critical temp is reached through the whole thickness) then quench in used oil. Do it outside and be wary of any fire that may occur during the process.
Leave in the oil until the tool has cooled enough to hold in your hand. The hardness of this piece will be approximately Rc 64-65. That's too hard to withstand any real stress so the piece needs to be tempered to approx. Rc 60-62. This is plenty hard enough to keep an edge and still be sharpenable, however, if you plan to use it as a pry bar then you will have to draw the temper down a little bit more (say Rc 58-60). To temper, first clean off ALL of the oil and scale and heat up your oven to 450 (475-500 for lower Rockwell) degrees. If all of the oil isn't off of your tool, you'll likely end up with a smoky mess in the kitchen and one ticked off wife. Once the oven has heated up, put your tool in there and let it set for about an hour and ten minutes. It should come out a nice straw color.
There is a lot more to heat treating steel than this but I'm still learning myself and tried to keep it simple and describe what *I* did. PLEASE REMEMBER to exercise good workshop habits when making the BArrow tool. Wear safety glasses or face shield, gloves and hearing protection.
I hope you have as much fun making and using your gear as I did!
Recycler
![]() Send
Warlord E-mail.
Send
Warlord E-mail.
Address: 
www.alpharubicon.com
All materials at this site not otherwise credited are
Copyright (c) 1996, 1997, 1998, 1999, 2000 Trip Williams. All rights reserved.
May be reproduced for personal use only. Use of any material contained
herein is subject to stated terms or written permission.