
*Survival Tips 101*
Recently at a Girl Scout training weekend I attended a "Survival Tips 101" class taught by Tina Smith. Tina is associated with the Greater Philadelphia Search and Rescue organization, is a certified tracker, and has been doing search and rescue for years. I found the class to be quite informative and learned several new tips. The following is a summary of my notes that I took during her class. I summarized the notes into "rules" to organize the material and emphasize key concepts that she discussed. Hopefully you will find something new and useful in her ideas.
Rule #1: Be Prepared
Whenever you go out into "the wilds", even if it is in your "own backyard" or you "know the area like the back of your hand", make sure you take "stuff" with you. There are some items that should always be with you whether they are in your pockets, a fanny pack, a backpack, or whatever other type of carrying bag you take with you on your adventure. It is not necessary to pack 50 lb of gear every time you go anywhere, but it is important to have some basic survival items for that remote chance that you actually need them (items discussed later).
When you go into the woods, tell someone where you are going and when you should be back. While "slipping off by yourself" may sound romantic, it could be a disaster if you get lost. By telling someone your tentative itinerary, they can alert the proper authorities if you don't show up within a reasonable amount of time (based on when you said you would be back) and someone can be sent looking (based on where you said you were going). It is also a good idea to leave a note in the window of your vehicle describing where you went. If you get lost, the rescue team can see what your plan was when you left your vehicle. This action is particularly important if your plans changed from the time you talked with your family/friends and the time your outing actually started.
Rule #2: STOP, Think, and Don't Panic
If you feel yourself becoming "misplaced" (i.e., lost), it is very important not to run around and get crazy. Stop and assess your situation. Where are you? What is around you? Do you recognize anything? What resources do you have (including the stuff in your pockets, fanny pack, etc)? What time of day is it? Is it close to sun down?
Just the act of analyzing these things can get you focused and help keep you from panicking. Running around crazy just burns up energy and water and doesn't get you in the proper mindset to deal with the issue at hand - surviving.
Rule #3: Remember: Warm, Dry, Sheltered, and STILL
Finding shelter to stay warm and staying dry is VERY important but so is staying still. If someone is looking for you, it is much harder for him/her to find a moving target. Unless you know there is a landmark nearby and you have some reasonable chance of finding it (maybe you have a map and a compass), you are much better off finding/making a shelter and staying put. You not only can stay warm and dry much easier, but you will also have a much better chance of being found sooner.
Make sure that your shelter is a "cozy waiting place" and not a "hiding place". The point is to stay warm while the rescue team FINDS you. If your shelter is too hidden, they might just walk by your shelter and never find you. Use aluminum foil, a brightly colored cloth or bandana, or other items to make the shelter obvious and visible. Do NOT use your clothing for the flag/signal; use clothing to keep you warm. Other ideas of things that can be used are money, hair ribbons, and white paper. Another idea is writing "HELP" with rocks or sticks with an arrow pointing towards the shelter.
It is very important to maintain the proper body temperature. In cooler climates, staying warm to avoid hypothermia is very important. The following are several tips concerning the subject of staying warm.
Rule #4: Watch for Behavioral Changes
If someone starts to stumble or becomes uncoordinated check forRule #5: Don't Rub Cold Hands
If the hands are frost bitten, rubbing them will tear the skin up the same way rubbing frozen hamburger causes it to crumbles into pieces. The cells have ice crystals in them, and the rubbing motion causes the ice crystals to cut up the skin. Better options are to put your hands into your arm pits, blow on them, or use warm (NOT hot) water.
Rule #6: "Stuff" List
A good list of items to take on a hike with you (or any time you will be out in the "wilds") includes:
Rule #7: Sources of Water
Drinking water is necessary to survive but be very careful where you get it. It is recommended to NOT go near any large bodies of water. Instead, drink from a supply that is smaller than you are so that you cannot fall in. Fast moving water is considered "ok" to drink but stagnant water (in ponds or puddles) should not be used unless treated first (e.g., boiled, bleach, water purification tablets, filtered, etc.). Other sources of water from nature that you should consider include dew collected overnight (use plastic bag or leaves), water out of moss, and sap from wild grapevines.
Rule #8: NEVER Eat Mushrooms
Mushrooms are too tricky to figure out if they are safe so avoid them.
Rule #9: Edible Foods
There is a lot of edible food including white pine (needles and underside of bark), dandelion, plantain, seeds from grasses, and acorns. If you are going to be out in "the wilds" a lot, it is advisable to take a wild edible course for more information on the types of foods that you might find in your area. This information could be very important if you get "misplaced" in a wooded area.
Rule #10: Four Fingers Rule
How can you tell what time it is? If you put your four fingers together and site with the bottom finger on the horizon, every finger counts for 15 minutes. So, one hand up from the horizon is 1 hour past sun rise, 6 fingers would be 1.5 hours since sun rise, etc. It is amazing how well this works, even for a beginner. For getting an accurate time, the only trick is having some idea when sunrise actually occurred.
More importantly, this trick can be used to determine how many hours till sun set, not necessarily what time it is. It is recommended that you start building a shelter no later than 1 hour prior to sunset so that you are warm, dry, and settled before darkness hits.
Rule #11: Moving in a Straight Line
If you break Rule #3 (the staying still part) because you "know where you are going", how can you make sure you are going in a straight line and not just walking in circles?
Something that can help with this process in a heavily wooded area is using surveyor's tape. It is brightly colored and plastic and can easily be tied around a branch. Pink, orange, or yellow are good colors since they are not used by rescue teams (at least in my area). You could even write "HELP!" on the tape if you have a sharpie. The rescue teams also will have an idea of where you have been and may be able to find you easier.
A note about surveyor tape: Rescue teams do use this material in their search and rescue operations. They tie it around trees and write notes on it - team #, time, date, etc. Every time a team sees a tape they are suppose to check it and write their information on it (unfortunately not all teams are conscientious). If they find surveyor tape without notes, it SHOULD be a tip to check it out
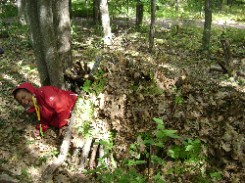
Rule #12: Debris Hut
Even if you carried nothing into the woods with you, you can still make a shelter out of "debris" from the woods. These types of shelters are called "debris huts".
To make the debris hut you use a long, preferable straight stick and put it into the V of a tree - this is the backbone. You want the stick that you use for the backbone to be as longs as your height so you can lay down straight and have enough room while minimizing the air space that needs to be warmed. Then take other sticks and teepee them along both sides - the ribs off the backbone - leaving an opening near the tree on one side so you can crawl in.
Cover the ribs with bark, fern (make sure you layer the fern fronds like you would roof shingles so that the water runs off them), or moss. Then cover with a thick layer of leaves. Also fill up the inside with leaves for added warmth. You can also put moss, fern fronds, etc. on the floor to make it more comfortable.
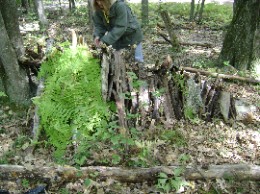
If your hut blends into the surrounding too good (ours did), make sure you put your aluminum foil or a brightly colored bandana somewhere so the searchers can find you.
While I hope you found some of this information useful, I hope you never need it!
www.alpharubicon.com
All materials at this site not otherwise credited are Copyright © 1996 - 2008 Trip Williams. All rights reserved. May be reproduced for personal use only. Use of any material contained herein is subject to stated terms or written permission.