*Safe Room Squirrel Cage Fan*
During "The First Gulf War" Saddam Hussein's forces fired Scud Missiles, almost blindly and randomly, into Israeli population centers... ALL Israeli citizens are issued gas-masks by the government, which they are required to carry with them at ALL times, with very few exceptions. The people of Israel have LONG lived under the constant threat of being hit by Chemical and/or Biological Weapons. I watched TV News as frightened Israeli parents donned Gas-masks during the Scud Missile attacks, since Saddam had promised Israel that if Iraq were attacked, he'd hit Israel with Chemical Weapons via Scud Missiles... Later, I watched in Horror as a report came out saying "the known Death Toll of Israeli CHILDREN" was still rising...
See, during a gas attack, parents should put their masks on FIRST, then those parents put gas-masks on their children. That SOUNDS horrible, I know.. Our initial instinct is to "Protect Our Children FIRST". However, the logic goes more like "If YOU die during the Chemical attack, then there's no one left to put masks on the children, or to care for them". Put YOUR mask on FIRST, Then put the masks on the Children! Israeli citizens know this... So that's how they donned their masks... However, MANY children HATE gas-masks being on their face, and will fight frantically to get the mask OFF. Many parents have to physically hold the mask in place on a struggling child's face. And THAT is where the tragedy began...
...In an environment that the parents were SURE was tainted by Gas or Biological Weapons, Frightened and distracted parents put gas-masks onto the faces of their children, the children began struggling to get the masks OFF, the parents held the masks in place... eventually the children stopped struggling... some of the frightened parents had forgotten to pull the "Seal Tab" off of the bottom of the Filter of their Children's masks... This "Seal" or "Plug" protects the gas-mask filter from dust and decay and foreign objects and even "gas" while the filter is being stored, but once the filter is on the mask, you pull that seal/plug off of the bottom of the filter, or you can't breathe!!! The horrified parents found that their children were struggling to remove their masks, not just because they didn't like the masks on their face, but because they couldn't breathe! The parents realized that they had held their struggling child's mask firmly in place, while their children suffocated to death...
I have nightmares about that to this day, and probably always will... It's no secret that I, as a parent, have a huge soft spot in my heart where children are concerned... I'm also an Engineer.. "Engineers fix things, we find solutions to problems".
"WHAT IF" one device could protect an entire apartment or home against a gas attack? "WHAT IF" parents didn't have to desperately worry about their struggling children removing a gas-mask in a Chemical or Biological Environment? "WHAT IF" parents didn't have to worry about their Children accidentally suffocating to death? The solutions are out there, but I found that the costs were prohibitive for the average person... Still "There's ALWAYS a way, you just have to find it"... That's what Engineers do best... So....
I just finished building and testing a new saferoom fan. These are the fans many of us bought from surplussales.com, he's sold completely out now.
(Updated 06 September 2004: Kwll found a good fan at Http://www.grainger.com.. Item Number "4C447". He's built a "Fan in a can" also, so we know it fits into an ammo can, and it's rated for a load as high as 0.500 inches of static presure! The fan is rated at 265CFM at 0.0 inches of pressure, and will still put out 135CFM even at 0.500 inches of pressure! Price is around 65 bux. See Kwll's Article HERE).
About the Fan
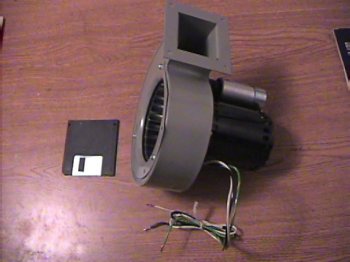
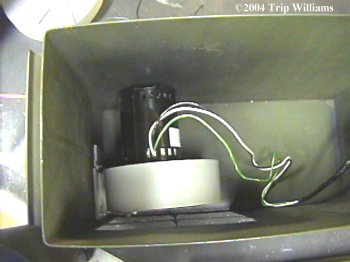
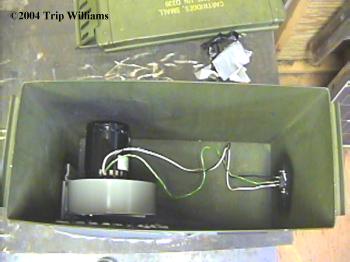
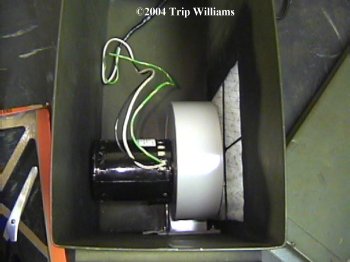
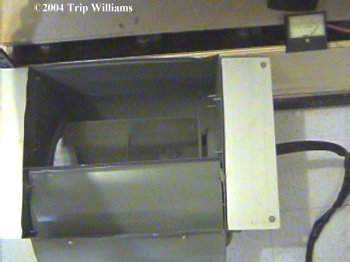
The fan used in this article is a Kooltronic 200CFM (Cubic Feet per Minute) fan. It is rated at 1.4 amps at 115VAC (About 161 Watts). It's a pretty small fan, but it moves a LOT of air. Plenty for two or three normal sized rooms when used as Saferooms.
..but first let me stress that not all Squirrel Cage fans are equal. Pay attention here, this part is CRITICAL... You want a fan that has a "Load rating" on it, it may say something like "Air Flow @ 0.100 Inch Static Pressure 200 CFM"... that means it was designed to pull/push air through a load (Like pulling air through a filter, or pushing air into a saferoom with a positive pressure on it).. the "CFM of air moved" is misleading. A box fan will move 300CFM easily @0.000 inches of static pressure, but with a filter on it, it won't move ANY air... so you MUST have a squirrel cage fan that has a "Load rating" on it.. if it has no load rating, it was NOT designed to move air through a filter! A non-load-rated fan will get VERY hot and may burn up from the extra work it is trying to do while pulling air through a filter. Fan motors designed to work against a static pressure are wound differently than fan motors that simply move air from one place to another.
A typical rule of thumb is, "Fan Blades do not work well for pulling air through a filter. You need Impellers (like the fan shown here)". But as I said above, you need an impeller fan that is rated to move air against a load.

Modifications and improvements to the NEWER "Fan In A Can", which accept multiple types of filter media, can be found HERE.
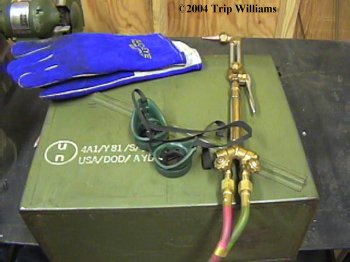
Building The Fan Housing
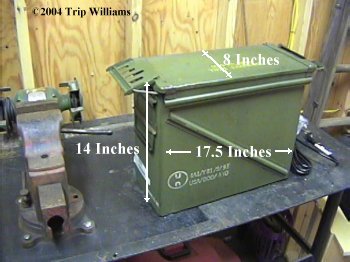
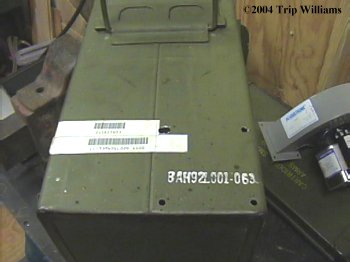
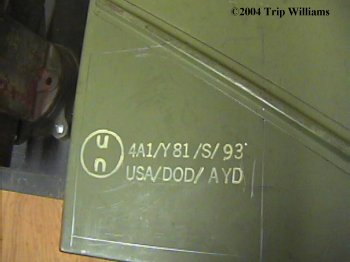
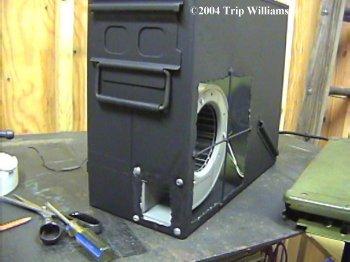
I decided to use a large ammo can as the fan box. The Dimensions on the Box below are CRITICAL! Many "common ammo cans" are smaller, and your fan will not fit into them! When buying the can be SURE of the size specs! Some companies even advertise larger specs, and then when you get the can you find they were not measured!
Putting a squirrel Cage fan in a box is almost a "must" since ANY hole in the fan casing will allow incoming air to bypass your filter. Motor bolt holes, a bad joint, the motor-shaft coming through the fan's side wall... all of these things are potential areas where a virus may get sucked into your fan, bypassing the filter, Therefore ANY air that gets inside your fan needs to be pre-filtered. Once the Ammo-can is sealed up the only air that gets inside the can is air that's been drawn through a filter, therefore any air coming out of the exhaust port into your saferoom is guaranteed to be pre-filtered.
Viruses are typically around 0.1 microns (Some are much smaller, but the ones that concern us are larger). Filtering air down to 0.15 microns is tricky and requires a LOT of care when building your fan housing. Small pox and most influenza viruses are smaller than 0.1 microns... comparitively, Anthrax spores are HUGE (Which is what this project was originally designed to filter). To put that into perspective, a virus is about one BILLIONTH your size... a hole the size of this Period, "." will let in over a million Virus particles. So make sure ALL seams and holes are well sealed!
It seems impossible to filter out Viruses, But to the best of our knowledge, to spread airborne, a virus particle must be attached to another particle that is 0.4 microns or larger (Water droplet, bird feces, pollen, etc)
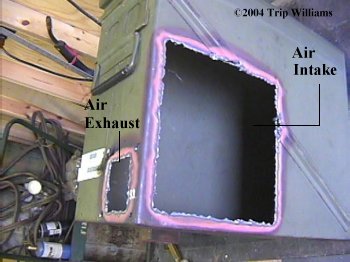
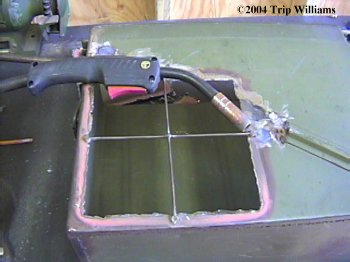
I started by putting the fan inside the box like I wanted it to sit when running, and I marked the bolt holes of the output flange onto the inside of the box with a pencil and drilled them. Then I removed the fan, matched the flange holes up to the OUTSIDE of the box and marked around the flange. This gave me the ability to measure in a few inches from the square I drew to be able to mark where the exhaust hole should go.
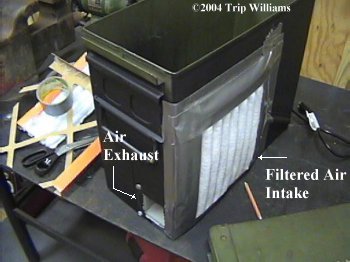
Once that square hole was marked out, I marked a hole about 8 inches square on the side of the box where the intake for the fan will be.
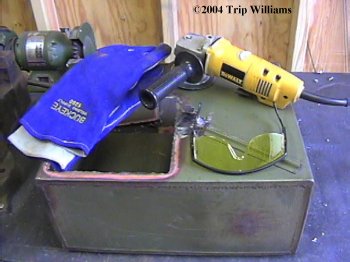
At this point, I could have used a sawzall to cut out the square holes, but I had my torch handy and I figured it would be faster to cut the box using that.
I also popped a hole in the other end of the box for the power cord to come out. I don't like the cord sticking out of these fans, so I just eliminated this and replaced it...
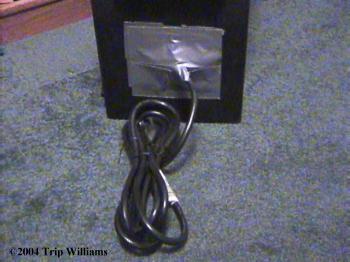
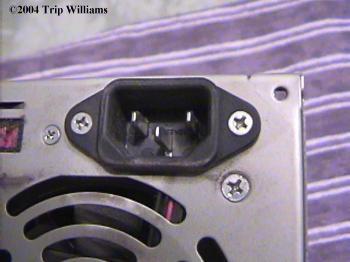
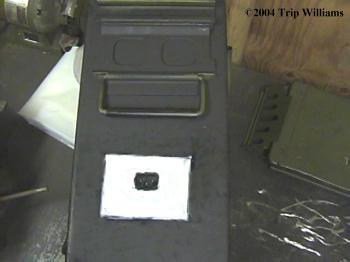
I pulled this countersunk AC outlet out of the back of a dead computer's power supply and put it on the ammo can where the old power cord came out... I cut a thick plastic plate to go over the existing plug hole in the ammo can, and then used silicon between the plastic plate and the ammo can, and then applied silicone sealant around the plug area inside and out:
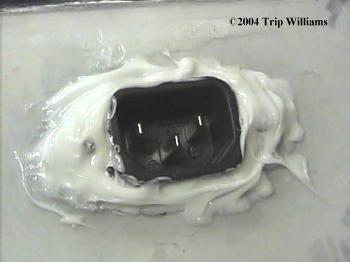
BE SURE that you seal up the tiny gaps between the metal contacts and plastic housing in the plug shown above! The gaps may not be easy to see, but they ARE there! That's why we cover the back of the plug with silicon also, inside the can where the internal power wires are connected to the plug. Apply your silicon so that as you cover the back of the plug housing it forces silicon sealant into those tiny gaps and it'll take care of the problem. Now I just have to use a computer plug cord to plug into the fan... when the fan is not in use, the cord can be stored inside the ammo can.. then you have a truly self contained setup with all the parts stored inside..
Anyway, back to the initial Box construction... I just used my DeWalt side grinder to knock off the slag and smooth out my torch cut. NEVER leave sharp edges, you don't want to have to fight off an infected cut while you are cooped up in your saferoom ;)
Since the fan draws air so hard, I was concerned that it might suck the filter loose and drag it into the fan blades. So I simply tack welded two stiff wire cross-bars over the filter hole. This will support the center of the filter and keep it out of the fan.
Once that was done, I sanded and painted everything.
When the paint dried, I bolted the fan in place (Using Weather stripping to seal the exhaust flange to the inside of the box). I built up some Weather stripping under the fan between the housing and the bottom of the box. This gives the fan some additional support and keeps down any vibration and noise caused by it.
I cut 2 pieces of 0.1 micron filter material and put it over the intake square on the side of the box using good quality duct tape. Make SURE no air can get into the box by bypassing the filter area! Tape it Good!
Yeah, it's Ugly as sin, but it works. I'm going to add a better filter holder later tonight.
This whole thing took less than an hour to build.
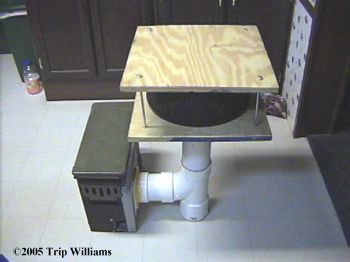
I put the top on the box (It has a heavy rubber airtight seal), and put the exhaust port into the safe room. I have a small square cut in the door plastic that mates with the exhaust port.. I duct taped the door-plastic to the fan's output port, and turned it on. (Later I'll add a square pipe out of the exhaust port so it's easier to fit into the hole in the saferoom door).
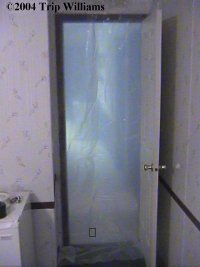
After just a minute, the plastic on the door bulged out and the barometer started to rise. It slapped a positive pressure on the Master Bedroom, the Office and the Master Bathroom just that fast! Viruses can not move upwind, so you want the pressure inside the saferoom to be greater than the pressure outside of the saferoom... this means that air is flowing OUT of your saferoom at all times.
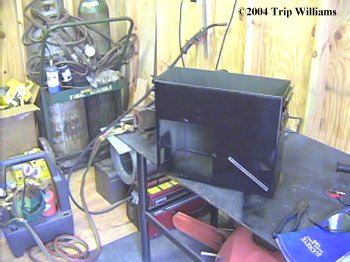
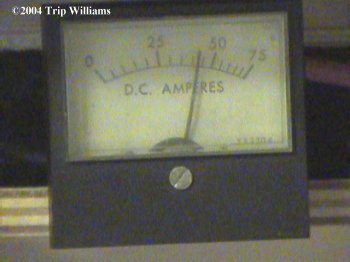
Anyway, running on our Xantrex (Trace) inverter on our alternate power grid, Filtering at 0.05 microns (PLENTY small enough to stop most all viruses), it uses 171 watts, and you can't breath with your face in front of the exhaust port, it blows too hard :)
Our exhaust valve in the safe room usually "Burps" every few seconds with our larger primary fan on low (It's a monster fan for the whole house, but it also pulls monster wattage ;).. with this fan it goes "brpbrpbrpbrpbrpbrpbrpbrp", which means there's more pressure on the three-room Saferoom area using this smaller fan-box than just depending on the primary fan to pressurize the whole house.
This little fan is working MUCH better than I expected, in fact, it's perfect! If your house is sealed, it may even do the whole house, but it'd take a while to get the initial pressure on. With our three room safe area, it's "Perfect".
I am VERY please with it.. I let it run about 45 minutes and the motor stayed cool inside the box. At the end of the test, the watts had come down to 170.5, I think the motor needs to be broken in, and if that's the case, it should drop even more.
Piece of cake!
TESTING
You need to TEST your saferoom fan/filter system. There are other articles here about many saferoom tests we've done. But if you want a "Quick and dirty" way to see if your fan/filter is working, set up your saferoom and start your fan running.. then place an open bottle of Vanilla Extract near the filter. If you start Smelling/Tasting Vanilla in the saferoom, then you have a problem. Air is bypassing your HEPA filter somehow! The human tongue can taste particles as small as 30 microns. We are trying to get our filter levels down to 0.1 microns! So if the larger vanilla extract particles are making it into your saferoom, then the much smaller viruses are going to come in with no problems! TEST your setup!

Safe Room Misconceptions
It seems that many people think you need an airtight seal in your saferoom.. NO!
Airtight is BAD. You want some air constantly flowing OUT of your saferoom. Viruses can not move upwind, so you want air constantly pushing airborne particles AWAY from the saferoom.
We're not doing a bio-safe level 4 room, we're doing a saferoom. A few cracks and gaps are what we want!
If you have a good saferoom fan, it'll keep a little positive pressure on the room, air will move out of the room through cracks in the doors and windows that would ordinarily let air blow IN. The plastic over the door does not need to be sealed airtight all the way around. We don't even put plastic over the windows here, we simply hang a sheet of plastic up where the door normally is, and tape it up. If it doesn't seal tight to the floor, no big deal.
You DO NOT want to overpressurize your room. You just need enough pressure to keep the outside air currents from bringing viruses or spores (depending on the threat) into the room.
It's not THAT critical to be sealed up tight. Close enough is good enough if you have a decent fan.
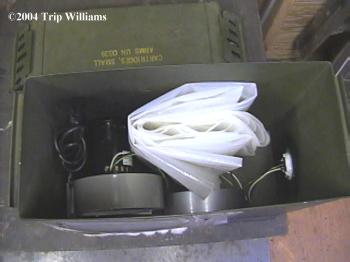
Once you have all your Saferoom plastic pre-cut, you can put that, your duct tape, power cord, etc inside the can for easy storage. When you need to set up the saferoom, just pop the top of the can, get your Saferoom building supplies out, close the lid, and you're ready! One of the nice things about the detachable power plug is that you can't accidentally turn the fan on while you are storing the plastic and stuff inside the box
Here's one of our Saferoom Tests. Again, You MUST be sure your fan/filter works, and that you can power it if the grid power goes down!
Modifications and improvements to the NEWER "Fan In A Can", which accept multiple types of filter media, can be found HERE.
"Fan in a Can" I like the sound of that ;)
Warlord
www.AlphaRubicon.com
All materials at this site not otherwise credited are Copyright © 1996 - 2004 Trip Williams. All rights reserved. May be reproduced for personal use only. Use of any material contained herein is subject to stated terms or written permission.