*FAL Extractor Tool*
One of the spring loaded parts you deal with when working on FAL’s and their variants is the extractor in the bolt assembly. Since writing about detail stripping the FAL upper receiver group, I found a tool originally thought out by one of the members of the FAL files. Derby Fals’s made the original prototype of this device and this article is how to make the version I settled on.
The primary differences between the prototype and mine are the orientation of the wire rod that engages the extractor plunger and the length of the lever arm of the device.
The rod that engages the hole in the extractor plunger on the Derby FAL prototype was wound on the lever arm such that it ran up the right side of the tool closest to the long part of the lever arm and would tend to pop out of the hole in the extractor. By winding it the way I’ve shown in my experience it doesn’t pop out as easily. I think that is because the extractor plunger engagement rod is closer to the bolt body so there isn’t enough wiggle room to dsconnect.
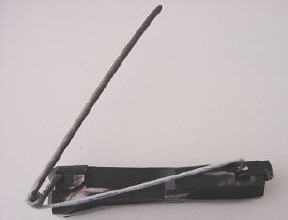
Here’s what the tool looks like at rest when it’s on the bolt you are removing the extractor from. Note the angle of the lever arm. I’ve found with an angle of about 30 degrees or so you can operate the tool easily.
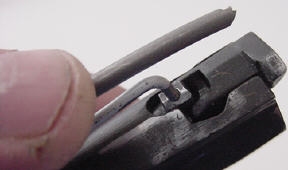
Once you compress the lever you retract the extractor plunger to disengage it from the extractor.
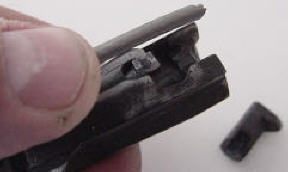
The extractor is then removed from the bolt. The nice thing is it is a totally controlled situation and the spring that wants to hurt you is under control.
I’m not going to give you dimensions of this tool because there is room for lots of slop in fabrication and you still end up with a useable tool. But here’s what I used and did to make my tools.
You need the following:
Materials.
A piece of 1/8th inch welding rod (I used fluxless oxy-acetylene rod) about a foot long. The rod I used was about 3 feet long and I made 5 of these tools from it.
A coat hanger that fits the hole in the extractor plunger
Tools:
FAL bolt
8" vice grip pliers
Large needle nose pliers (I used my Leatherman Wave)
Bench vice
Hammer
Sand paper or grinder or file
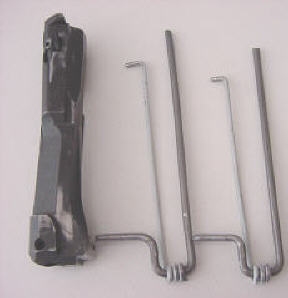
The firing pin retaining pin hole in the FAL bolt is I believe 3mm in diameter. So the first thing you do with your bare welding rod is to reduce the diameter of the welding rod to allow it to go through the retaining pin hole to the other side with a little sticking out. You then bend the rod at 90 degrees using the body of the bolt as the bending tool. Next take the bent rod and clamp the vice grip to the long piece and place the part that fits into the bolt into the vice. Now bend the rod down over the top of the vice grip and use the hammer to make a square 90 degree bend. You continue bending the rod using the vice grip as a sizing mandrel until it (the lever arm) looks like the very top picture. Place the rod back into the bolt and mark it where it clears the top of the bolt when the long arm is parallel to the bolt body. Cut the rod at the mark. You now have the lever arm built. I left it long because if it is too long for you then you can cut it back. If you cut it short you can’t stretch it.
Take the coat hanger and cut it open. Make a "U" in it with the short leg of the "U" being about an inch and a half long. Place it in the well of the lever arm making sure the short side is closest to the long part of the lever arm. Take the pliers and bend the coat hanger around the lever arm for at least 3 turns.around the rod to square up the coat hanger on the lever arm. You can then cut off the nub from the short end if it was too long.
Place the lever arm back into the bolt and measure along the coat hanger until you get to the hole in the extractor plunger Note: This is the measurement of the coat hanger when the lever arm is in the rest position of the second picture of this article (where I talk about the 30 degree angle). Add about 3/8th of an inch and cut the coat hanger. Then bend the 3/8ths over until you mate with the hole in the extractor plunger. You might have to bend the coat hanger angle to align it with the hole in the extractor plunger. Take the needle nose pliers and burnish the extractor plunger pin on the coat hanger to get it smooth enough to go into the hole. You do this by twisting the pin in the jaws of the pliers. In my tools the paint on the coat hanger caused the pin to drag until I removed it.
Once you have the burnishing done try out your new tool. Be sure and aim the bolt for the first compression at something that will absorb the extractor, plunger and spring if you screwed up or my instructions were too clumsy to follow. If it worked you done good. If not I’m not a very good teacher.
Like I told Climber on one of the posts on the Weapons board I prefer store bought tools. But in this case, this tool adequately performs the job and it is easy enough to fabricate even I had no trouble building it. I hope the tool is of use to you.
Thanks for the read.
serger
www.alpharubicon.com
All materials at this site not otherwise credited are Copyright © 1996 - 2004 Trip Williams. All rights reserved. May be reproduced for personal use only. Use of any material contained herein is subject to stated terms or written permission.