Detail Stripping of the FAL Upper Receiver Group
Once the rifle has been field stripped if need be you can detail strip it into components. The rifle Im using in the pictorial is an STG-58 kit I assembled on an Imbel receiver. In this discussion I will be taking the rifle down to individual components an owner would do to replace worn parts. As such the barrel, ejector block, locking shoulder, sights and swivels stay put.
Im assuming you have field stripped and cleaned the rifle. If you havent done that then go to the Field Stripping Article .
If you need a detailed drawing of the rifle go here. FAL Parts list
Before I go into the disassembly part of this article review the next section to ensure your rifle is in a safe condition before proceeding.
Ensure the rifle is unloaded. Take the Cocking Handle and pull it rearward to retract the bolt assembly. There should be no ammunition in the action. If the magazine is empty the tab on the magazine follower will push up the lifting pin on the bolt hold open device and lock the bolt rearward. NOTE: On many of the inch pattern weapons the lifting pin for the bolt hold open was removed and the bolt will not stay rearward with a magazine in the weapon. In that case push up on the bolt hold open to lock the bolt rearward. Take the magazine release and push it toward the barrel. This will unlatch the magazine. Rock the magazine toward the barrel until the tab on it clears the cut in the lower receiver. Then pull down to remove it from the rifle. Visually look into the chamber and down the magazine well to verify there is no ammunition in the rifle. Pull the Cocking Handle rearward and ease the bolt closed. Next take the selector and rotate it up to the safe position.
The rifle is now in a safe condition.
The first thing you do is to unscrew the upper from the lower receiver. For this I usually use a Nickel (American 5 cent piece). You can use the appropriate coin of your choice, or a flat tipped screwdriver. The Joint Pin unscrews and you can push it out with a pencil or what ever. The military uses a cartridge point.
Once you have the halves separated then well start with the upper.
Ive got the long gas tube on my rifle and to remove it you need to unscrew the gas regulator sleeve and the gas tube nut. When they are unscrewed there is a pin under the gas tube you need to punch out. The pin diameter is 3/32". If you lose it like I did the first time get a drill rod and cut it down.
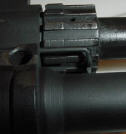
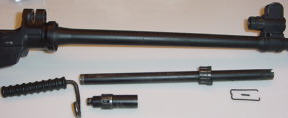
Heres what the gas system looks like when its in pieces. If you look at the picture on the right you can see the spring that retains the Gas Regulator Nut. It snaps into the sight base and gives the Gas Regulator Nut its "click".
The next area to break down is the Bolt. When you fieldstripped it you removed the Firing Pin and Firing Pin Spring. Next you need to pull down the Extractor. You can do this with a cartridge. I dont recommend it but if you need to it can be done. In fact Ive done it twice since I started writing this so you can see the individual parts. When you need to put it back together put it into a vice and muscle it back in. This is one area where the tool is something I plan to get.
Hang in there. The only thing left to do to the upper is to remove the Cocking Handle and the Magazine Catch and Hold Open Device.
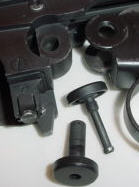
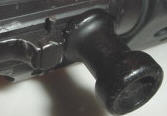
To remove the Cocking Handle take your hammer and punch and tap out the retaining pin. I try and punch out my pin from the bottom. It keeps any finish marring I might do harder to see. Note: Most of these pins are bent and they tend to come out hard. Dont be surprised if they come out rough. The first photo shows the pin you need to punch out. I already did it and placed the pin back so youd see the relative position of the parts.
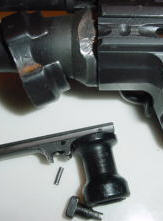
The next picture shows the Cocking Handle with the Cocking Handle lug pulled out.
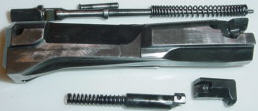
You also see to the left of the receiver the Hand guard retainer pulled off the barrel. You need to push the Cocking Handle toward the barrel to get it off the frame. If you dont the detent in the handle will drag and mar the finish on the Upper Receiver. Check out the rust I found on the Hand Guard retainer. You can also see the marring on the flat of the barrel where I torqued it onto the receiver.
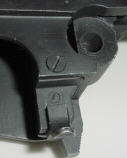
The last thing on the upper is the Bolt Hold Open and Magazine Release. They are held in by one screw and are a piece of cake to remove. When you get them out note the Magazine release spring has seats cut into both the receiver and the release itself. NOTE: The inch pattern Bolt Hold Open device usually has the pin for lifting the hold open removed. Im not sure what the reasoning was for this but you can replace it with a piece of rod stock pressed in. Ive also heard of people using a roll pin. The Spring for the Magazine Release is longer than the metric ones and people who have a loose fitting magazine have replaced the metric with the inch spring with good results.
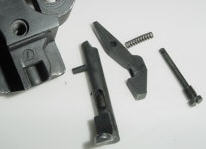
The magazine release has a small spring and plunger inside it. You need a 1/16" roll pin punch to drive it out. I havent had any problems there and have not disassembled this piece. You can see the cut out for the screw to pass through. The plunger presses on the screw and kept the bolt hold open retracted.
Note: If your Bolt Hold open doesnt have the pin to pick it up on an empty magazine and you want it to then go here and read the excellent article on how to remove this modification.
The upper receiver group is now disassembled. When you reassemble the Upper remember to keep the springs under control. The only major one to worry about is the Gas Piston Spring. It is fairly strong and will launch the Piston but the chance of it really hurting you is not great. Just be careful.
Final NOTE: The front sight can be unscrewed and under it you will find a ridged plate called the Front Sight Fixing Plate. The Front Sight Spring under it holds it against the Front Sight. If you lift this plate out you can see where the gas is tapped off and sent to the Gas Piston. Many of the Kit guns out there have a lot of crud in the spring well and I guess you might have trouble with the Front Sight Losing its tension but I doubt that. If you feel adventurous screw your sight down all the way and count the clicks. Then back it out and clean this area. When you reassemble the sight you can crank it down all the way and back it out the number of clicks and your elevation setting for the re-zero will be close.
serger
All materials at this site not otherwise credited are Copyright (c) 1996-2002 Trip Williams. All rights reserved. May be reproduced for personal use only. Use of any material contained herein is subject to stated terms or written permission.