Fieldstripping, Cleaning and Reassembly
I finally got around to cleaning my FAL and thought you'd like a visual as well as verbal walk through of its maintenance. The Rifle in the pictorial is an STG-58 pattern rifle I assembled on an Imbel receiver and is representative of the metric rifles you would probably encounter in the United States. Where there are Inch pattern variations I am aware of I will note them. (I don't have any inch pattern rifles so you'll have to live with my poor descriptive abilities without photos.)
If you need a detailed drawing and parts description of the rifle go here. FAL Parts list
Wear Safety Glasses.
Work SAFE. I know it gets old but MOST SAFETY WARNINGS WERE FIRST WRITTEN IN SOMEONES BLOOD.
Dont let the next one be written in yours.
The first thing you need to do is ensure the rifle is unloaded. Take the Cocking Handle and pull it rearward to retract the bolt assembly. There should be no ammunition in the action. If the magazine is empty the tab on the magazine follower will push up the lifting pin on the bolt hold open device and lock the bolt rearward. NOTE: On many of the inch pattern weapons the lifting pin for the bolt hold open was removed and the bolt will not stay rearward with the magazine in the weapon. In that case push up on the bolt hold open to lock the bolt rearward. Take the Magazine Release and push it toward the Barrel. This will unlatch the magazine. Rock the magazine toward the barrel until the tab on it clears the cut in the Trigger Frame. Then pull down to remove it from the rifle. Visually look into the chamber and down the magazine well to verify there is no ammunition in the rifle. Pull the Cocking Handle rearward and ease the bolt closed. Next take the selector and rotate it up to the safe position.
The rifle is now safe.
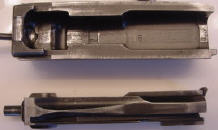
Rotate the take down latch clockwise to unlock the Upper Receiver from the Trigger Frame. Tilt the upper receiver and grasp the rattail of the Bolt Carrier and remove the Bolt Carrier and Bolt from the rifle. Invert the Bolt Carrier and place your thumb at the base of the rat-tail where it hinges into the Bolt Carrier. Push the Bolt toward the rattail and compress the Firing Pin onto your thumb and with it compressed pull the Bolt up and out from the Bolt Carrier. Take a round of ammunition or the end of the rattail and press the Firing Pin Retaining Pin out until you can remove it from the Bolt. Tap the Bolt and the Firing Pin and Firing Pin Spring will drop out of the Bolt.
The Bolt Carrier and Bolt are now field stripped.
Pull the Top Cover off by sliding it to the rear until it clears the Upper Receiver. Now the back of the rifle is field stripped.
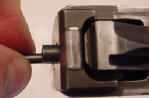
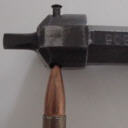
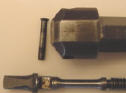
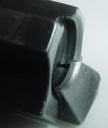
On the barrel end of the rifle you next need to remove the Gas Plug and Gas Piston with its Spring. Rotate the Gas Plug 270 degrees clockwise. The Gas Plug will pop out along with the Gas Piston. Pull the Gas Piston and Spring out of the rifle. Note: On many metric and inch pattern rifles the Gas Plug has a spring-loaded plunger on it that must be depressed with finger pressure or the point of a cartridge to allow you to spin it. The STG-58 has a neat lever that is real easy to manipulate so you don't need a strong thumb or cartridge to remove its plug.
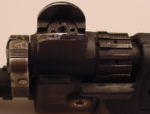
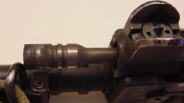
Note: When you remove the Gas Plug from the rifle look and see that the gas plug has a wide and narrow flange. This flange corresponds to cuts in the gas block that allow the plug to be removed. Also note the Gas plug has to be oriented in the weapon so the hole in the side of the plug is up toward the front sight to allow for semiautomatic operation. With the hole down the rifle is setup for Grenade launching operation and as such is now a single shot. This is a cause of complaint from many new owners and I know of at least one incident where the owner sold his rifle to an individual at a significant loss because he thought the rifle was defective. In a sense it was, it had an ignorant owner.
Unscrew the hand guards from the upper receiver and remove them from it.
The rifle is now field stripped.
Cleaning the Rifle.
I routinely use the following for cleaning of my rifle in the field:
1. .30 Caliber cleaning patches
2. .30 Caliber thong with bore brush
3. 30-06 chamber brush (I like these because they are a little longer than the 7.62 NATO ones and for me work better).
4. .45ACP or 20 gauge bore brush
5. Stiff toothbrush
6. Wooden handled cotton applicators (Your basic cotton swab on a stick).
7. CLP or Ed's Red gun oil.
Once the FAL is field stripped I usually clean from the lightly fouled areas to the heavily fouled ones. The reasoning for this is to allow the best use of cleaning supplies in the field in that you can go from less dirty to more dirty and keep clean. Going the other way uses more supplies. As such I proceed as follows:
Take the Bolt and wipe off all carbon from it's exterior, paying special attention to the area under the Extractor. I find the gunk gets thick under here. Clean out the firing pin channel and wipe off the Firing Pin. Take a cotton tipped applicator and whittle the tip into a wedge and clean the Firing Pin Hole.
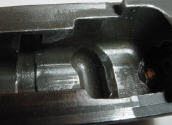
Wipe off the Bolt Carrier and clean the channel where the Bolt cams up and down. Pay particular attention to the rails on the bolt carrier where it rides in the Upper Receiver.
Look for crud in the lower receiver and remove it. Check the magazine well and make sure all the controls in the lower receiver operate freely. Wipe out the Magazine well. Clean out the Bolt Carrier ways,
Scrub out the chamber and barrel with their respective brushes. Where the barrel screws into the Upper Receiver remove powder fouling and other crud with the cotton applicators and toothbrush. You can whittle the wooden ends to act like a scraper and get the majority of the greasy sludge and carbon.
On the front end do the following:
Scrub the Gas Plug with the toothbrush and barrel brush to remove loose carbon fouling.
Scrub the Gas Piston to remove the carbon fouling. Don't get stupid here and use sand or sand paper. You just want the majority of the stuff gone. The Canadians were very bad with their rifles in this respect in that they would take the gas piston and twirl it in the dirt and the abrasive action would result in squeaky clean pistons and gas systems that were so worn they could not be regulated properly. Anzac troopies did it too to a lesser degree and possibly the Brits. If you must you can take the edge of a pocketknife and scrape off the fouling on the very end of the piston. Other than that just get the loose stuff. Take the 20-gauge brush and clean out the gas port where the Gas Plug fits. Get the majority of the gunk here. You can take a piece of the cotton tipped applicator and carefully check the gas hole where gas is bled off by the regulator nut and remove the loose fouling and copper from there. Dont break it off or you'll have to spend extra time removing it.
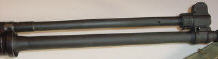
Wipe down the area under the hand guards and the inside of them to remove carbon. On many of the FALs floating around the gas tube was modified by cutting it down and brazing the short tube stub onto the gas block. Since my rifle doesnt have this modification I have to occasionally scrub down the gas tube to remove loose fouling. Lastly take a bore brush and clean out the hole the Gas Piston passes through when it pushes the Bolt Carrier.
One thing before we reassemble the rifle; you want the gas system absolutely dry. No lubes, no grease, nothing that will promote carbon-fouling retention. Keep it dry and you'll be happy. Ive seen one gun that the owner (not Me) thought the fouling would be easier to remove if there was a light coat of lithium grease like what he used on his Garand bolt on the Gas Plug and Gas Piston. The rifle quit shooting as a Semiautomatic after 70 rounds and we had to use Carburetor cleaner and a vice grip to get it out of the gun. It was a mess.
The only areas the books recommend lubricating are the rails the Bolt Carrier rides on. I hit that area very lightly with a cotton applicator that has some lube on it. I wipe down the exterior of the rifle with a cleaning patch that has a little lube on it. Other than that the rifle stays dry. I live in a desert.
To reassemble drop the Gas Piston and spring into the Gas Tube and take the Gas Plug and fit it into the Gas Regulator block. Spin it until it is oriented right (on the STG-58 Plug the "A" is up not the "Gr").
Next put the Firing Pin Spring on the Firing Pin and drop it into the Bolt. Make sure the Firing Pin is Oriented with the notch up and press it in to the Bolt and replace the Firing Pin Retainer Pin.
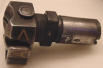
Grasp the rattail of the Bolt Carrier and set the Bolt inside it. Press down and compress the Firing Pin and the Bolt will snap into the Bolt Carrier.
Holding the Bolt Carrier by the rattail start it into the ways on the Upper receiver. With the Barrel pointing slightly down the Bolt carrier will slide in and return to the home (closed) position. Slide the Top Cover onto the Upper receiver and snap the Upper Receiver and Trigger Frame together.
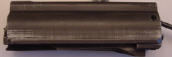

As you look at the Photos of the assembled bolt carrier the one on the left is with the bolt out like it would be when you put it in the rifle. The left picture is with the bolt cammed into the bolt carrier like it would be in the rifle with a round chambered.
Place the Selector in the Semi position and retract the Bolt with the Cocking Handle. Pull the trigger to release the Hammer and gently slide the bolt home.
The rifle is now clean and reassembled.
serger
All materials at this site not otherwise credited are Copyright (c) 1996-2002 Trip Williams. All rights reserved. May be reproduced for personal use only. Use of any material contained herein is subject to stated terms or written permission.