*The Alpha tent*
I guess it's time to mention another piece of equipment I carry, The "Alpha Tent".
Back about 1985 I realised I hated lugging around redundant equipment due to weight (especially now, since I am getting old and soft), so since everyone carries (or should carry) a military poncho in their butt pack, ALICE Pack, Back Pack, where-ever, I decided that there was no need to carry a regular "tent" on fast patrols. The idea of using a poncho for a tent is, of course, an old one, but you see people running string and sticks all over creation to make a tent out of it, and they aren't very weather proof in that configuration, or very easy to set up, or move.
I knew that there just HAD to be a better way...
Everyone probably has some old shock-corded tent poles laying around from old torn up dome tents, so gather them up and use em!
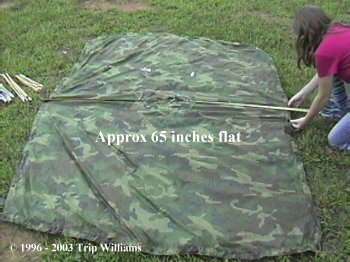
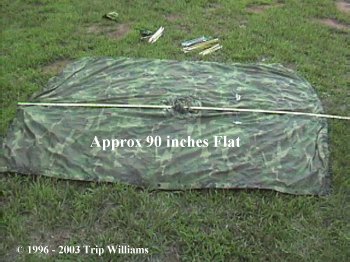
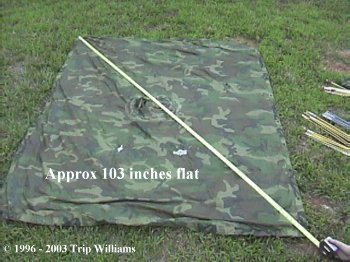
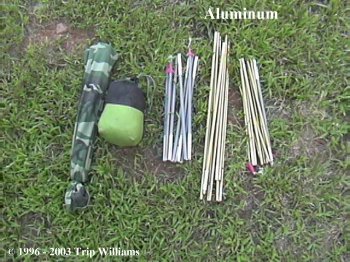
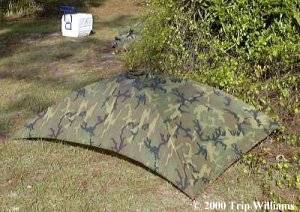
What you need to make an Alpha Tent is two flexable shock corded poles that are a total of 111 inches long, and you'll need 4 red electrical wire nuts (The kind with "wings" on the side work best). NOTE: I use the Military RipStop Ponchos... the rubbery Ponchos are a different size, I don't know the dimensions for those ponchos.
MANY people have written over the years to find out the dimensions of the Poncho I use. At the request of the forum users over at BackPacker.com I drug out the Alpha Tent and updated the photo's some.
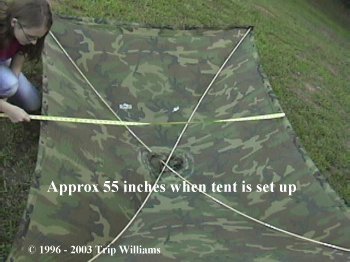
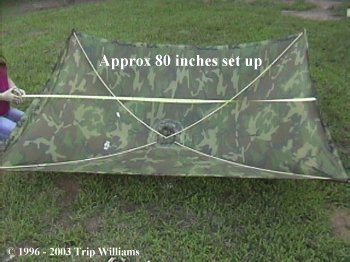
The inside center height when set up as an Alpha Tent is approx. 23 inches.
As for the Poles, I prefer THIN Aluminum shock corded poles (Cheaply available in any lengths from Easton), but thin fiberglass ones work just as well. If you do decide to cut old poles yourself, unstring your little poles, and cut each one till it is about one foot to 18 inches long ...Cut the poles to whatever length fits best in your gear, yet will still bow enough to form the "dome" of the Alpha Tent... cut them all the same length, and don't cut the end with the female socket, you'll need it to fit the other poles in as normal. At this point, PRE-PLANNING is crucial. While figuring what length to cut all your poles, remember that the TOTAL assembled length must be 111 inches, you lose a little length each time you stick the male end of one pole into the female socket of the next pole, so figure accordingly. If using thinner fiberglass poles I like my poles to be around 13 inches long when collapsed, but your poles may have to be a different length depending on the depths of your pole sockets and the material from which the poles are made. I like my poles to be even shorter when using quality Aluminum... shorter poles are easier to "stow in your gear and forget", as long as the shorter lengths will still bow enough to form the "Dome" of the Alpha Tent.

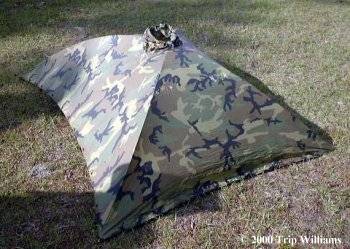
You can also lift up one side of the "tent" and prop up the two lifted corners with sticks for use as a lean-too.
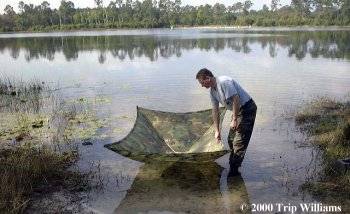
You can close the hood tight and turn the tent upside down, toss your equipment in it and use it as a mini canoe for river crossings (YOU can't get in it, but you can push your equipment in it while you swim)... No more sinking, bulky, balky, air filled "poncho rafts" (You military guys and gals know what I mean!)
I've also had a lot of people writing to ask about "Modifications" to the Alpha Tent; asking if a floor could be added to the Alpha Tent, and/or if hooks could be sewn into the Poncho to hang a small LED Lantern inside when assembled, and many many other questions about hundreds of different modifications... But at some point when modifying the basic Alpha Tent you defeat the basic purpose and advantages of the Alpha Tent, and you'd probably be better off just carrying a small One Man Trail Tent... The Poncho for your Alpha Tent needs to remain a usable Poncho, The simple addition of shock-Corded poles just allows you to get one more type of use out of your GI Poncho (that already has a hundred and one uses) without affecting the normal function of the Poncho.
The most I ever add to an Alpha Tent Package is a GI Poncho liner that can be attached as normal to the inside of the poncho when it's really cold outside, OR the Poncho Liner can be used separately as a Blanket, OR by adding a LONG plastic zipper to three sides of the Poncho Liner you have a decently serviceable "Sleeping Bag" that fits inside the Alpha Tent well... Adding a plastic zipper around three sides of a Poncho-Liner doesn't affect your ability to use the Poncho-Liner for any of it's normal "hundred uses", nor does it add any noticeable weight...
When a pair of my fatigues starts getting ratty, or I just need a pair of Camo Short Pants, I cut the legs off the set of Fatigues at about the knee and turn the resulting "Camo Patterned Tube" inside out to sew the "Knee End" of the Tube closed. Then I flip the cut-off leg right-side-out again, and I end up with a nice Camo Bag with a draw-string closure at one end thanks to the normal draw-string found at the ankle of Fatigue Pants. You get TWO bags per pair of pants.. BONUS! ;) UPDATE: The poles appear to have seen some solid use from the wear marks and scratches, which I think is fantastic since it means the sender has used them a lot! The new poles pop my little Alpha-Tent up firmly and solidly, in fact these poles make the Alpha Tent a bit longer (but a bit lower) and over-all the dome seems sturdier than it is when using Aluminum or Fiberglass poles! Using these poles the small "bow" that is usually along the bottom of both long sides of the assembled Alpha Tent are no longer there; The bottom edge of the Poncho sits almost flat against the ground all the way around now. The tiny size of the new poles lets me fold them up inside the Poncho out of the way so there is no separate set of poles to carry elsewhere on/in my gear, everything needed for an emergency tent is folded up in the little draw-string bag I carry my Poncho in! As usual, feel free to use this idea for your own personal use, but don't try to make money off our ideas... NOT cool! Click HERE for Pictures of Alpha Tents sent in by Readers!!! Updated as often as time permits (Last Updated: 27 June 2012)...
www.AlphaRubicon.com
Different Ponchos stretch differently, so you may want to make sure your poles are the right length for YOUR specific poncho using the method above BEFORE you cut your poles. The above "trial and error" method also works for small tarps (which might be able to give you a better height-to-length ratio I guess).... just remember, the bigger the tent, the more unstable it is, and the heavier it is...
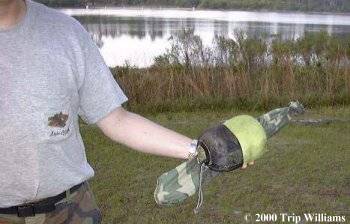
I stuff my Poncho Liner in this bag so it stays clean and decently dry, not to mention it makes an awesome "pillow" at the end of a long hard day if you don't need to use the Poncho-Liner to keep warm or anything. You can also stuff a GI Poncho in the bag, AND a set of Shock Corded Poles to make your Alpha Tent from.
In 2005 the military contacted me about the Alpha Tent, asking for permission to buy the concept... I never charge the military for article use, or for using ideas like this one. They had a LOT of ideas for uses of the Alpha Tent "Concept" that I'd never even thought of. I was asked to not repeat some of those uses, but I will say that with different materials used in place of Aluminum Poles and the Standard Issue "Military Poncho", specifically materials designed to hide thermal signatures, and even RADAR signatures (as well as shielding against other detection methods), I am amazed at what this simple idea has become! I am told that the "Alpha Tent Concept" continues to see use by some Special Warfare Units in desert environments, as well as the rugged mountainous areas of the Middle East.
Another UPDATE:
(and updated yet again on 05 June 2012 to add pole lengths and such of some new poles):
In late 2011 I received a small package in the mail with a note that simply said, "Your Alpha Tent lightened my load, I hope these lighten your load in return". Enclosed in the little package were what I thought were extremely thin, Aluminum, Shock-Corded Tent Poles, with each section being only about 6.5 inches long, for a total length of about 108 inches from tip to tip when the poles are assembled... I later learned the tiny thin poles are TITANIUM! They're obviously custom made... The Titanium poles are a subdued Tan color, and no bigger around than the Aluminum Gutter Nails that I carry to stake down my Alpha Tent when needed... actually they're almost exactly the same size as "Human-sized" drinking straws (not the monster-sized straws from Mickey-D's). The ends of the poles don't have wire nuts on them to seat in the Poncho's grommets, but simply swell outward a bit right at the end where the end of the poles mate with the grommets of the Poncho. When extended, each completed pole has a thin strip of double-sided Velcro epoxied in place perpendicular to the pole, right at the halfway point of the assembled poles, so that the Velcro can be wrapped around both sets of poles to secure them where they cross. You really only need one strip of Velcro on one of the pole sections, but I guess it's easier and cheaper to put a strip on ALL of the poles so that you don't have to worry about two different types of poles, and possibly grabbing two poles with NO Velcro... These Velcro straps also hold all of the poles together as a tight bundle when a pole is broken down into sections for carry. A close friend of mine who served as an Army Quartermaster says they appear "Mil-Spec"... Actually he said, "I dealt with every piece of Mil-Spec equipment you can think of almost every day for 25 years... You get to a point where you just 'know' when something is Mil-Spec... So trust me Bro, a bidder made these for the military".
To "whoever", Thank You Sincerely!
Yet Another UPDATE - 31 March 2013:
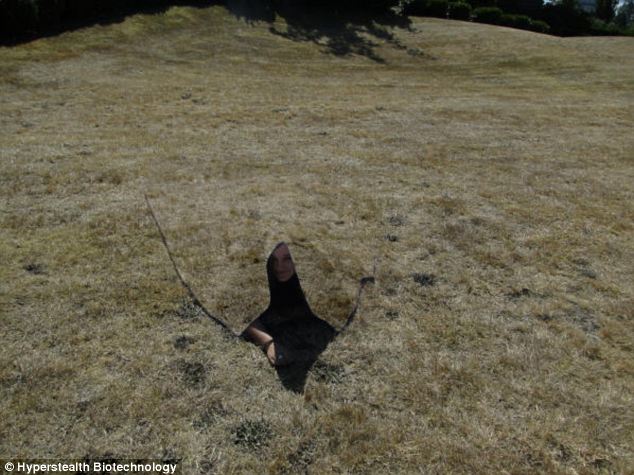
I got a link sent to me pointing to a "UK Mail" News Article showing the Unclassified Version" of pictures of a fabric being used now on the "Alpha Tent", made for the US Military by a company from Canada named "HyperStealth Biotechnology Corp"... The "Real" material is supposedly too invisible to even be photographed! "CNN International" has a very good Video News Story about the new Fabric, dated 29 December 2012! Remember, the pictures below are "Modified Mock-Ups" of the new material because the actual Material is still classified, and is too invisible to even be photographed! Amazing!


Enjoy!
Trip Williams
A.K.A. Warlord (Lighten Up, it's an old Gaming Handle ;)
Return to the Alpha Group Main Page
![]() Send Warlord E-mail.
Send Warlord E-mail.
Address: 
All materials at this site not otherwise credited are Copyright © 1996 - 2002 Trip Williams. All rights reserved. May be reproduced for personal use only. Use of any material contained herein is subject to stated terms or written permission.