*Barreling the FAL variant *
By serger
24 May 2003
Barreling and headspacing the Free Worlds Right Arm
In some parts of the United States, assembling military pattern rifles from parts kits and receivers have reached the level of a cottage industry or barn raising practiced by neighbors a century ago. Friends get together, share tools, expertise, and workspace to perform "builds" of these rifles. The assembled rifles are every bit as good as those assembled at civilian or military arsenals. One of the easiest rifles of this class of "home brewed" guns to build is the FAL.
Many of the guru’s who build these rifles have a whole spectrum of tools they use in the rifles assembly. The usual setup of assembly equipment is as follows:
All these tools will, I guarantee you, allow an individual to produce excellent work and a fine rifle.
For those of us who are part of WECSOG* there are just as effective methods of rifle assembly and the tooling up cost is much less. The most sophisticated tool I use in my assembly process is a drill press and that is just a frill.
Before I get into the actual mechanics and processes of assembling the barrel to the receiver a few things need addressing:
First of all you need to get the best rifle kit and receiver you can. It’s like all other mechanical assembly processes. If you start with good parts your chances of errors and having to adjust and hand fit sub assemblies are minimized. SO what does this mean?
For me it means buying Imbel receivers. Imbel is still licensed to FN for the manufacture of this rifle. As far as I know Imbel no longer makes assembled rifles, just replacement parts. But they are licensed to produce the FAL and that means their receivers are built to FN Specifications. The Imbel receiver is also manufactured over length on the barrel side of the receiver to allow for fitting and installation of a used barrel. They did this to help us poor homebuilders. Actually that is not accurate, they got permission to make the over length receiver to allow the big players like Century International Arms and others the ability to assemble neutered FAL’s for the American civilian market and the trickle down process placed them (the receivers) in the hands of the small gunsmith or in this case the WECSOGer’s.
For parts kits I use either STG-58 or Imbel kits. Both types of kits were made from rifles that were carried a lot and shot a little. I’ve seen Israeli kits that must have been Sinai refugees and R1 kits from South Africa that personally enforced Apartheid. They were rough. As far as I know they may have been battlefield pickups. And even though some of the design features of the L1A1’s are superior to the metric weapons, I’ve stayed away from Inch Pattern kits because the majority of the world used metric rifles.
The next area is the Safety Disclaimer. The methods I’m going to describe are what I’ve used to assemble the half dozen or so rifles I’ve put together. These methods worked well for me. If after reading my assembly methods you feel like they are unsafe then don’t use them. I’m just describing what worked for me and take no responsibility for any problems that might occur to you if you follow these methods.
Now for some interesting information on the FAL. These rifles headspace by the action of the bolt dropping into the receiver and pushing against the locking shoulder. The engineers who designed this rifle wanted to be able to compensate for stretching of the receiver over the life of the weapon. To do this, they made the locking shoulder in different sizes to allow for different headspace requirements as the rifle aged. In the FAL’s non-neutered configuration it is a main battle rifle, a machinegun, and designed to consume large amounts of ammunition in a very short period of time. Because of this the FAL was over built and given the ability to have a "liberal" headspace and still function properly and safely.
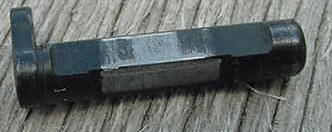
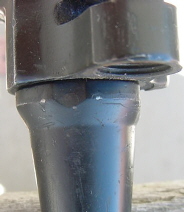
The above picture is a locking shoulder that has been removed from a receiver. Note the alignment tab at the top left of the shoulder.
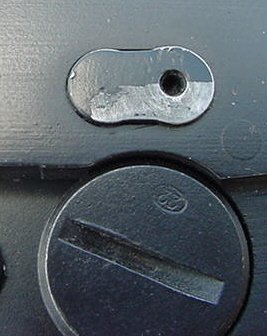
Here is a locking shoulder that is in a weapon.
What this says to the WECSOG builder is if you are building your rifle from a kit that was originally a rifle and not parts you’ve acquired and you get the timing of the barrel to be Top Dead Center (TDC) when you install it, then when you install the locking shoulder and test try the bolt, the headspace should be fine. Since the rifle you are building was originally a rifle made at an FN licensed factory, along with your receiver, and all the parts were wear matched to each other you should not have any problems. In all the rifles I’ve assembled I’ve found this to be the case. If by some weird circumstance you happen to have excessive headspace when you barrel your receiver you can measure using a pin gauge at your local machine shop and determine what size locking shoulder you need and order it. It’s that easy! Also if you are building a rifle that will be used for field use and not as a match weapon then the techniques I’m going to talk about will be very adequate. But I have to say a couple of the rifles I assembled will out shoot my capabilities. These guns can, and do, shoot into 1.5 inches (37mm) at a hundred meters. My son with his rifle can routinely shoot clay pigeons set on the mountainside at ranges out to 225 meters standing offhand. I can’t do this without a steady rest but he can. I guess the point I’m trying to make is if you pay attention to detail you can with the most minimum of equipment assemble a very good rifle.
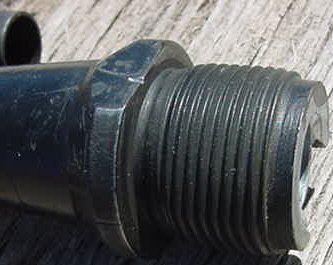
To barrel an FAL you need to screw the barrel down tight and have it end up at TDC. Usually you have to remove material from the barrel flange to allow you to do this. The flange is the flat part between the barrel threads and the tapering area. This particular barrel has a nick on the flat from the dremel tool when I cut the receiver stub off it.
After you get the barrel on the receiver then you have to install the locking shoulder and try fit the bolt. That’s called headspacing. If everything goes well, and it should, after these two steps you should be able to finish assembling the rifle and have it operational in less than an afternoon’s work
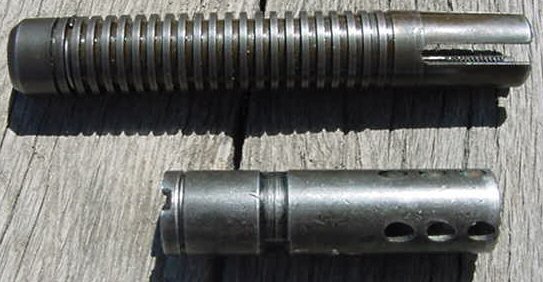
You will need a clean barrel. If you bought your kit and the barrel came with the flash suppressor and receiver stub on it, you need to remove these parts along with the gas tube. To remove the receiver stub go here. To remove the flash suppressor you need to place the barrel in a vice or device that will allow you to torque on the flash suppressor. The suppressor is reverse threaded so try tightening it to loosen it.
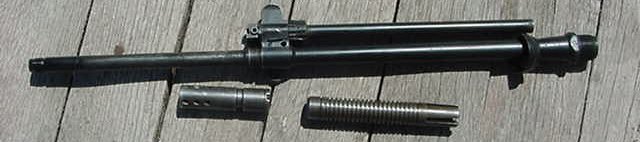
The Major Stoll suppressor from the STG-58 is easy to remove. It is the long one with the slots in the end of it. You just put a big screwdriver in the slots and twist. The Imbel required me to place the barrel in a vice and I had to use a pipe wrench to turn it the first turn. After that they both spun off.
.
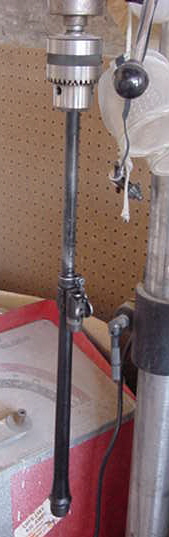
Once the barrel is clean then place the receiver with the bolt carrier in it into the blocks on the vice and tighten the vice enough the receiver doesn’t wiggle. Then take the barrel and spin it hand tight onto the receiver. In all my rifles the barrel stopped at between 13 minutes until twelve and 9 minutes until 12. That correlates to 78 and 54 degrees from TDC. I try and have my barrel timing to stop at 36 to 42 degrees from TDC. That’s between 6 and 7 minutes until twelve. That will allow you to have enough torque on the barrel to get it tight enough it won’t unscrew itself and embarrass you. (It’s usually about 85 to 100 foot-pounds, for what that is worth). To get to that position you have to remove metal from the barrel flange. What I do is to place the barrel in the drill press and using a triangle file I cut off the metal I need. I set the press on the slowest speed it can go and remove the metal I need to. One hand holds the file while the other backs up the barrel by providing counter torque on the spinning barrel. That is the part I wrote the safety disclaimer for. Be sure and wear the safety glasses and don’t have any clothing that can get caught up in the spinning barrel.
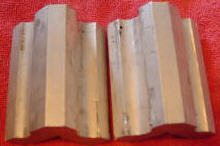
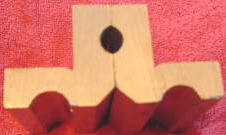
The cut and try method works fine. Some people chuck the barrel up in a vice and file it on alternate sides in a star pattern to reduce the web thickness of the flange. I’m doing the same thing with the drill press, it just goes faster and I don’t have to worry so much about my filing being at right angles to the barrel axis. To hold the receiver for barreling I use the barrel blocks out of the Armorers kit and place the bolt carrier inside the receiver to prevent damaging or warping the receiver from the compression of the vice. If you don’t have barrel blocks like the M-16 ones below, I have seen folks who made some blocks out of oak and a wood rasp to approximate the contour of the receiver. The only critical thing is to prevent the receiver from spinning when you torque down the barrel. If you watch that and don’t mar the finish on the receiver either way will work fine.
Once I’ve gotten the barrel timed where it bottoms out hand tight at about 7 minutes until twelve then I take my 15-inch adjustable wrench and torque it home.
Make sure the hand guard retainer (hand guard assembly cap, part 23) is on the barrel prior to torquing it or you will have to unscrew the barrel and put it on. (Ask me how I know that one!) And make sure it is oriented right. (Yeah I screwed up twice). Then you can press the locking shoulder into the receiver. Once you have it in about 2/3 of the way align the tab to mate with the cutout on the receiver. You can then press it home. Don’t hammer on the locking shoulder because it is hardened and can shatter.
Now that you have the barrel on the receiver you need to see if you have it as close to TDC as you can. The three easiest ways to do that are as follows:
Once that is done take the bolt and a 7.62 Nato match round. (If you don’t have one of them a Federal match round will do the same thing) Put the round under the extractor and slide the bolt home with your thumbs. The bolt should just fall into the locked position. Next try it with a piece of masking tape on the back of the cartridge. The bolt should not quite go into the locked position. If it does and it’s tight that’s a judgment call. I’d take the rifle and finish assembling it and take it out and fire it. These guns are so tough I KNOW it wouldn’t blow up on me. I would just be concerned about a case separation.
If that happens with the bolt locked, the worst that can happen is all the other ammunition in the magazine will be blown out the bottom of the magazine and the magazine will bulge some. You will have to pick up the ammunition out of the dirt and retrieve the magazine parts and squeeze the magazine body to make it rectangular again and not the oval it became. If the cartridge case separated into 2 parts you will have to take a bronze chamber brush for the 7.62 round (or 8X57 or 30-06) and push it up into the chamber spinning it like you were cleaning the chamber. Then you will need to turn it slightly the other direction to lock the bristles into the shell case. Next take a cleaning rod, run it down the barrel and tap it slightly with a mallet. The separated upper half will pull out. Or you can take an empty case and let the bolt slam it up into the chamber. It will jam into the separated case and when you open the bolt by banging the butt of the rifle against the ground the case will come out. OR, if you have a broken shell extractor you can use it the way it was intended. But the gun won’t eat it’s self or you. I’ve had case separations from HOT reloads and that’s what occurs.
If that didn’t happen and I was just shooting Military surplus Berdan primed ammunition (thicker case walls and no reloading for me) then I’d call it good to go. If I was worried about the headspace then I’d get a wider locking shoulder after I had ran a pin gage through the hole and determined the size for the bolt lockup I wanted. I don’t have any pin gages but I do have an extensive set of drill bits or if that didn’t work I’d go to the machine shop and borrow or rent their set and find which locking shoulder I needed.
The next check is to put the gas tube back on the barrel and slide the gas piston for it’s full length back and forth through it’s range of travel. If that works right then you can finish assembling the rifle and take it out and try it out.
That’s the quick and dirty method of barreling and headspacing the FAL variant. You can assemble a very nice rifle from quality parts, a drill press, a triangle file, a bench vice with blocks to hold the receiver, a cartridge, masking tape and a big adjustable wrench. And what’s even better is you can do it yourself in your garage!
* The Wile E. Coyote School Of Gunsmithing. The WECSOG term is in generic usage for unconventional home Gunsmithing as originally applied to FAL rifle kit assembly.
Thanks for the read.
serger
All materials at this site not otherwise credited are Copyright (c) 1996-2003 Trip Williams. All rights reserved. May be reproduced for personal use only. Use of any material contained herein is subject to stated terms or written permission.