Detail stripping of the FAL Trigger Frame group (AKA the Lower Receiver)
Once the rifle has been field stripped if need be you can detail strip it into components. The rifle Im using in the pictorial is an STG-58 kit I assembled on an Imbel receiver. In this discussion I will be taking the rifle down to individual components an owner would do to replace worn parts. As such the barrel, ejector block, locking shoulder, sights and swivels stay put.
Im assuming you have field stripped and cleaned the rifle. If you havent done that then go to the Field Stripping Article. Remember, a clean rifle is a happy rifle.
If you need a detailed drawing of the rifle go here. FAL Parts list
Before I go into the disassembly part of this article, review the next section to ensure your rifle is in a safe condition before proceeding.
The first thing you need to do is ensure the rifle is unloaded. Take the Cocking Handle and pull it rearward to retract the bolt assembly. There should be no ammunition in the action. If the magazine is empty the tab on the magazine follower will push up the lifting pin on the bolt hold open device and lock the bolt rearward. NOTE: On many of the inch pattern weapons the lifting pin for the bolt hold open was removed and the bolt will not stay rearward with a magazine in the weapon. In that case you will have to push up on the bolt hold open to lock the bolt rearward. Take the magazine release and push it toward the barrel. This will unlatch the magazine. Rock the magazine toward the barrel until the tab on it clears the cut in the Upper Receiver. Then pull down to remove it from the rifle. Visually look into the chamber and down the magazine well to verify there is no ammunition in the rifle. Pull the Cocking Handle rearward and ease the bolt closed. Next take the selector and rotate it up to the safe position.
The rifle is now in a safe condition.
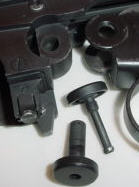
Unscrew the Upper Receiver from the Trigger Frame. For this I usually use a Nickel (American 5 cent piece). You can use the appropriate coin of your choice, or a flat tipped screwdriver. The Joint Pin unscrews and you can push it out with a pencil or what ever. The military uses a cartridge point.
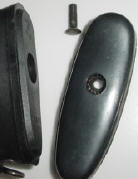
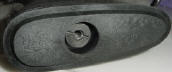
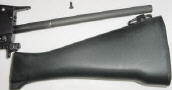
The Butt Plate is removed by unscrewing the screw that retains it. If this is the first time youve removed this screw be advised some of them are torqued and may be retained by 40 years of gunk.
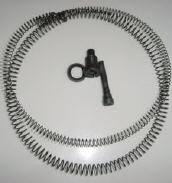
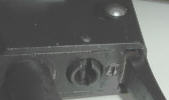
Take a look the end of the rifle. You will see the Butt Stock Screw. It holds the Butt Stock on AND keeps the Inner and Outer Return Springs (recoil springs) in the Return Spring Tube. These springs are big ones and will hurt you if they can. I recommend you watch out, follow safety precautions and either buy a stock disassembly tool or make one prior to proceeding; failing that, cover the area with a large rag to control the return springs when they pop out and want to hurt you.
Once you have unscrewed the Butt Stock Screw there is another screw on the tang of the Trigger Frame. Unscrew that screw and the Butt Stock will come off. You may have to work at it.
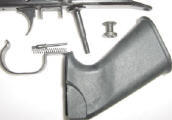
To remove the Pistol Grip unscrew the Pistol Grip Retaining Nut and
pull the Pistol Grip off. Tilt the Trigger Guard out of the Trigger Frame
to remove it. Under the Pistol Grip you will see the Trigger Plunger Spring
and Trigger Plunger. I used a pair of padded needle nose pliers to lift
the Trigger Plunger out of its detent in the Trigger. Remember this spring
will get you until you release the pressure on it. When the Trigger Plunger
assembly is remover the pistol grip area is stripped.
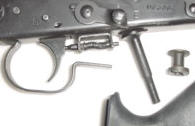
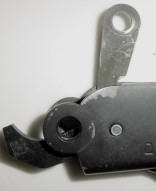
To remove the trigger group first rotate the Selector to the up position. As you look into the Trigger Frame you will see a cut out in it to allow the Selector to be taken out.
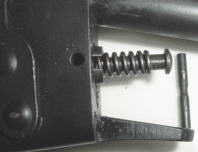
Pull the Selector out. Hold the Hammer and pull the Trigger. Gently let the Hammer go to its home position. Remove the Hammer Return Spring, Rod, and Plunger. NOTE: On Inch pattern rifles this is an assembly and not individual parts that makes it a lot easier to put back together. It also makes it harder to fix if the Hammer Return Spring fails.

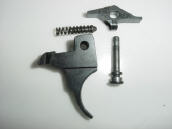
The next thing is to turn the Locking Plate up to unlock the Hammer Axis Pin and the Trigger Axis Pin. You will have to release the sear from the hammer to rotate the hammer. Push out the Hammer Axis Pin and remove the Hammer and Locking Plate.
Hold the Sear to keep it from being thrown out by the Sear Spring and push out the Trigger Axis Pin and remove the Trigger and Sear.
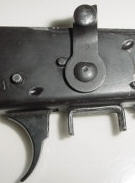
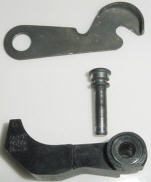
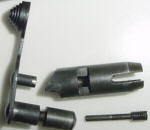
The Frame Lock Assembly consists of the Frame Lock, Frame Lock Spring and Plunger and the Frame Lock Lever. To remove it unscrew the Frame Lock retaining screw.
Then lift out the Frame Lock Lever. Use a Punch and punch out the Frame Lock Retaining Pin. Put you finger over the Frame Lock Spring and plunger to hold the spring in and remove the punch. Remove the Punch.
Remove the Frame lock.
The Trigger Frame is now detail stripped.
To reassemble, start here and work backwards. Remember the springs are not your friends until they are retained in their respective holes or detents.
FINAL NOTE: If you want to remove the Back Sight Assembly (Rear Sight Assembly) from the Trigger Frame Ive found the easiest way is to unscrew one of the Back Sight Adjustment Screws all the way out and tap the Back Sight out with a wooden punch and mallet. There isnt much that can go wrong with these assemblies and because of that I havent torn one down. One nice thing about only removing one of the sight Adjustment Screws is when you replace it you can tap it on and once you tighten the Adjustment Screw you can have your rifle back real close to the original zero and resighting it in wont be hard.
serger
All materials at this site not otherwise credited are Copyright (c) 1996-2002 Trip Williams. All rights reserved. May be reproduced for personal use only. Use of any material contained herein is subject to stated terms or written permission.