*Part 2 - Trigger Assembly*
By: Trigger
12-17-02
(Click Here to view the first
part of this article.)
(Click Here to view the first
part of this article.)
Stripping the Trigger Assembly
Within the trigger group assembly, many customizations can be done.
I like to take the trigger assembly apart once a year or so to clean it.
Keep on reading to see how to go about.
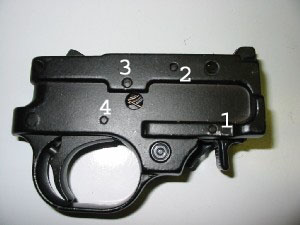
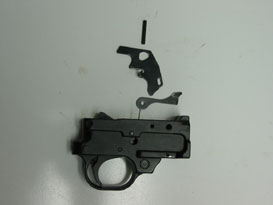
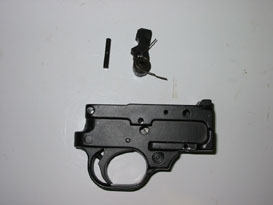
(View of the trigger assembly with a the extended mag release.)
(NOTE: The pins are numbered for easier explanations below)
(Magazine release latch and plunger)
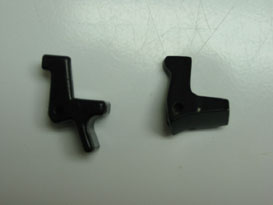
(The extended magazine release latch on the left if made by Eagle,
the one on the right is the original release latch.)
Let's start off by pulling the magazine latch pivot pin (pin #1). This
will reveal the magazine release latch and the magazine latch plunger.
Many individuals (me included) suggest to change the original release latch
for this extended one. They are very cheap to buy and make for changing
magazines much faster. They are well worth it in my opinion.
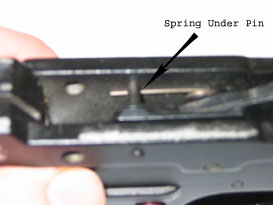
(Bolt Lock & Ejector)
(Here the spring is under the ejector pin)
The bolt lock and ejector are removed by pulling the the ejector pin (pin #2). (The pin is identical to the magazine latch pivot pin). You will notice that when you remove the pin, a spring will pop. Don't worry, we will have to pre load that spring and make sure that it goes under the pin when reinstalling the pin.
If you have noticed, I have altered the bolt lock. I have filled down
the little notch in the hole where the ejector pin goes through the bolt
lock. Fixer has written an article on this modification 10/22
BOLT STOP MODIFICATION.
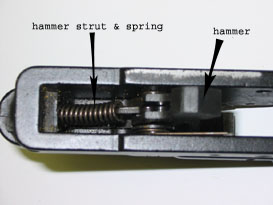
(Hammer with it's Strut & Spring)
We now have to remove the hammer strut and spring before continuing.
If the hammer is in the cocked position (like in picture on the right)
you will have to release the hammer by pulling the trigger while holding
the the hammer to absorb the pressure (with my thumb in the picture). Once
the hammer is decocted (as in the picture on the left), you will be able
to push the hammer forward and then pull the hammer strut & spring
out.
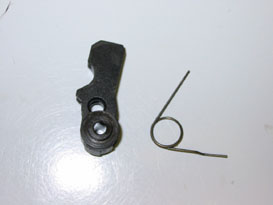
(Hammer and Bolt Lock Spring, zoomed view of the two on the right)
Next in line is the hammer and the bolt lock spring. The two are removed
by pulling the hammer pivot pin (pin #3). Notice the top end of the spring
is the end that will go under the ejector pin (pin #2). The other end of
the spring has a little bend in it. This end will hook on the bolt lock.
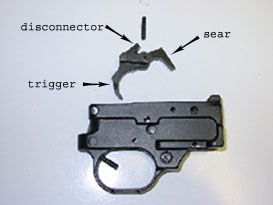
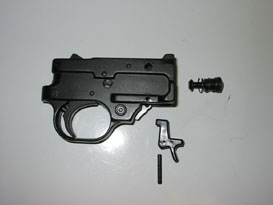
(Trigger attached to the sear with trigger plunger & spring in
trigger guard)
Finally, the trigger can be accessed by removing the trigger pivot pin
(pin #4). When the pin is removed, the sear is also released, however,
the sear is connected to the disconnector by a little spring (sear spring),
be careful not to loose this spring. When the trigger is pulled out of
the trigger guard, the trigger plunger & spring will fall out, don't
loose them!

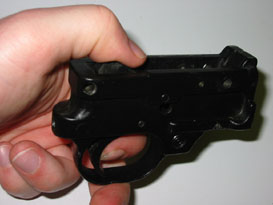
(The safety and it's plunger & spring)
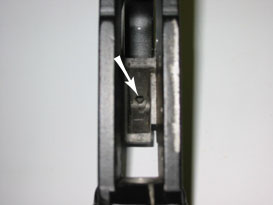
(Hole for the safety plunger)
The safety can be removed by pressing down on the safety plunger with a small screwdriver or tweezers while at the same time pushing on the safety button. This should make the safety pop out of it's housing. To reinstall the safety, the reverse is done, you have to put in the plunger & spring in first and hold it down with the screwdriver while at the same time trying to push the safety back into its place.
Note: The safety cannot be changed for left-handed shooters unless you intend to do some machining to the safety button.
WARNING! - Do not remove the safety, leave it alone! Trying to reinstall the safety is very frustrating and time consuming...You've been warned!
Trigger
All materials at this site not otherwise credited are Copyright © 1996 - 2002 Trip Williams. All rights reserved. May be reproduced for personal use only. Use of any material contained herein is subject to stated terms or written permission.