eBay has scads of these for around $30.00 or so
*Level Table*
01 July 2023 Note: GVI has written a followup to this article describing how he used this level table to cast new bushings to fit new grinding wheels for his hand-cranked grinder. Replacement Grinding Wheel for a Hand-Crank Grinder
This article will present a ridiculously simple project I just undertook for two reasons:
The purpose of this "level table" is to facilitate making a bushing for a grinding wheel. There are many ways to do this. The best ones involve a 3D printer or a lathe, but Chez GVI has neither.
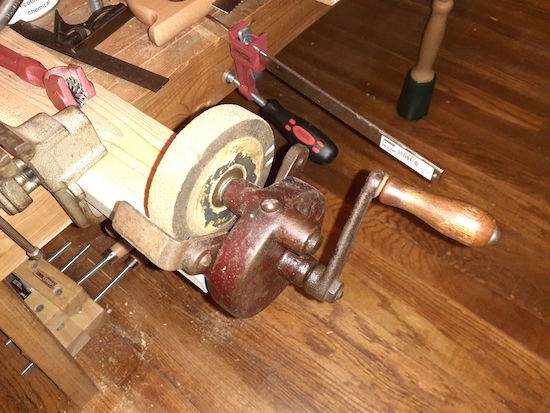
Chez GVI does have a small hand-crank bench grinder, which I bought for (I think) $15.00 at an antique store of the type I've discussed elsewhere. These grinders are small, handy, plentiful and inexpensive. They are an ideal preparedness item.
eBay has scads of these for around $30.00 or so
They will almost always come with a grinding wheel attached. What they almost always won't come with is a replacement wheel. They're not easy to find. The only place I was able to get replacements was McMaster-Carr and I got three of them, which will suit me for a good many years. The good news is the prices are reasonable and the shipping is quick & reliable.
The bad news is these wheels don't come with bushings to fit the spindle on your machine. You must find this yourself, get help from the vendor or (my approach) make it yourself.
As I said, I have no lathe or 3D printer. I've therefore been reluctant to use my grinder; not for fear of ruining a tool, but because until I have a reliable replacement for the grinding wheel, it is an extremely finite resource. And while I have replacement wheels, until I get bushings to hold them onto the grinder, they're useless.
The solution should have come from my own imagination and creativity, but it did not. It came from the proprietor of Colonial Homestead, which I discussed here.
While I was there a few weeks ago, I brought the grinder and my problem with it up to the store's owner. Notice in the linked article how I said the guy was a Subject Matter Expert? Well, he is; and when I laid out the problem, he responded with an answer that left me speechless:
"Are you familiar with babbitt-metal?"

See Rainbow Dash here? I looked exactly like that just then.
I was speechless not merely because his suggestion was so breathtakingly obvious, but also because, being Amish, he made me have a conscience about using the kind of language I was VERY tempted to use just then. I had to content myself with using my inner-voice to curse my lack of imagination.
Of course I'm familiar with babbitt-metal! Back in the Bonny-Bygone-Days-of-the-Way-Before-Times, after surveyors stopped using linked "Gunter's Chains" but before accurately-etched steel tapes were affordable, they measured distances with a tape called a "Throw Chain," or a "Babbitt Chain." It was an ordinary steel tape that had "babbitts" - little blobs of lead hardened with tin and other metals - that were placed on to the tape (they self-soldered) at every foot, except for the first foot which had these blobs every 1/10th of a foot. These blobs were then stamped at the exact distance with a notch and the number of feet.
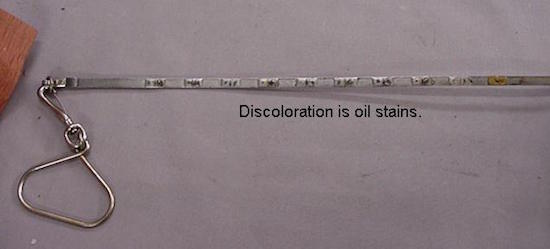
This is the end of a Babbitt Tape or Chain, with "babbitts" every 1/10th at the end.
So yeah, the solution was sitting there right in front of me the entire time but I just didn't have the imagination to see it! Just pour a hardened lead alloy in the wheel's hole, drill out the center and BOINGGGG! - instant perfect bushing!
My username in the Rubicon stands for "Global Village Idiot." Now you see why.
Babbitt-metal comes in many different formulations, but the ones most easily within my capabilities - perfectly suitable for a low-tolerance application like a hand-crank grinding wheel bushing - are mixtures of lead, tin and antimony, basically a variation of bullet-lead. I've already got a lifetime supply of lead for bullet casting, and it has small amounts of tin and antimony already in it. I can live without the extra antimony necessary to achieve an industrial-grade formula, and I can get extra tin at the metal recycling place in My Fair City.
I do my casting on my front porch, but this porch isn't level. This isn't a problem when I'm holding a bullet mould underneath the spout of the furnace; but the present project will be different. I needed a working surface about the size of a small cutting board that can be leveled, so I have somewhere to put the wheel while the babbitt-metal goes in the hole. And while I'm sure I could find such a thing ready-made, I'll be damned if I'm going to buy one when I can just make it for pennies-on-the-dollar, and be sure it's fit-for-purpose.
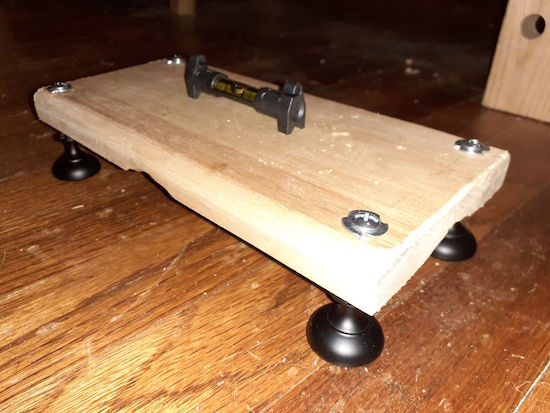
I got lucky with the table portion
Table
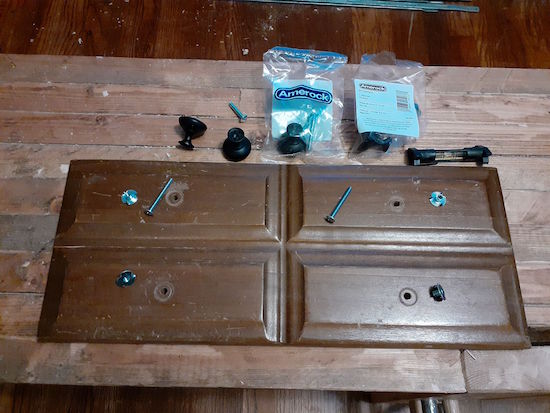
This is the front of a drawer from a dresser I disassembled a few months ago. It already had holes bored in it for the previous drawer-pulls, so it saves me several steps. If you're using store-bought lumber, I recommend spending the extra money to get the kind that's finished-and smooth on four sides, unless you really really like truing up rough-cut boards. You spend money or you spend time - your choice.
Drawer Pulls
I wanted somewhat heavier drawer pulls than the ones that were originally on the drawer, and in particular I wanted something with a rounded face. The knobs that were on it previously were indeed circular, but they were small and flat on their face. You see, this is what is going to contact the surface the table is placed upon - they will serve as the table's feet. The ones I got came with two different lengths of machine screw, and I'll be using the longer of the two.
Tee-nuts
These will allow the machine screws to travel up-and down, allowing the table to be leveled.
Spirit Level
I ought to spend a little time talking about why I chose this sort of spirit level, rather than a "fish-eye" level.
The truth is, either will work just as well for the purpose. But a line level allows far greater precision in adjustment, by way of the method of leveling. In addition, while I could simply glue a fish-eye level somewhere on the table - or even get fancy and inset it into the table - this would not only mean I lost that portion of the table as a working surface in the future, but I would also lose the use of the level for anything other than just this one device, to say nothing of the inaccuracy created by not drilling a perfectly square inlet or the glue-blob throwing the level out-of-true. Declining to permanently inset a level into the board is lazy, but it's an example of "laziness in the right direction."
Since I'm using an existing drawer front, much of my work of layout and truing-up is already done, but not all of it. For one thing, the board is too big - it would be awkward to try to reach the leveling screws if they're that far underneath the edges of the board. Plus, the back of the board (which will end up being my working surface) has dadoes for the sides and bottom of the previous drawer. I don't need them and they're unsightly; not that this table is going to be displayed in the Metropolitan Museum of Art or anything, but you know what I mean.
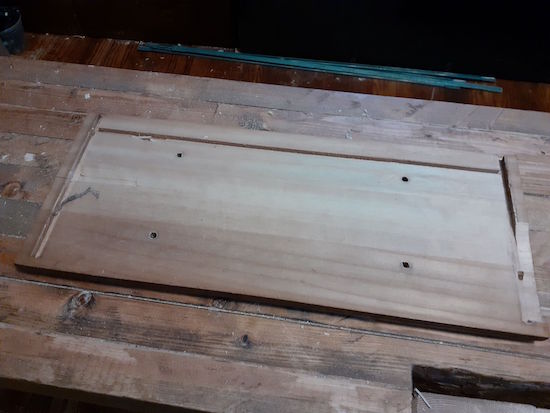
Ugly.
Layout is based on where the holes are - the edges will be rounded and the surface finished with a card scraper, but that's about it.
After not very much wood-butchery which would be tedious to explain and worse to read, this is what I ended up with. It's unsightly, but having the tee-nuts on top was a conscious choice for several reasons:
It's not very big but it's exactly as big as I need. If I need a bigger example, I can always reuse the hardware and discard this one.
The drawer knobs fit loosely on the screws - they are not "snugged-up." This is necessary - there must be several threads' worth of movement in the knobs in order to raise or lower the corners as needed.
Prior to and after use, set the knobs more-or-less in the middle of their "travel" up-and-down the screws - halfway between "snugged-up" and falling off. This ensures you don't "run out of thread" before the table is leveled.
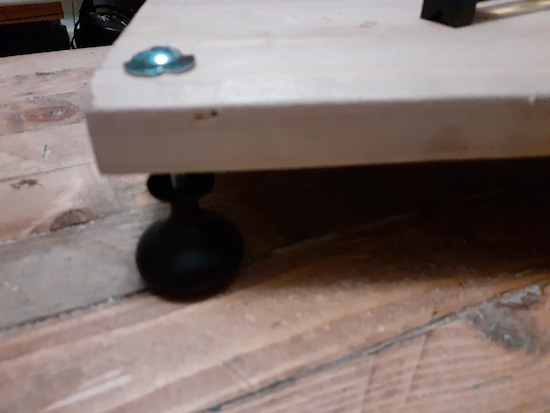
My camera can only focus so close. You can see what I mean by "travel" - there's plenty of room to move up-and-down
Once the table is placed where it's needed, raise or lower one screw to ensure all four knobs are in contact with the surface, with no wobble from unevenness (a little wobble from "play" in the knobs is unavoidable and its effect is negligible). You can often do this with only one knob.
It's then leveled by first setting the spirit level in the middle, with its ends toward opposite corners like so:
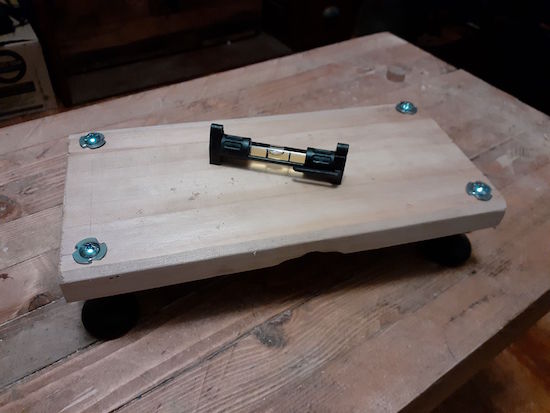
Operate the screws the level is pointing to by screwing them both in or both out at the same rate. This is the same way surveyors level their instruments; in fact this is the "older" way when most instruments had four leveling screws instead of three.

If you have normal human hands with thumbs in the proper places, you should be looking at your thumbs as you hold the knobs. When you turn the knobs (either both-in or both-out), the bubble in the spirit level will move in the same direction your left thumb is moving. In other words, if you're turning the knobs both-out (left thumb is going left, right thumb is going right), the bubble will move to the left; if you're turning the knobs both-in (left thumb going right, right thumb going left), the bubble will travel to the right. Be patient and don't try to whiz the knobs.
Take care that both knobs stay in contact with the surface as you rotate them. You'll know this by feel but a gentle wobble back-and-forth will determine whether they're in contact or not. This is a knack developed over time and practice (I've been a surveyor for 35 years) but it's pretty intuitive.
Once the bubble is centered, move the spirit level so that its ends are pointing toward the screws you didn't adjust yet, and repeat the procedure, both-in or both-out. Just like before, the bubble will move in the same direction your left thumb is moving.
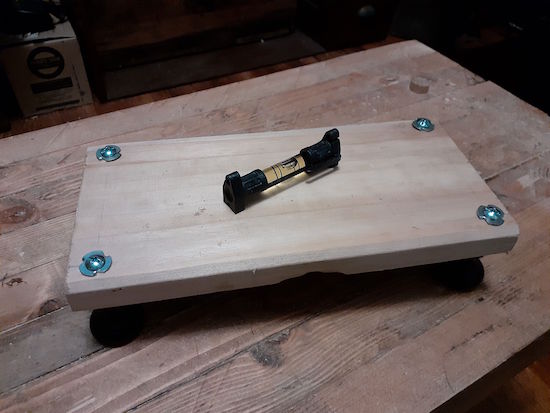
It's a good idea to put the level back in the first position and check to see if it moved. It's an even better idea to turn the level 180 degrees from its original position. If you do this and "the bubble is off," make half the correction needed to center the bubble. This will take care of any inaccuracy in the bubble. Once the level is checked in all four positions, the table is level.
My "level table" is about 9 inches side-to-side by 4 inches front-to-back. The idea itself will scale up to about "cutting board" sized. Any larger and it starts to become cumbersome or - especially if you're prepping the board yourself and not using a previously-flattened cutting board or drawer front - "local irregularities" in the board (i.e. bowing, cupping, warping or twisting) will make it appear that the board is not level, or level in one place on it and not in another. The larger the board, the greater effect such irregularities will have. I used a set square to check this little "table" for flatness and used a card scraper to reduce small flaws. I didn't need a smoothing plane for the "table" surface but if I'd been working from rough stock, I'd have had to spend considerable time getting the table-top ready before I did anything else. The board must also be a certain minimum thickness in order to resist being bowed by its own weight and that of whatever is placed upon it. This thickness will depend on the material being used and what it's holding - let common sense be your guide.
As for whether the babbitt-lead trick worked...
...that is a story for another time.
GVI
www.alpharubicon.com
All materials at this site not otherwise credited are Copyright © 1996 - 2023 Trip Williams. All rights reserved. May be reproduced for personal use only. Use of any material contained herein is subject to stated terms or written permission.